Pork Loin Sliders

We have these little pork loin sandwiches about once a week. They are cheap, easy, and delicious! And most important – the kids love them!

pork slider blog 013

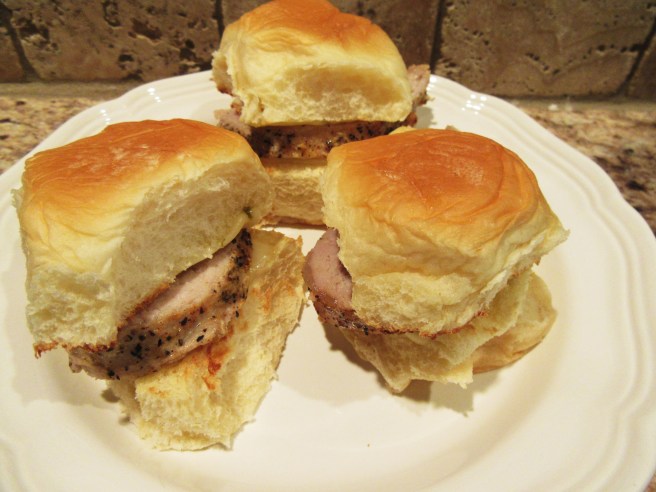
You only need 3 ingredients – a pork loin, some cheese, and Hawaiian sweet rolls.

pork slider blog 003

The easy part is that these pork loins come already seasoned, so they are ready to cook without any prep. You can find them in several flavors. Our favorite is the Cajun flavor, but they were sold out this week so this is a Peppercorn Garlic flavor. (I added some Tony’s seasoning to it to make it taste more like the Cajun flavor.)

I’ve cooked these in a glass dish and a metal pan in the oven, but I’ve found the best way to cook them is in a stoneware dish. You can find this kind of bakeware in just about any store nowadays. I don’t know the science behind it, but the meat stays juicy in this type of baking dish, while it dries out in the others.

pork slider blog 004

Just put the pork loin in the dish, drizzle with about a spoonful of olive oil, and add about 1/4 cup water or chicken stock to the bottom of the pan to keep meat moist while cooking. The pork loin package will have cooking instructions on the label. This one was 425 degrees for 45 minutes. The cooking time will vary based on the size.

pork slider blog 009

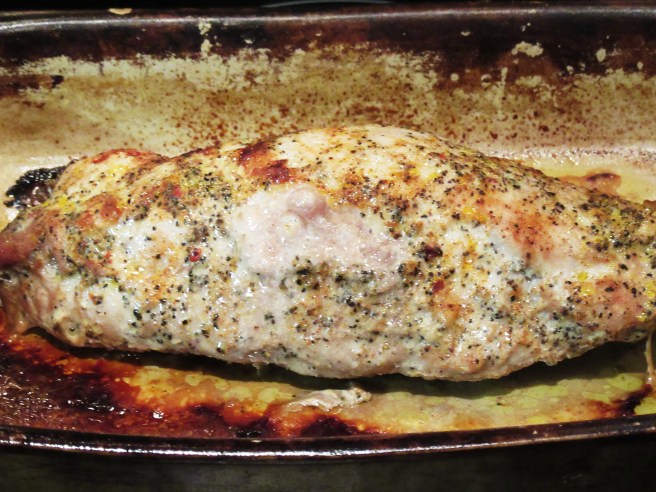
After cooking, the water (or chicken stock) will be cooked away and you will be left with this beautiful, juicy, tender piece of meat. Let it sit for just a few minutes and then slice it up for the sandwiches.

pork slider blog 010

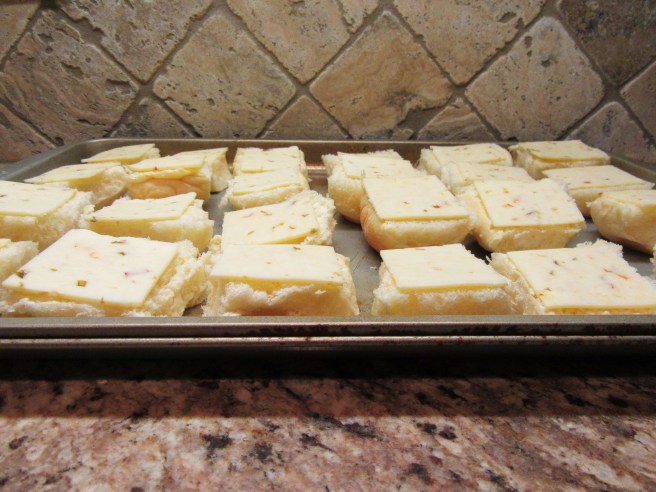
While the meat is in the oven, you can be preparing the sandwich part. First, cut the Hawaiian sweet rolls in half and lay out on a baking sheet.

pork slider blog 005

Next, stack up your cheese (we use pepperjack) and cut into fourths.

They will be the perfect size to fit on top of the buns. (And yes, I put the cheese on the tops AND bottoms – we LOVE cheese!)

pork slider blog 008

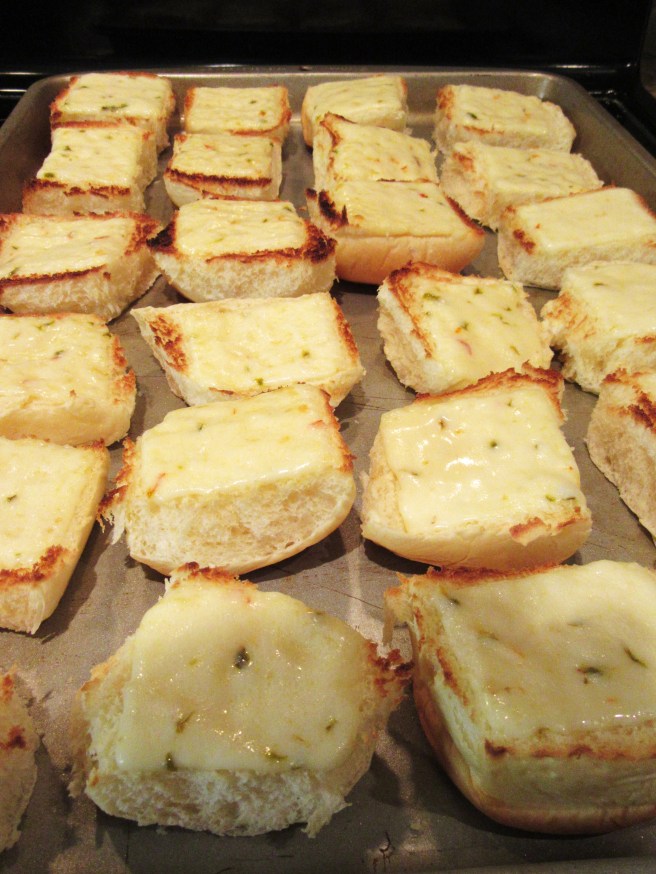
After you’ve taken the pork loin out of the oven, turn it to broil and put in the buns. It only takes a minute or so to melt the cheese, so watch it closely or the buns will burn.

pork slider blog 011

Now just place the sliced pork loin on buns and assemble the sandwiches – super easy!

pork slider blog 012

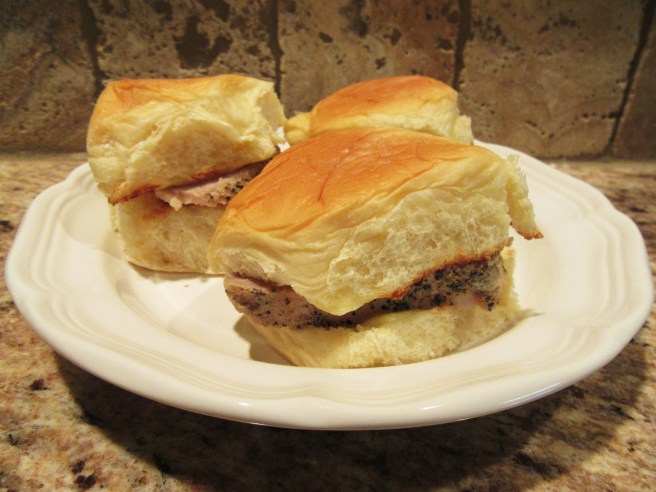
The sweetness of the rolls and the spicy pepperjack cheese go great together. If you happen to have any leftover, they are good cold as well, so you can put them in your kid’s lunchbox for the next day.

Thanks y’all!

   – Nikki

Crawfish-Rice Dressing

crawfish blog 004

If you live in Louisiana, you have to love crawfish. It’s a state law. At least I think it is. If it’s not, it should be.

Besides eating them right out of the shell on the tailgate of a pickup truck, there are a lot of ways to eat crawfish. You can put them in a baked potato, gumbo, etouffe, casserole, omelet, or this recipe – crawfish-rice dressing. It’s a very simple recipe – all you have to do is mix up all the ingredients and pour into a casserole dish and bake. Here’s what you’ll need:

crawfish blog 003

  • 1 lb frozen crawfish tails (with fat/juice), thawed
  • 1 1/2 cups uncooked long-grain rice
  • 1 can cream of mushroom soup
  • 1 can cream of onion soup (my store was out, so I substituted 1/2 can French onion soup and 1/2 can cream of celery soup and it turned out great)
  • 1 chopped bell pepper
  • 4 tbs butter, melted
  • 2 tsp Tony’s seasoning
  • 1 tsp garlic salt
  • 1 1/2 cups chicken stock
  • 2 dashes hot sauce (or more if you like it spicy)

Just mix all ingredients in a large bowl…

crawfish blog 005

… and pour into a greased 13×9 baking dish. Cover with foil and bake at 350 degrees for 1 hour. Taste the rice when it’s done – if it’s still a little crunchy, put back in oven for another 10 minutes, or until rice is tender. That’s it! Super easy!

crawfish blog 008

This is perfect as a main dish, but it can also be served as a side dish if you’d like. It tastes like you’ve slaved away in the kitchen for hours, and no one has to know that you were really watching old episodes of Grey’s Anatomy while it baked.

crawfish blog 010

crawfish blog 009

Thanks y’all!

   – Nikki

Baked Spaghetti

bakedspaghetti 021

When I think of spaghetti, I think of boring. This is not that kind of spaghetti. This spaghetti may change your life.

Instead of boring noodles with pasta sauce, this is more like a casserole, filled with veggies, meat, and cheesey goodness.

Here’s what you’ll need:

bakedspaghetti 003

  • 1 lb ground beef (I used ground deer meat because we have a freezer full of it)
  • 1 chopped bell pepper
  • 1 chopped yellow onion
  • 3-4 cloves minced garlic
  • 1 box spaghetti noodles
  • 1 can diced fire-roasted tomatoes
  • 1 can cream of mushroom soup
  • 1 cup shredded cheddar cheese
  • 1/2 cup grated parmesan cheese

(I usually add some chopped black olives as well, but I didn’t have any on hand.)

First, brown the ground meat in a large skillet.

bakedspaghetti 005

While the meat is browning, boil the pasta and then drain and set aside.

bakedspaghetti 004

After the meat is completely cooked, push it to one side of the skillet and add in the onion, bell pepper and garlic to the other side. (This is why you need a large size skillet.)

bakedspaghetti 006

If there is not enough fat in skillet from the meat, you may have to add a little butter or olive oil to cook the veggies in. Season everything with salt and pepper.

Once the vegetables are tender, mix them together with the meat.

bakedspaghetti 008

Now stir in the can of fire-roasted tomatoes. (And black olives, or any other veggies you’d like.)

bakedspaghetti 009

Next, stir in the cheddar cheese, and cook just a minute or two, until cheese melts.

bakedspaghetti 010

Now for the “baked” part of this spaghetti dish. Preheat your oven to 350 degrees and spray a 13×9 baking dish with cooking spray. Layer half of the cooked noodles on bottom of baking dish.

bakedspaghetti 011

Now layer half of the meat mixture on top of noodles, then repeat layers with the other half of noodles and meat mixture.

bakedspaghetti 014

Mix the cream of mushroom soup with a couple of spoonfuls of water to thin it out a little, then spread on top of dish.

Sprinkle the parmesan cheese on top evenly…

bakedspaghetti 016

…then bake for about 20 minutes, until cheese is melted on top.

bakedspaghetti 018

Even though there are vegetables in this dish, don’t worry – your kids will eat it because there is CHEESE!

bakedspaghetti 019

Thanks y’all!

  – Nikki