Ranch Bread

You had me at ranch. Ok, and at bread.

ranchbreadblog-020

I first had this amazingness years ago at a baby shower, and I’ve been making it ever since. It is a great appetizer for parties or watching football games, or it can even serve as a meal. It only takes a few minutes to make, which is why I make it a lot on busy nights when I don’t have much time to cook, like when my son has a baseball game.

It only has four ingredients – ranch dressing, ham cubes, shredded cheese, and a loaf of french bread. I make my own ranch dressing from the Hidden Valley packet. It tastes so much better than the bottled kind. The ham cubes can be found in the grocery store by the lunchmeat.

Start by cutting the loaf of french bread in half lengthwise, then spread the ranch over both halves. Top with ham and shredded cheese, and bake at 350 degrees just until the cheese melts, about 5-7 minutes.

ranchbreadblog-019

Let it cool for just a minute and slice. That’s it! Super easy!

ranchbreadblog-022

The bread will still be pretty soft since it didn’t cook for long, and the ranch tastes amazing hot. There are no vegetables, so the kids won’t be whiny about eating this!

ranchbreadblog-023

Of course you can add vegetables if you’d like – chopped onion or black olives would taste good. I have a friend who even adds pineapple to hers.

ranchbreadblog-021

So the next time you don’t think you have time to cook supper, skip the fast food and try this instead – I’m confident you and your family will enjoy it!

Thanks y’all!

   – Nikki

Dramatic Bedroom Makeover for Less Than $150

When my daughter asked me if we could paint her bedroom, I immediately told her no! I mean, think of how much time and money that would be! Not to mention the fact that we just redecorated her room less than a year ago!

After a few weeks of thinking about it and browsing ideas on Pinterest, I realized it would not take as much money and energy as I thought it would, and I became the one who was excited about painting her room! We could keep her furniture and bedding since they were white and would match any paint color, so all we would have to buy would be the paint and a few accessories. I think it turned out fantastic!

She felt like the original turquoise wall color was too childish, and also wanted to simplify her room by getting rid of some things on the walls.

We decided on a medium gray color for the paint, thinking that would be a good neutral color (so she wouldn’t change her mind again anytime soon!) and would also be a pretty contrast to the white bedding.

There are a ton of gray paint colors out there, so we bought three samples ($3 each at Lowe’s for a sample jar of paint) to test out on her wall.

grayroomblog-001

The first color is “peppercorn” and we thought it was way too dark. It looked almost black once it dried. The last color is “antique silver” and it was way too light, and also had a brownish tint to it. The color in the middle is what we chose – “Dover gray.” It was the shade we were looking for, was a warm and relaxing color, and looked great with the dark wood floors and white accents. These colors looked a lot different on the wall than they did on the little color cards you can take home from the paint store, so I’m glad we decided to test the samples out first. Otherwise, we may have paid for paint that we weren’t really happy with. Now it was time to paint!

I started by taping off all the baseboards and trim, and removing all the switchplates…

grayroomblog-002

I used a paintbrush to do the wall corners and around the trim, then a paint roller for everything else…

It actually went very fast – I was finished painting the entire room in just a few hours. It also dried quickly, so I could put the room back together the same day.

grayroomblog-015

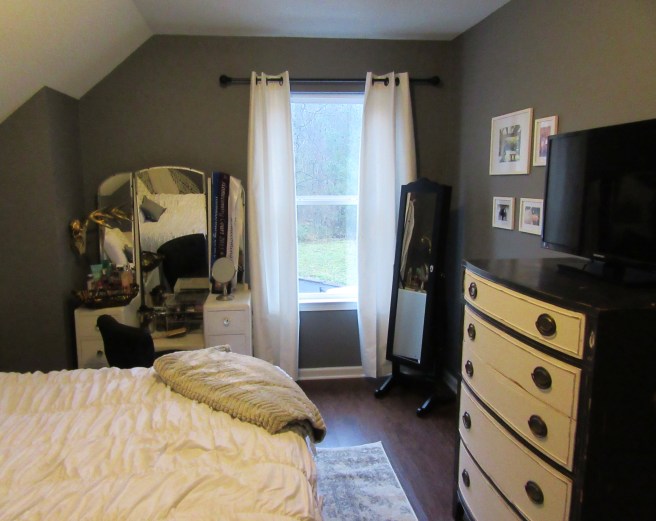
The gray looked so good contrasted with the white – simple and elegant, perfect for a teenage girl.

grayroomblog-018

I found this rug on Amazon, and it helped to soften the room and tie in the gray from the walls. (Plus it’s beautiful!)

grayroomblog-019

I replaced her striped curtains with plain white ones, and also got a new curtain rod.

grayroomblog-020

We removed almost everything from the walls, and just a hung a few pictures in plain white frames instead. The less wall clutter makes the room feel bigger, and also helps the gray make a bigger statement.

grayroomblog-027

All of this took only one day, and made a dramatic difference! Her room went from a young “tween” look to a more sophisticated “grown-up” look. She is so excited about her “new” room, and truthfully I am excited as well! I think it turned out so pretty! (And I’m proud of my handywork!) What a dramatic transformation for less than $150!

So if your son or daughter comes to you about changing up their room, don’t freak out! It won’t take as much time and money as you think!

grayroomblog-018

  • one gallon flat interior paint, paintbrush, paint roller, painter’s tape – $36 from Lowe’s
  • two curtain panels and curtain rod – $30 from T.J. Maxx
  • 5×7 area rug – $64 from Amazon
  • gray throw pillow on bed – $12 from Burke’s Outlet

*I was also able to sell her old curtains and a few accessories from her room to help with the cost, bringing my total to less than $100!*

Thanks y’all!

– Nikki

Spanish Pork Chops

spanishporkchopsblog-012

This is by far my favorite pork chop recipe. It’s so flavorful, so juicy, and so pretty! The rice on the bottom layer cooks in chicken stock instead of water, giving it tons of flavor. The topping is a combination of sausage and vegetables, and the pork chops in between will blow your mind! Here’s what you’ll need…

spanishporkchopsblog-008

  • 1 package boneless pork chops
  • 1 lb smoked sausage
  • salt and pepper
  • paprika (smoked paprika is even better!)
  • rice (about 2 cups cooked)
  • chicken stock
  • 1 onion, chopped
  • 3 cloves garlic, minced
  • 1/2 jar roasted red peppers
  • 1/4 cup white wine
  • olive oil
  • parsley (fresh or dried)

Start by cooking your rice according to package directions, but using the chicken stock instead of water. This will give the rice a darker color, and also a rich flavor. While the rice is cooking, preheat oven to 350 degrees and coat a large skillet with olive oil.

Season the pork chops on both sides with salt, pepper and paprika. (Smoked paprika gives this dish an even richer flavor, but I was all out so just used regular paprika.) Brown the pork chops in the skillet, about 2 minutes on each side, then transfer them to a baking sheet and finish cooking in the preheated oven.

Remove the casing from the sausage and chop it into bite-sized pieces, then brown it in the same skillet used for the pork chops. Next add the onion and garlic and saute with the browned sausage.

spanishporkchopsblog-009

While that’s cooking, combine the roasted red peppers and parsley in a food processor.

(If you don’t have a food processor, you can use a blender, or just chop the peppers up really small.) Add the red pepper mixture to the sausage mixture, then pour in the wine and let it cook down for a few minutes.

After most of the liquid has cooked out, return the pork chops to skillet for just a few minutes on each side so they can soak up some of the flavor.

On a serving dish, layer the rice, then the pork chops, then the sausage mixture on top.

spanishporkchopsblog-014

It looks so good! And it tastes even better than it looks!

spanishporkchopsblog-013

I know it sounds like a lot of steps, but this only takes about 30 minutes to cook from start to finish. But it looks so fancy that your family will think it took you hours to prepare!

spanishporkchopsblog-015

Thanks y’all!

   – Nikki

Adding Dimension to Your Walls

I love a good old framed photograph just as much as the next person for hanging on the wall. As a matter of fact, I have at least one hanging in every room of my house. But if that’s the ONLY thing you have decorating your walls, it can get boring.

Adding dimension and texture to your walls adds character and charm to your home. Here are just a few ideas I’ve used in my own home…

spanishporkchopsblog-007

An old rake head ($5 at an antique store) doubles as a key holder by the back door. I’ve also seen these used to hang jewelry and wine glasses.

spanishporkchopsblog-006

Wooden signs are a great way to make a statement in any room. You can find them just about any size, or if you’re really crafty, you can make your own out of a piece of wood.

This old window was cute by itself, but a small wreath ($10 at Hobby Lobby) attached to it gives it even more texture and color.

spanishporkchopsblog-002

Shelves are awesome for adding depth and dimension to a wall. This one has a really unique shape, and I love that it is made of both wood and metal. ($12 from Hobby Lobby)

spanishporkchopsblog-005

Hanging a basket on the wall ($12 from Amazon) is a great way to display something in a kid’s room.

spanishporkchopsblog-001

Instead of a traditional headboard, hang something on the wall for added height and texture, like this decorative metal piece ($22 at Hobby Lobby). Other ideas are old wooden doors or old metal garden gates.

So get creative when you’re decorating your walls – just about anything can be hung on a nail! Many of these items were even cheaper than a picture frame!

Thanks y’all!

   – Nikki