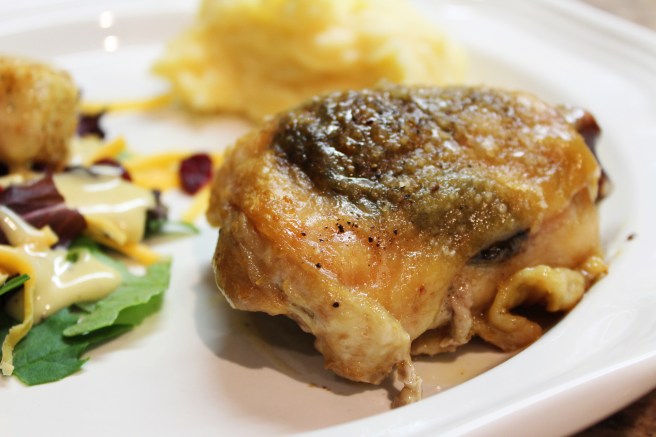
If your family is anything like mine, they LOVE chicken! So I’m always looking for new ways to cook it, so it doesn’t feel like we are eating the same chicken dish every week. This one is very easy, very juicy and flavorful, and inexpensive to make. The color you see underneath the skin of this chicken thigh is from a mixture of butter, garlic, seasonings and herbs stuffed inside. You can use whatever seasonings and herbs you have in your pantry, and even change it up each time to create entirely different flavors.
**I use chicken thighs for this, because they are cheaper than chicken breasts and have more flavor. If you decide to use chicken breasts instead, you may have to cook them a little longer since they are usually bigger than the thighs.**
Here’s what you’ll need:
- 8 chicken thighs (bone-in and skin-on!)
- 1 stick butter
- 2-3 cloves garlic
- seasonings of you choice (I used salt, lemon pepper and Tony’s)
- herbs of your choice (I used dill and Italian seasoning)
- oil for brushing
**In the spring and summer I use fresh herbs that I grow outside, but since it’s winter I used dried herbs from the store. If you’re using fresh herbs, you may have to add a little more of them since the flavor will not be as strong as the dried type.**
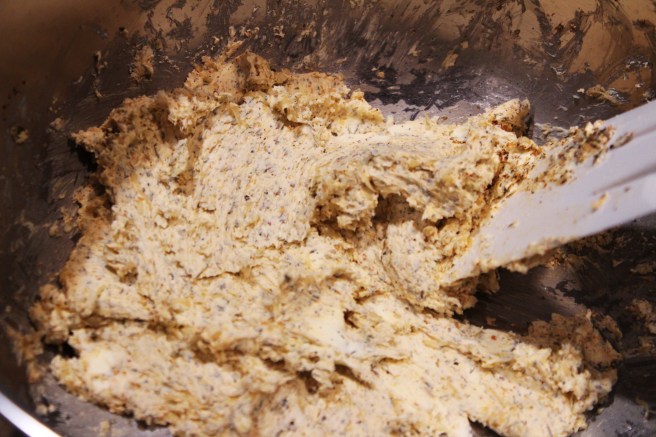
Start by letting the butter soften at room temperature until it mixes easily. Mince the garlic cloves (or I used a grater to get the smallest pieces possible) and add to the butter. Next add your seasonings and herbs. I never measure these – I just add in whatever I feel like at the time. If I had to guess, I’d say maybe a tablespoon of each ingredient? The more you add, the more flavor the chicken will have. Now just mix with a spatula until everything looks combined evenly.
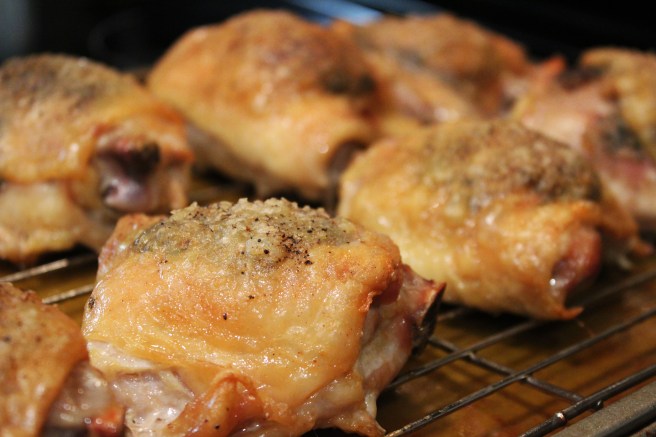
Now loosen the skin from the top of each chicken thigh, and stuff a good amount (1-2 tbs) of the butter mixture under the skin. Then tuck the skin back under the chicken to seal in the butter mixture.


After all the chicken thighs have been stuffed, brush a little oil over the tops and sprinkle with salt and pepper.


Arrange the chicken on a wire roasting rack on top of a cookie sheet or baking dish, and bake for an hour at 425 degrees. The butter will melt underneath the chicken skin to make it juicy, and the herbs will stay tucked under the skin to give it lots of flavor.

If the chicken is completely cooked, but the skin doesn’t have the pretty golden brown color, you can always turn your oven to broil for just a few minutes to crisp the skin.
And don’t forget you can change up what herbs and seasonings you use each time to create entirely different flavors. You could give it an Italian flavor, a Mexican flavor, a Greek flavor, a barbecue flavor, a citrus flavor – the possibilities are endless!

If you’ve been in a “chicken rut” lately, I hope this recipe has given you some inspiration!
Thanks y’all!
– Nikki