Inside-Out Stuffed Bell Peppers

jambalaya blog 032

My husband and I both love stuffed bell peppers, but our kids – not so much. They end up eating the “stuffing” and leaving the bell pepper shell. They like the taste of the peppers, just not the idea of eating one whole.

My solution? Just make traditional stuffed peppers into a casserole!

jambalaya blog 034

This dish has everything a stuffed pepper is filled with, with the bell peppers chopped up and mixed in. Cover it with cheese and the kids will never know the difference!

Here’s what you’ll need:

  • 1 lb ground beef, browned and drained
  • 3 cups cooked rice
  • 1/2 onion, chopped
  • 3-4 bell peppers, chopped
  • 2-3 cloves garlic, chopped
  • 1 can diced tomatoes (I use fire-roasted)
  • 2 cups shredded cheese
  • seasonings (I used salt, pepper, crushed red pepper flakes, and Italian seasoning)

After you brown your meat, dump it into a large mixing bowl. Use same skillet to saute the veggies until they are tender, then dump them in same mixing bowl. Add all other ingredients, saving about 1/2 cup cheese for topping, then mix well.

jambalaya blog 033.JPG

Pour mixture into a greased 13×9 casserole dish, cover with foil, and bake at 350 degrees for 30 minutes. Next, remove foil and top with remaining 1/2 cup cheese, and bake another 5-10 minutes (uncovered) until cheese is melted.

jambalaya blog 035.JPG

Now you have all the flavor of stuffed bell peppers, but without the complaints from your kids!

Thanks y’all!

– Nikki


Buttermilk Roasted Chicken

buttermilkchickenblog 005

I know there are hundreds of roast chicken recipes out there, but this one is super easy and super flavorful. If you aren’t a fan of buttermilk, don’t worry – the chicken doesn’t taste like buttermilk. It just helps the other ingredients stick to the chicken, and also makes it extremely juicy!

Here’s what you’ll need:

  • 6 chicken legs
  • 1 cup buttermilk
  • 5 garlic cloves, minced or grated
  • chopped parsley (a handful if fresh, 1 tbs if dried)
  • seasonings (I used salt, pepper and Tony’s)
  • 1 tbs olive oil

Place the chicken legs in a gallon-size ziploc bag, then mix together all other ingredients and pour into bag over chicken.

buttermilkchickenblog 001

Let sit in refrigerator for a few hours to marinate – overnight is even better.

Preheat oven to 400 degrees and grease a 13×9 casserole dish. Place the chicken in a single layer into the baking dish, then pour the rest of the buttermilk mixture over top of chicken.

buttermilkchickenblog 002

Now bake at 400 degrees for an hour, or until chicken is cooked thoroughly. If you’d rather use boneless/skinless chicken, reduce roasting time to 30-45 minutes. Your kitchen will smell amazing while it’s cooking!

buttermilkchickenblog 003

If the chicken is done, but does not have enough color to it, you can turn oven to broil for a few minutes at the end to darken it up.

buttermilkchickenblog 004

This roasted chicken is so juicy and flavorful, and also healthy – buttermilk is fat-free, right?!? It is also easy to make and you only dirty up one dish!

Enjoy!

Thanks y’all,

– Nikki


Dorito Chicken Casserole

Sometimes you get tired of eating healthy. Sometimes you get tired of your kids complaining about what’s for supper. Meet your new best friend – Dorito Chicken Casserole…

doritoblog-calendar2018 061

Made with nacho cheese flavored Doritos, this dish will please kids AND grown ups! Here’s what you’ll need:

  • 2 cups cooked chicken, cut into bite-size pieces (or a shredded rotisserie chicken is the perfect amount)
  • 1 bag shredded cheese (I used the cheddar-jack but any kind is fine)
  • 1 can cream of chicken soup
  • 1 can Rotel
  • 1/2 packet taco seasoning
  • 1/2 cup milk
  • 1/2 cup sour cream
  • 1 bag nacho cheese Doritos

Preheat oven to 350 degrees and grease a 13×9 casserole dish. Combine all ingredients in a large bowl, except for the chips and a handful of cheese (for topping). Layer half of the chips on bottom of dish, followed by half of the chicken mixture, then repeat the layers once more. Top with the remaining cheese and bake about 20-30 minutes, until cheese is melted and bubbly.

doritoblog-calendar2018 060

What you have now is a delicious (and easy!) supper with no complaints from the kids!

Thanks y’all!

– Nikki


Jambalaya Pasta

This recipe combines two of my favorites – pasta and jambalaya!

jambalaya pasta - calendar2018 015

When I make jambalaya, it’s a long process making the roux and cooking the meats just right. But since everything in this dish is coated in a cheese sauce, I use the pre-cooked stuff to make it easier and faster.

Here’s what you’ll need:

jambalaya pasta - calendar2018 009

  • 1 lb dried pasta (I used the bowties because they’re cute!)
  • 1 lb pre-cooked shrimp, peeled and de-veined
  • 1 pkg sausage, sliced
  • 1 pkg pre-cooked chicken, cut into bite-sized pieces
  • Tony’s seasoning
  • 1/2 onion, diced
  • 1 bell pepper, diced
  • 2-3 cloves garlic, minced
  • 1/2 cup chicken stock
  • 1 can diced tomatoes (I like to use fire-roasted for the color and flavor)
  • 1/2 cup heavy cream
  • 1/2 cup Parmesan cheese, grated

Start by boiling the pasta, then drain and set aside, saving 1 cup of the pasta water for the sauce. While the pasta is boiling, chop up your vegetables.

In a large pan, saute the onion, bell pepper and garlic in butter or olive oil until tender. Then scoot the vegetables to one side of the pan and add the sliced sausage to the other side.

jambalaya pasta - calendar2018 011

Once the sausage is cooked, stir in with the vegetables and add the chicken pieces, shrimp and Tony’s seasoning. Once everything is heated through, add in chicken stock and tomatoes.

jambalaya pasta - calendar2018 012

Your kitchen should be smelling good by this point! Next add in the reserved pasta water, heavy cream and Parmesan cheese, and stir until the cheese melts into a creamy sauce. Now just toss in the cooked pasta and you’re done!

jambalaya pasta - calendar2018 014

If you don’t have a pan big enough to toss the pasta in with the sauce, just pour the sauce over the pasta in a separate dish.

jambalaya pasta - calendar2018 013

This twist on classic jambalaya is so good and so easy! I hope y’all enjoy it as much as my family does!

jambalaya pasta - calendar2018 016

Thanks y’all!

   – Nikki

“Life’s a garden – Dig it.” -Joe Dirt

gardeningblog-calendar2018 015

I am by no means an expert on gardening, but I do enjoy growing (or trying to!) different kinds of plants and flowers. Over the years I have figured out what grows best in my yard, and also what doesn’t. I wanted to share a few plants I’ve had success with, and some tips I’ve picked up along the way…

 gardeningblog-calendar2018 038

I’m pretty sure it’s a law that you have to have at least one hydrangea bush if you live in the South. I got this one about three years ago, and it has since quadrupled in size.

gardeningblog-calendar2018 024

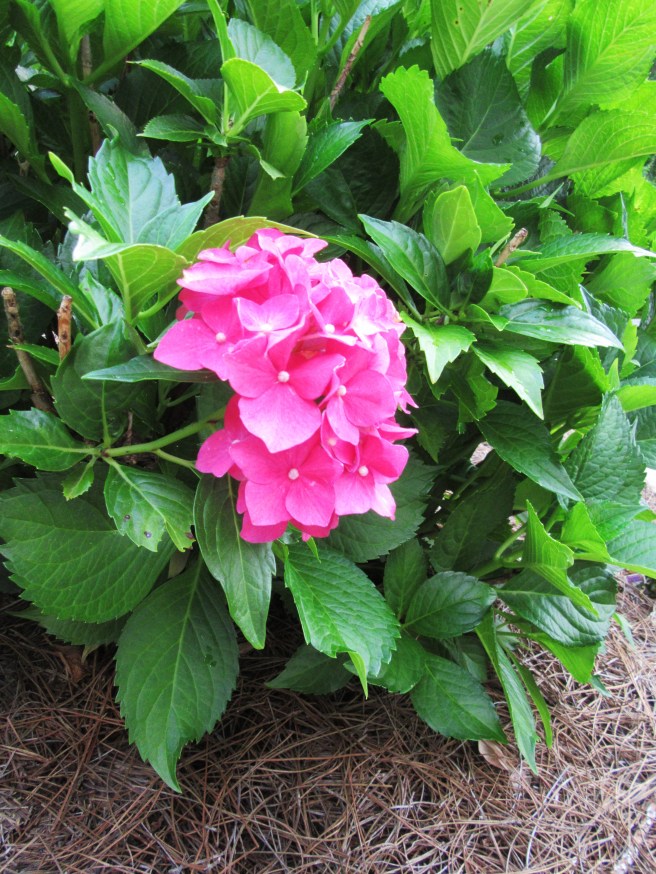
I remember reading in Southern Living a long time ago that if you prune the dormant stems at the wrong time of year, you won’t have any flowers the next year. Well this made me so nervous that I’ve never pruned mine. If you look closely you can see a few of the dead stems from last year still sticking up. Every year the bush grows taller than the year before, and the leaves hide the parts that should have been pruned, so I’m cool with this if it means I have blooms.

Another staple in any southern yard is the gardenia…

gardeningblog-calendar2018 025

These smell amazing! This is another bush that doubles in size each year, and doesn’t require nearly as much watering as the hydrangea bush. The flowers only stay open a few days before turning brown and falling off, but new buds open every day so there are always flowers. This means you can pick as many as you want to put inside in vases so you can bring the intoxicating smell indoors.

For my flower bed filler, I use vincas…

gardeningblog-calendar2018 026

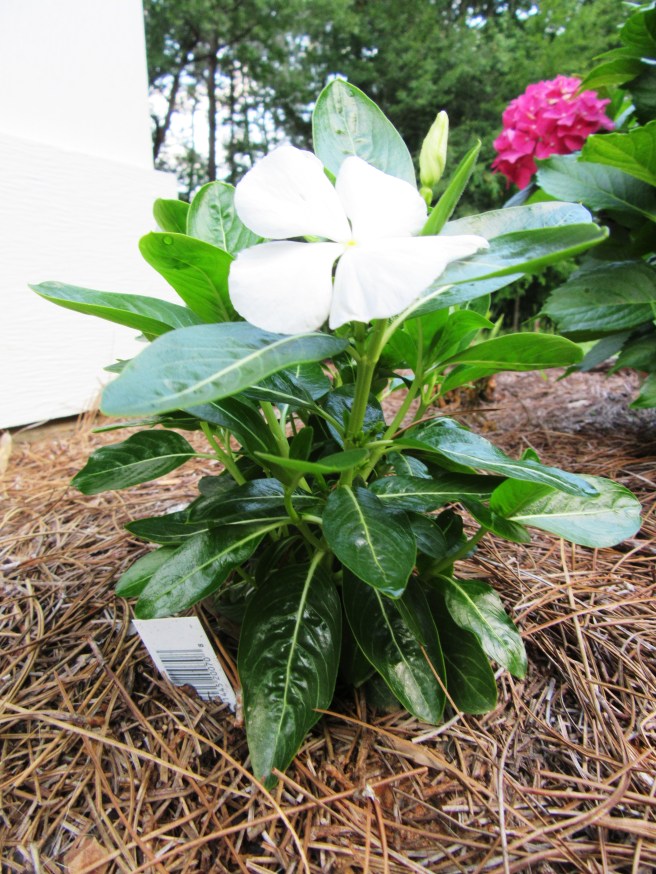
These hardy little flowers love the sun and the heat, and are very forgiving if you forget to water them every day. They come in several colors, but I love the classic white. They also multiply, so you can space them out when planting.

I like to keep my flower beds simple and clean, so I add color with my flower pots…

I fell in love with this yellow hibiscus bush when I saw it at the nursery, and the bright colors also attract butterflies and hummingbirds. And don’t be afraid to plant more than one flower in the same pot – there are three different types of flowers in this big green one, giving it lots of layered texture and color.

I have these urns on either side of my front door, and I used the “thriller, filler and spiller” method when deciding what to plant in them. The “thriller” is giant caladiums, the “filler” is begonias,” and the “spiller” is creeping Jenny. All are shade-loving plants, so they do well on the covered front porch. As the summer goes on, the begonias will grow and fill in the spaces more, and the creeping Jenny will continue to cascade down the urns onto the porch.

gardeningblog-calendar2018 028

I used the same method in this window box, but with different plants since this side of the house faces the sun.

gardeningblog-calendar2018 029

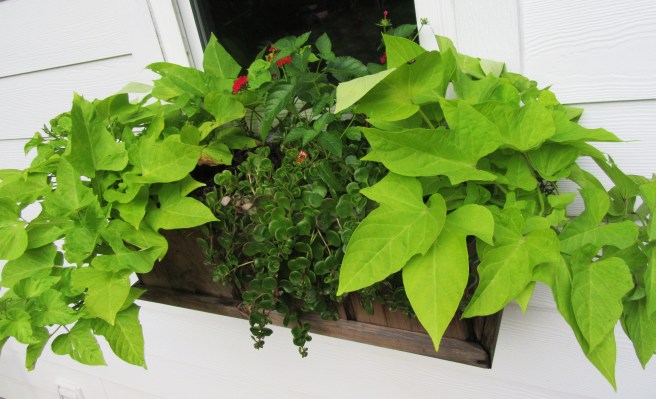
The sweet potato vine loves the sun, and will continue to grow in length all summer. The lantana gives a pretty pop of red, and also loves the sun.

gardeningblog-calendar2018 018

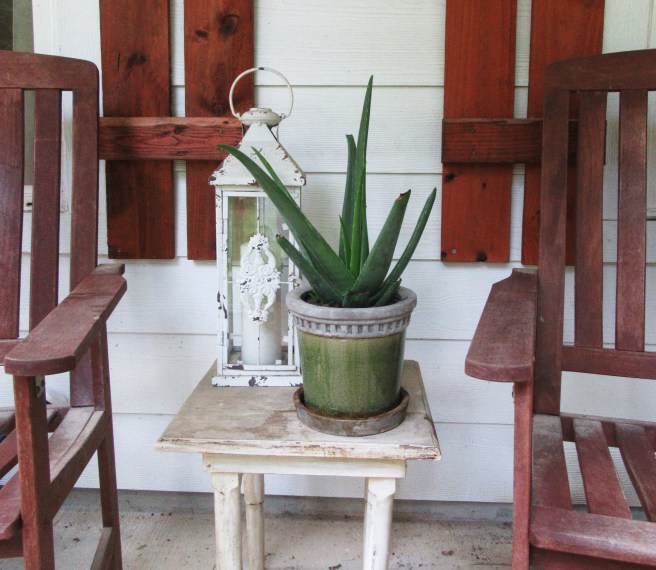
I also have an aloe plant on my front porch, in honor of my grandmother. She kept an aloe plant on her porch for as long as I can remember, and anytime we got a burn she would break open one of the stems and rub the aloe on it, curing the burn overnight.

gardeningblog-calendar2018 023

Ferns are another staple of southern landscapes, especially hanging on front porches. They love the shade, so under a porch is a perfect spot. They also love fresh rainwater, so I take mine down and set them in the yard when it rains.

Of course I also grow vegetables and fruit, but I really only have one tip on that subject…

gardeningblog-calendar2018 036

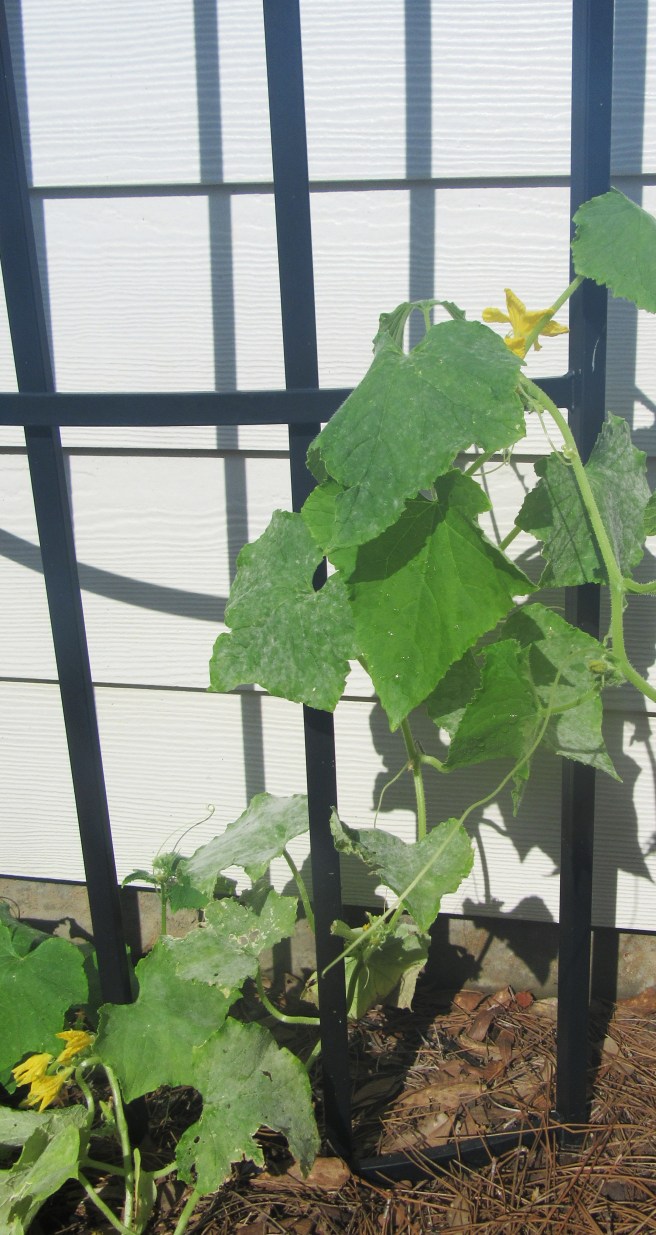
Let your cucumbers grow up a trellis instead of along the ground. This way they won’t get that ugly stripe on the side from touching the ground, and they are easier to pick when ripened.

I have a long way to go when it comes to gardening, but I am learning new things each year. I hope reading this has inspired you to plant something new this summer!

Thanks y’all!

   – Nikki

gardeningblog-calendar2018 032

P.S. – Here’s a picture of my chickens because they are just so cute!

Mimi’s Chocolate Pie

Growing up, the only kind of chocolate pie I knew about was made from instant pudding and Cool Whip, so when I first tasted my mother-in-law’s version my mind was blown! The filling is so thick and rich, and homemade whipped cream is so much better than the frozen kind from a plastic tub.

calendar2018chocpieblog 006

Anytime my mother-in-law would ask what she needed to bring to a family gathering, I would always request this pie. I now have the recipe for myself, and although it’s a little more complicated than instant pudding, it is so worth it!

Here’s what you’ll need:

  • 1 pie crust, cooked according to package directions
  • 1 1/2 cups sugar
  • 4 tbs flour
  • 4 tbs butter (1/2 stick)
  • 1 tsp vanilla extract
  • 3 egg yolks
  • 1 can (12 oz) Pet milk
  • 1 bar German sweet chocolate

calendar2018chocpieblog 001

This chocolate is found on the baking aisle of the grocery store and comes in a green box. Start by breaking it into smaller pieces and melting it with the butter on medium heat, stirring occasionally.

calendar2018chocpieblog 002

While that is melting, whisk together the Pet milk and egg yolks in one bowl, and the flour and sugar in another.

calendar2018chocpieblog 004

Once the chocolate and butter have melted, alternate adding in the sugar/flour mixture and the egg/milk mixture, whisking constantly. Continue cooking on medium heat, whisking the entire time, until the mixture comes to a rolling boil and becomes thicker. This may take about 5 minutes or more, so don’t panic if it doesn’t happen right away. Remove from heat, stir in the vanilla, then pour into the cooked pie crust.

calendar2018chocpieblog 005

Allow to cool a little while, then put it in the refrigerator to finish cooling and setting up. Top with whipped cream – 1/2 pint heavy whipping cream and 1/4 cup sugar beat together with mixer until thick.

calendar2018chocpieblog 019

Thanks y’all! (And thanks Mimi for sharing your recipe with me!)

   – Nikki

Cheesy Mexican Pasta

It’s been quite a while since I’ve posted any recipes, and that is because it’s been quite a while since I’ve actually cooked anything. It’s baseball season, which means it’s fast food season. When you are at the ballpark more than you are at home, it can be hard to make supper for your family. This is a quick and easy recipe that can be made ahead and heated in the oven when you get home, and we always have enough leftovers for the next night as well.

calendar2018mexpastablog 013

It’s got meat, vegetables (if you count Rotel as vegetables, and I do!), and lots of cheese!

Here’s what you’ll need:

calendar2018mexpastablog 012

  • 1 box medium shell pasta
  • 1 package pre-cooked fajita chicken
  • 2 cups cheddar-jack cheese, divided
  • 1 can cream of mushroom soup
  • 1 can Rotel
  • 1/2 cup milk

This bag of chicken is possibly the best thing ever discovered. It’s all-natural, seasoned perfectly, and already cooked! It comes in pretty big slices, so I always chop it up into smaller pieces for this dish.

Start by boiling the pasta and preheating your oven to 350 degrees. Once the pasta is cooked, drain it and transfer to a large mixing bowl. Add in the soup, Rotel, milk, chicken pieces, and 1 cup of the cheese. Mix well and pour into a greased 13×9 baking dish. Top with the other cup of cheese and bake at 350 degrees for about 20 minutes, until the cheese is melted and bubbly.

calendar2018mexpastablog 015

That’s it! So easy and so good! You can add more vegetables, like chopped onion or chopped green chiles, but my kids are pretty grouchy when it comes to added vegetables so I don’t even bother.

calendar2018mexpastablog 016

So next time you’re short on time and sick of fast food, give this easy recipe a try!

Thanks y’all!

   – Nikki

Italian Stuffed Bread

We have a freezer full of deer meat, and I’m always looking for new ways to use the ground meat. Let me clarify that – I’m always looking for new and EASY ways to use the ground meat!

2018 calendar cheer park pics 043

This recipe is very easy, and my entire family loved it! You don’t have to use deer meat, of course. You can use regular ground beef, or any ground meat, including sausage.

The bread is full of meaty-cheesy goodness, and also a healthy amount of vegetables.

Here’s what you’ll need:

2018 calendar cheer park pics 044

  • 1 lb ground meat (venison or lean beef works best)
  • 1 tube refrigerated french bread dough
  • 1/2 onion, chopped
  • 1 bell pepper, chopped
  • 2-3 cloves garlic, minced
  • 1 can tomato sauce
  • 1 cup shredded cheese
  • butter and garlic salt for top of bread

Start by browning your meat in a large skillet. While the meat is cooking, preheat oven to 350 degrees and chop the vegetables. Once the meat is cooked through, push it to one side of the skillet and saute the vegetables in the other side. (Since my deer meat was so lean, there wasn’t enough fat in the skillet for my vegetables to saute in, so I added a pat of butter.) Add in salt and pepper to taste if you’d like.

Once the vegetables are tender, mix together with the meat, then stir in the tomato sauce. Once the mixture is heated through, stir in the cheese, then set aside to cool for a few minutes.

While the filling is cooling off, grease a cookie sheet and carefully unroll the french bread dough onto it. (I say “carefully” because it’s easy to tear the dough, and any holes in it will allow the mixture to seep out while baking.)

Spoon the meat mixture onto one side of the french bread dough, then fold over the other side to cover. Pinch together edges of dough to seal.

Spread a little bit of melted butter on top of bread dough, then sprinkle with garlic salt. This will give the bread a pretty golden color after cooking, and will also taste great!

Bake the stuffed bread at 350 degrees for about 30 minutes, or until golden-brown, then let it cool for a few minutes before slicing.

2018 calendar cheer park pics 046

You can see the vegetables and the cheese inside, and the bread is thin so it doesn’t overwhelm the meaty filling.

2018 calendar cheer park pics 050

You can change this recipe up many ways, like adding different vegetables, using Italian cheeses, or mixing in ground Italian sausage with the ground meat.

2018 calendar cheer park pics 047

I hope your family enjoys this as much as mine did!

Thanks ya’ll!

   – Nikki

Easy Southern Strawberry Pie

The days are getting longer and the flowers are starting to bloom, which means warmer weather is on its way! And what better way to cool off than enjoying a cold slice of strawberry pie!

2018 calendar cheer park pics 042

I’ve tried several recipes for strawberry pie, and while they were all delicious, they were also difficult and time-consuming. I’ve come up with this easy recipe by combining a filling from another dessert I make with fresh strawberries, and it tastes amazing!

Here’s what you’ll need:

  • 1 refrigerated pie crust
  • 8 oz cream cheese, softened (I used the 1/3-less-fat kind)
  • 1 tub Cool Whip (I used the fat-free kind)
  • 1/2 cup sugar
  • 1 pint fresh strawberries, sliced

Start by cooking the pie crust according to package directions, and then set aside to let cool completely. Cream together the cream cheese and sugar with a mixer until smooth, then mix in the cool whip. Fold in the strawberries, and then spread the filling in the cooled pie crust. That’s it! The hardest part is letting it sit in the refrigerator for about 30 minutes before cutting into it!

I hope your family enjoys this pie as much as mine does!

Thanks y’all!

– Nikki

Ranch Bread

You had me at ranch. Ok, and at bread.

ranchbreadblog-020

I first had this amazingness years ago at a baby shower, and I’ve been making it ever since. It is a great appetizer for parties or watching football games, or it can even serve as a meal. It only takes a few minutes to make, which is why I make it a lot on busy nights when I don’t have much time to cook, like when my son has a baseball game.

It only has four ingredients – ranch dressing, ham cubes, shredded cheese, and a loaf of french bread. I make my own ranch dressing from the Hidden Valley packet. It tastes so much better than the bottled kind. The ham cubes can be found in the grocery store by the lunchmeat.

Start by cutting the loaf of french bread in half lengthwise, then spread the ranch over both halves. Top with ham and shredded cheese, and bake at 350 degrees just until the cheese melts, about 5-7 minutes.

ranchbreadblog-019

Let it cool for just a minute and slice. That’s it! Super easy!

ranchbreadblog-022

The bread will still be pretty soft since it didn’t cook for long, and the ranch tastes amazing hot. There are no vegetables, so the kids won’t be whiny about eating this!

ranchbreadblog-023

Of course you can add vegetables if you’d like – chopped onion or black olives would taste good. I have a friend who even adds pineapple to hers.

ranchbreadblog-021

So the next time you don’t think you have time to cook supper, skip the fast food and try this instead – I’m confident you and your family will enjoy it!

Thanks y’all!

   – Nikki