Mimi’s Room Redo

If I weren’t a nurse, my dream job would be flipping or staging houses. But for now I’ll just have to stick to helping out my family and friends with their homes. My mother-in-law, or “Mimi” to her grandkids, has lived in her home for over 15 years. While the main part of her house is decorated beautifully, her master bedroom has never even had curtains in it. Mimi is a school teacher, and in her spare time she is usually keeping her grandkids, sewing clothes for her granddaughters, or working on her lesson plans, so she has never had much time to focus on doing anything for herself. I wanted her to be able to come home to a cozy and relaxing retreat in her bedroom, so I offered to redecorate for her.

My first step was to meet with her and talk about her favorite colors and anything special she had in mind for her bedroom. After showing her some pictures I had saved on Pinterest and seeing what she liked and didn’t like, I was able to figure out her design style and start planning. Her main “want” was new furniture since her bedroom set was over 30 years old, but my budget was tight, so we talked about painting her furniture and getting new hardware instead. Her existing furniture was really big and solid wood, so it would be shame to get rid of such quality furniture. Here is everything I was able to do, including before and after pictures.

Before

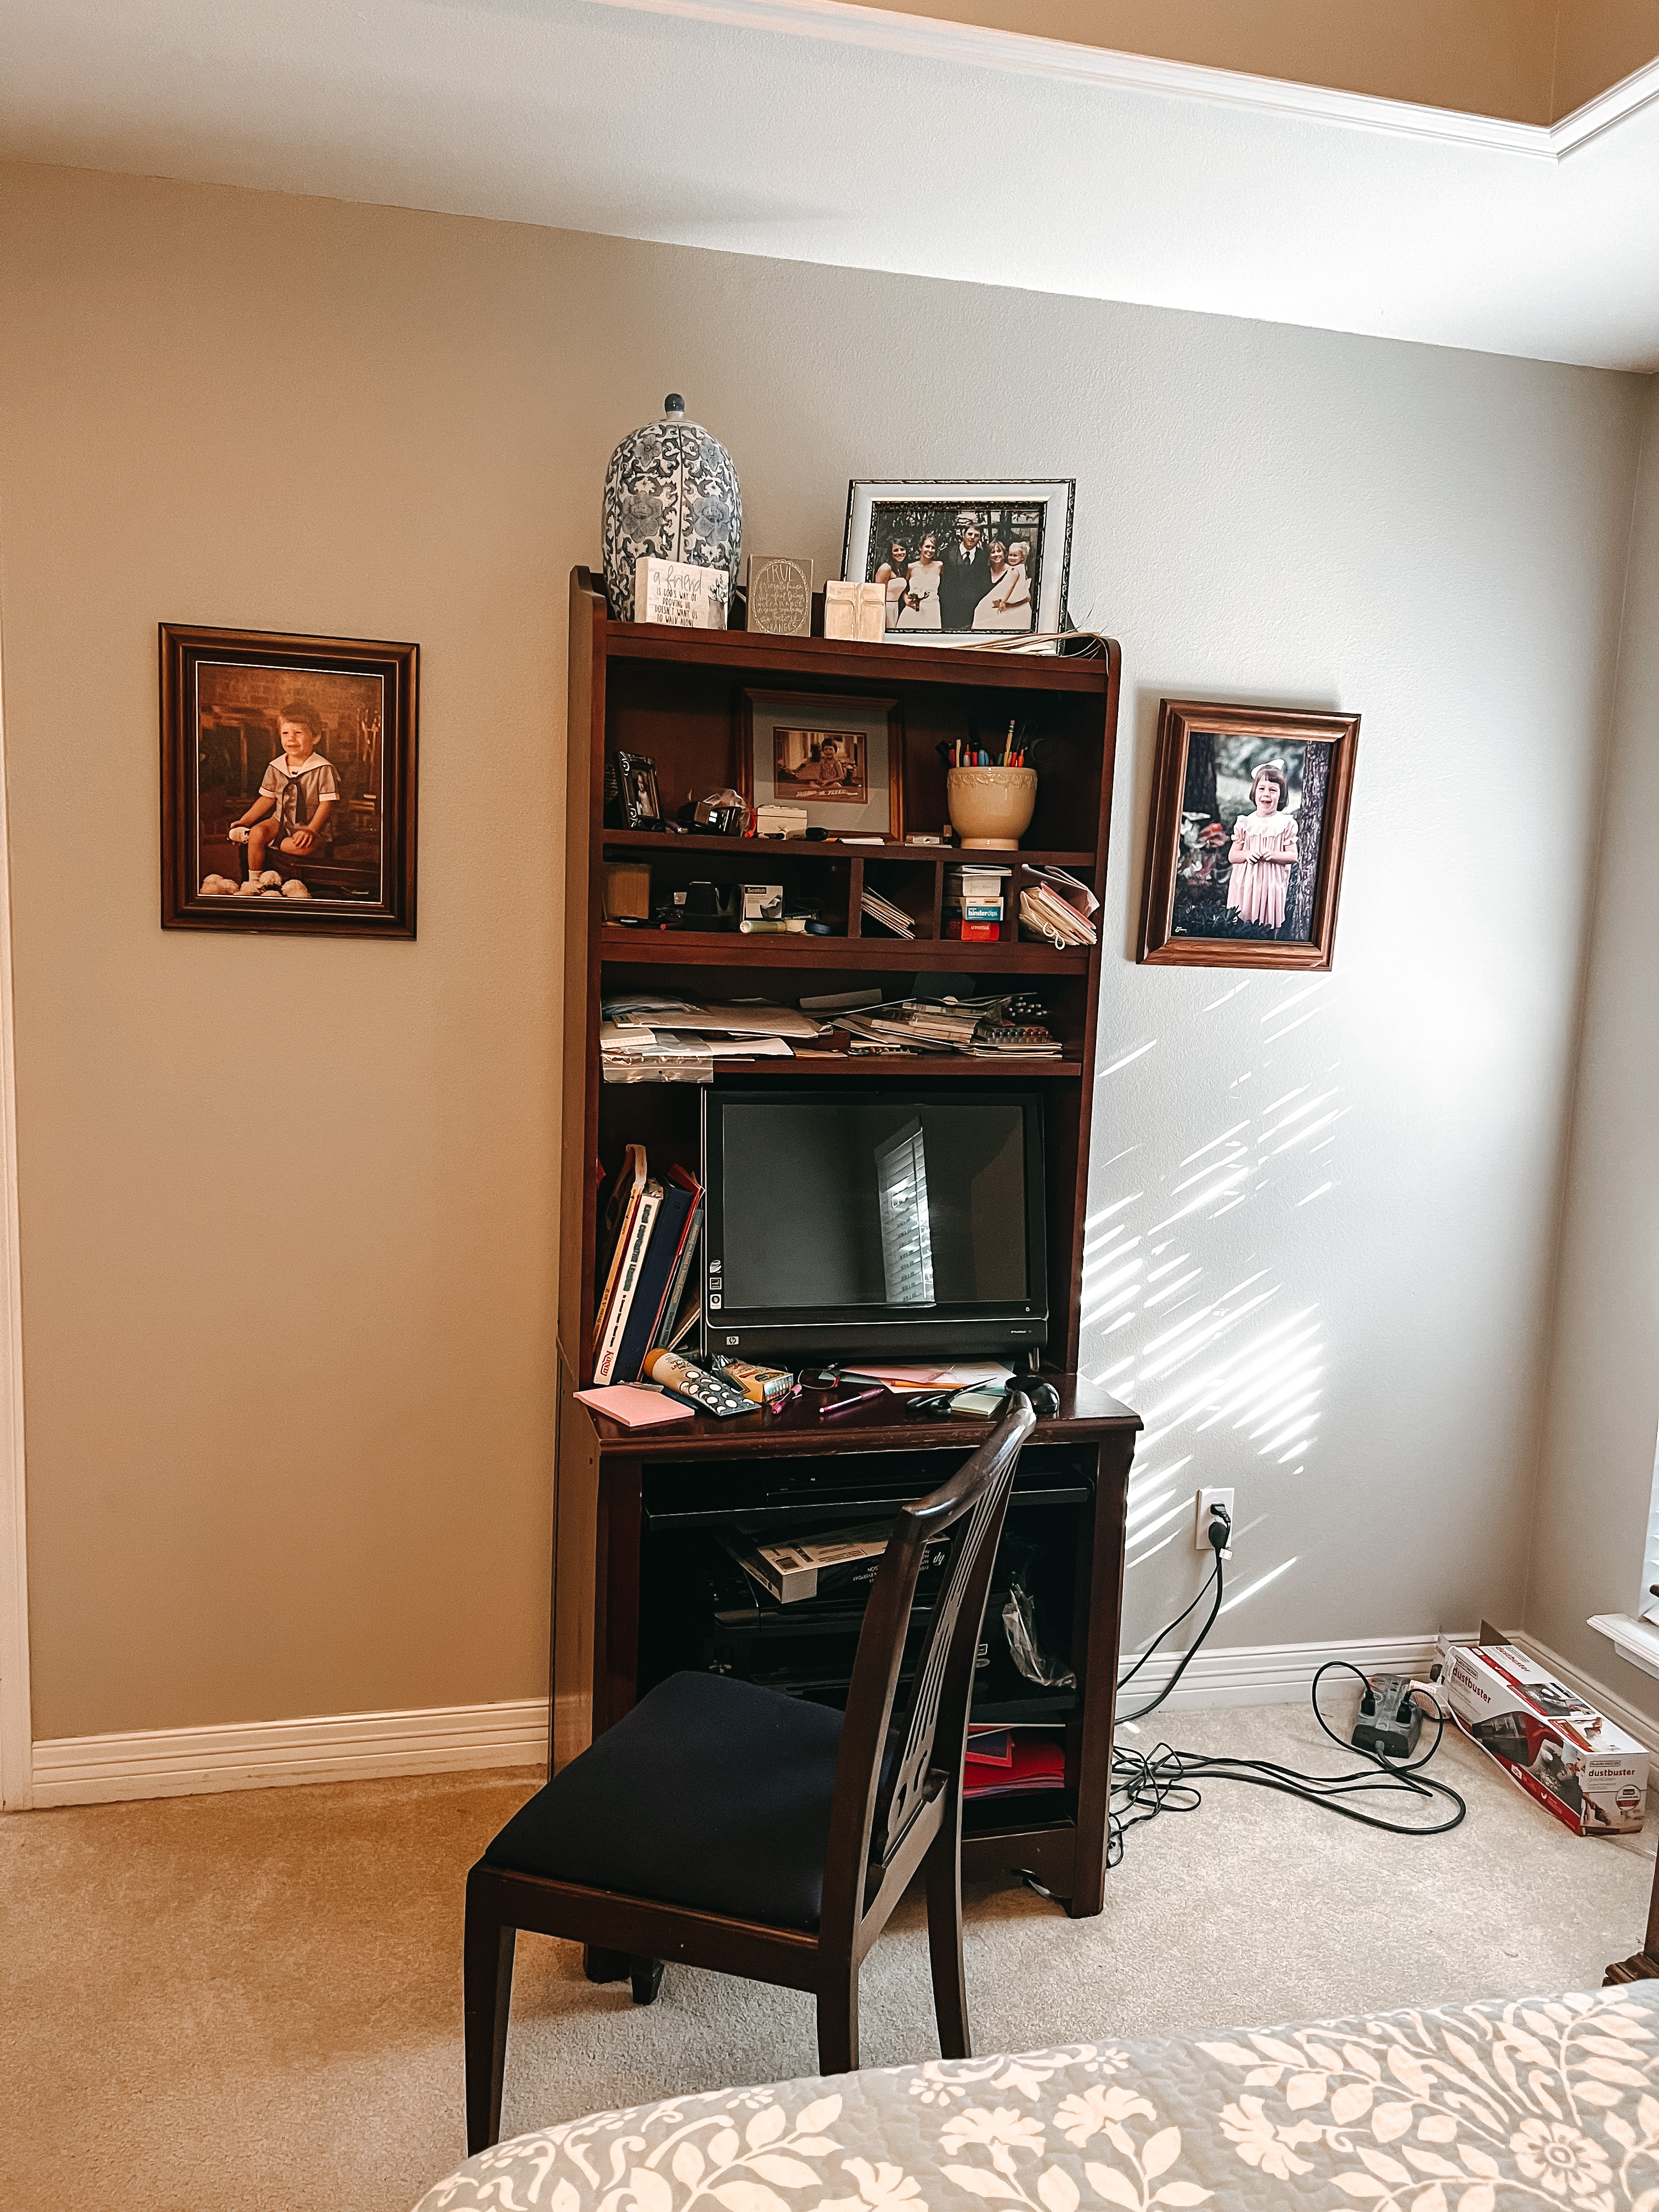
My biggest obstacle was this computer desk. Since she is a school teacher and does a lot of work at home, it was not an option to get rid of her computer, so I had to be creative with hiding it. Even a new, bigger desk would be more expensive than my budget allowed, and that still wouldn’t solve the issue of hiding everything. After a couple of weeks of searching, I was able to find a used computer armoire for sale. This armoire is solid wood, has slide-out trays for both her keyboard and her printer, and is beautiful. It has so much more storage than the old desk, and the doors can be closed when she isn’t using it, making it just look like a beautiful piece of furniture instead of a desk.

After
After

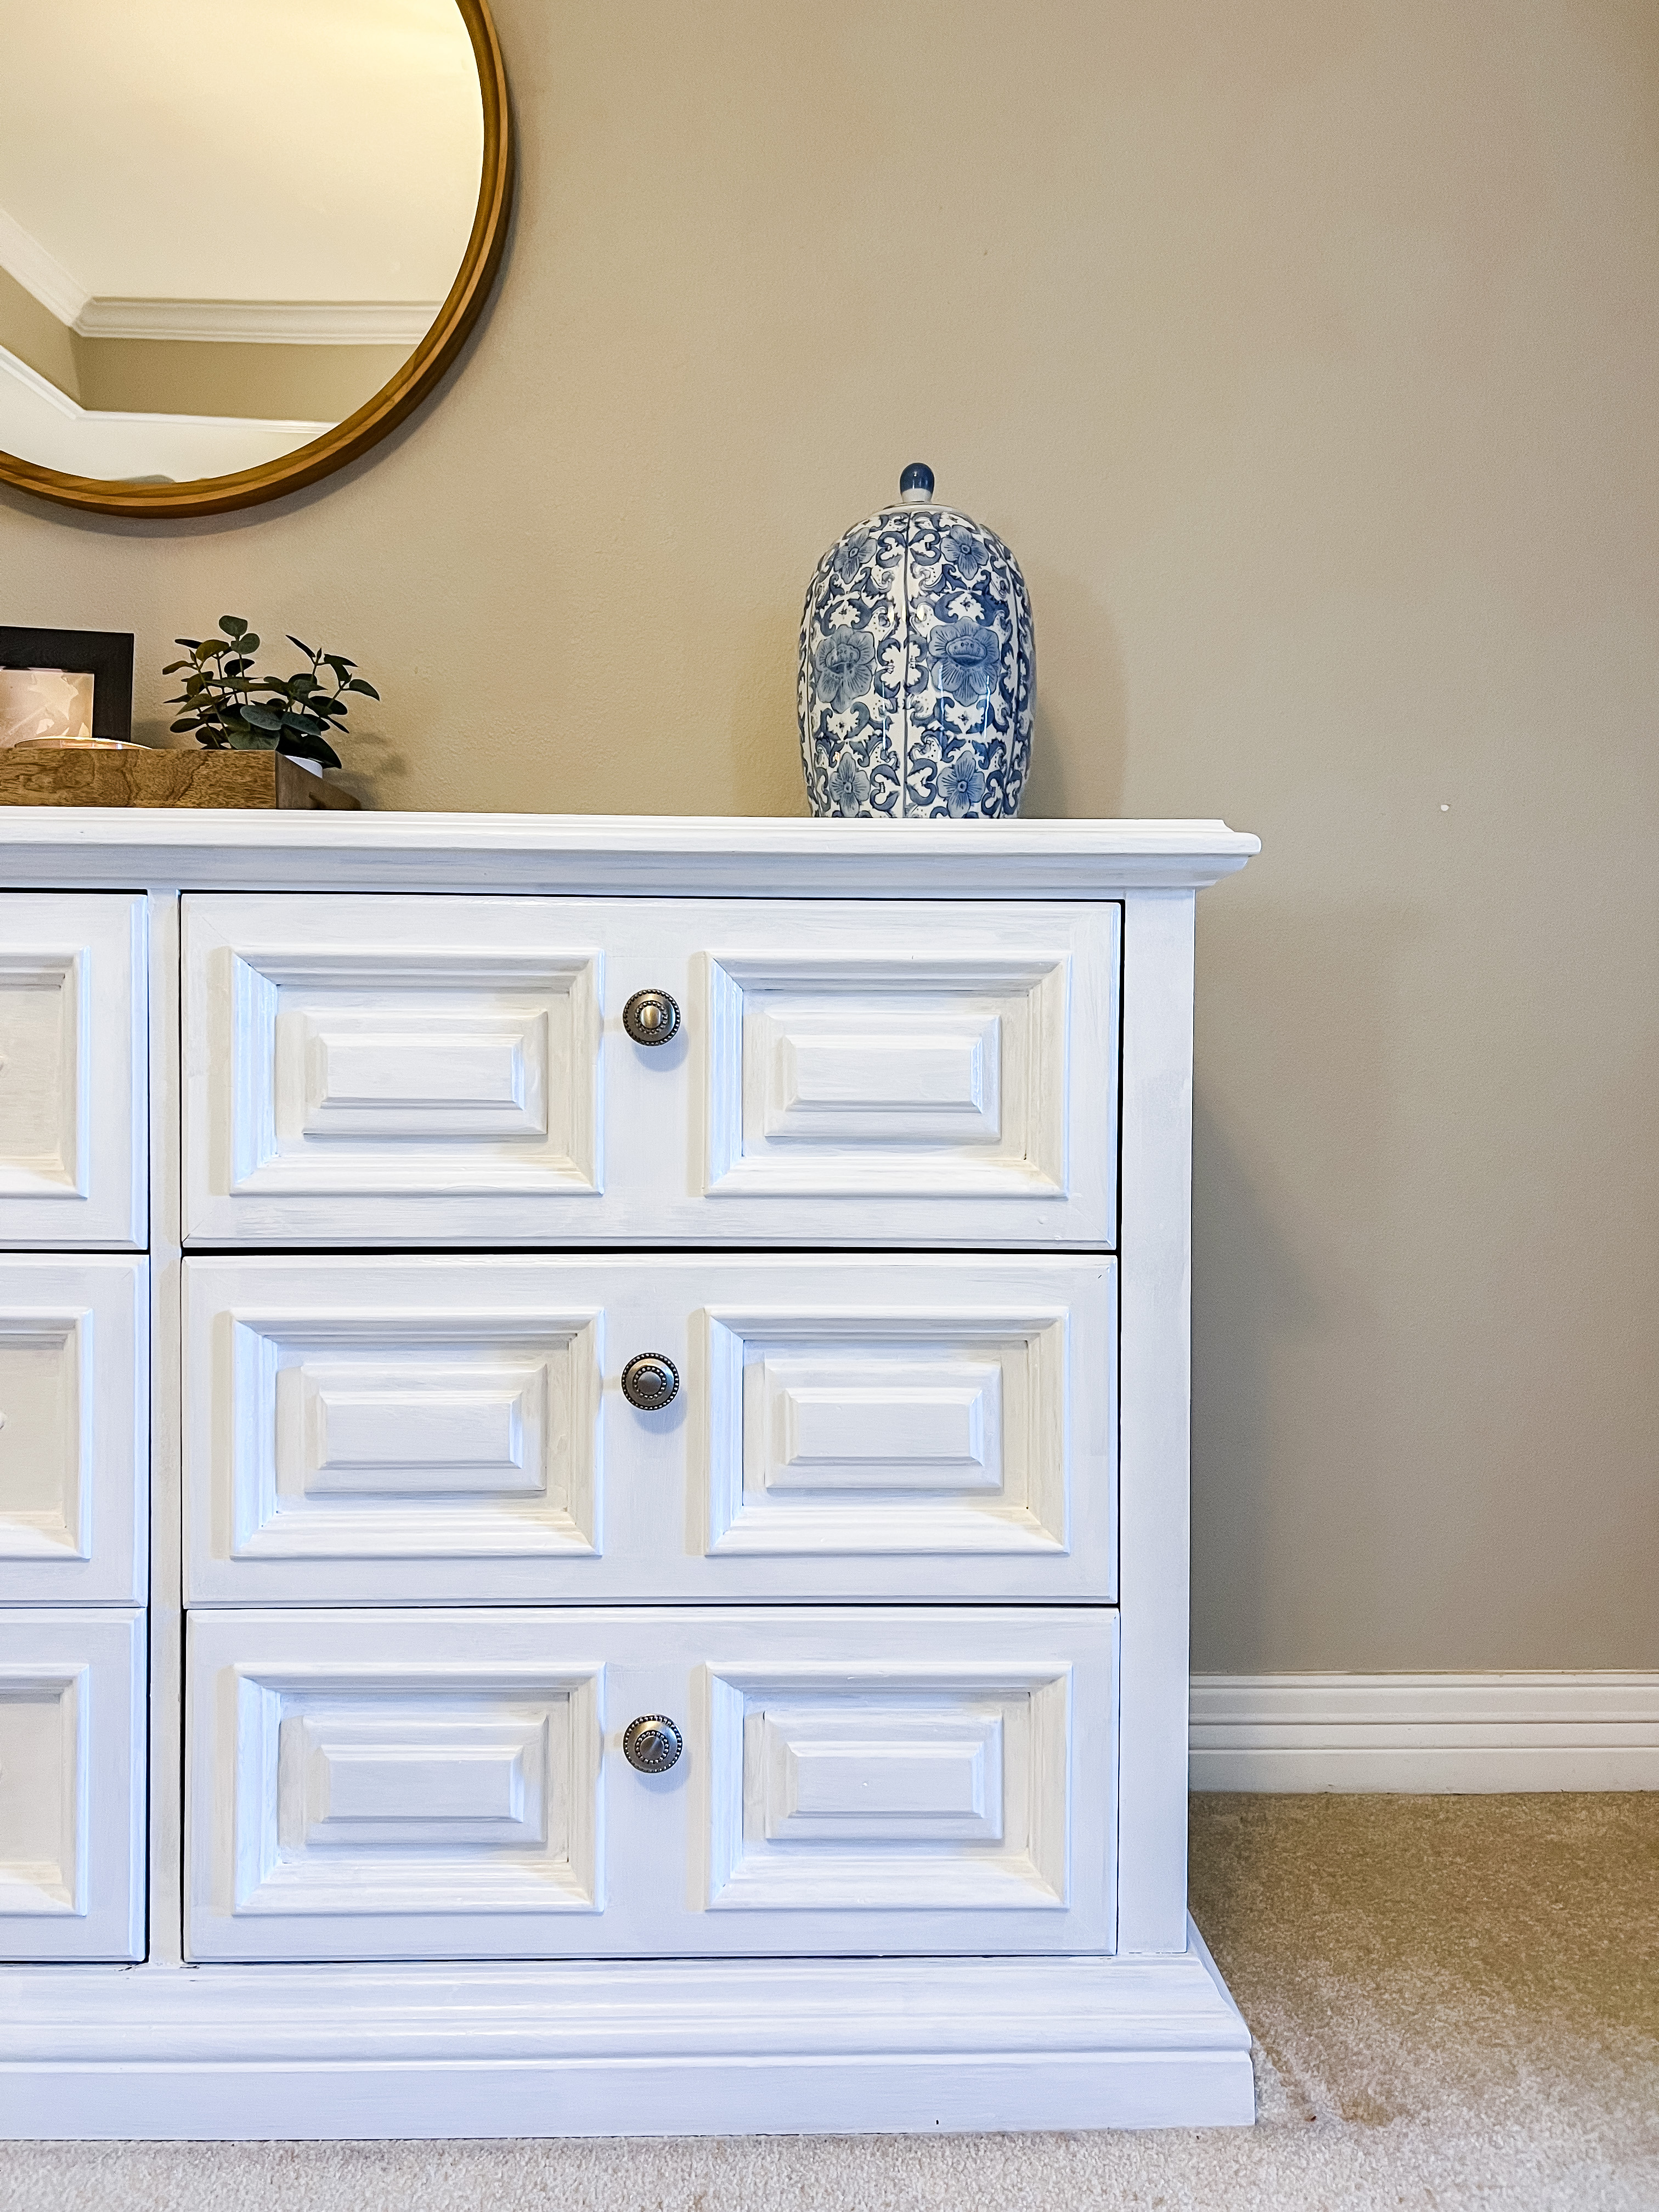
My next project was the furniture. There was a large dresser with attached mirror on one wall, another set of drawers next to it holding her tv, and two nightstands.

Before

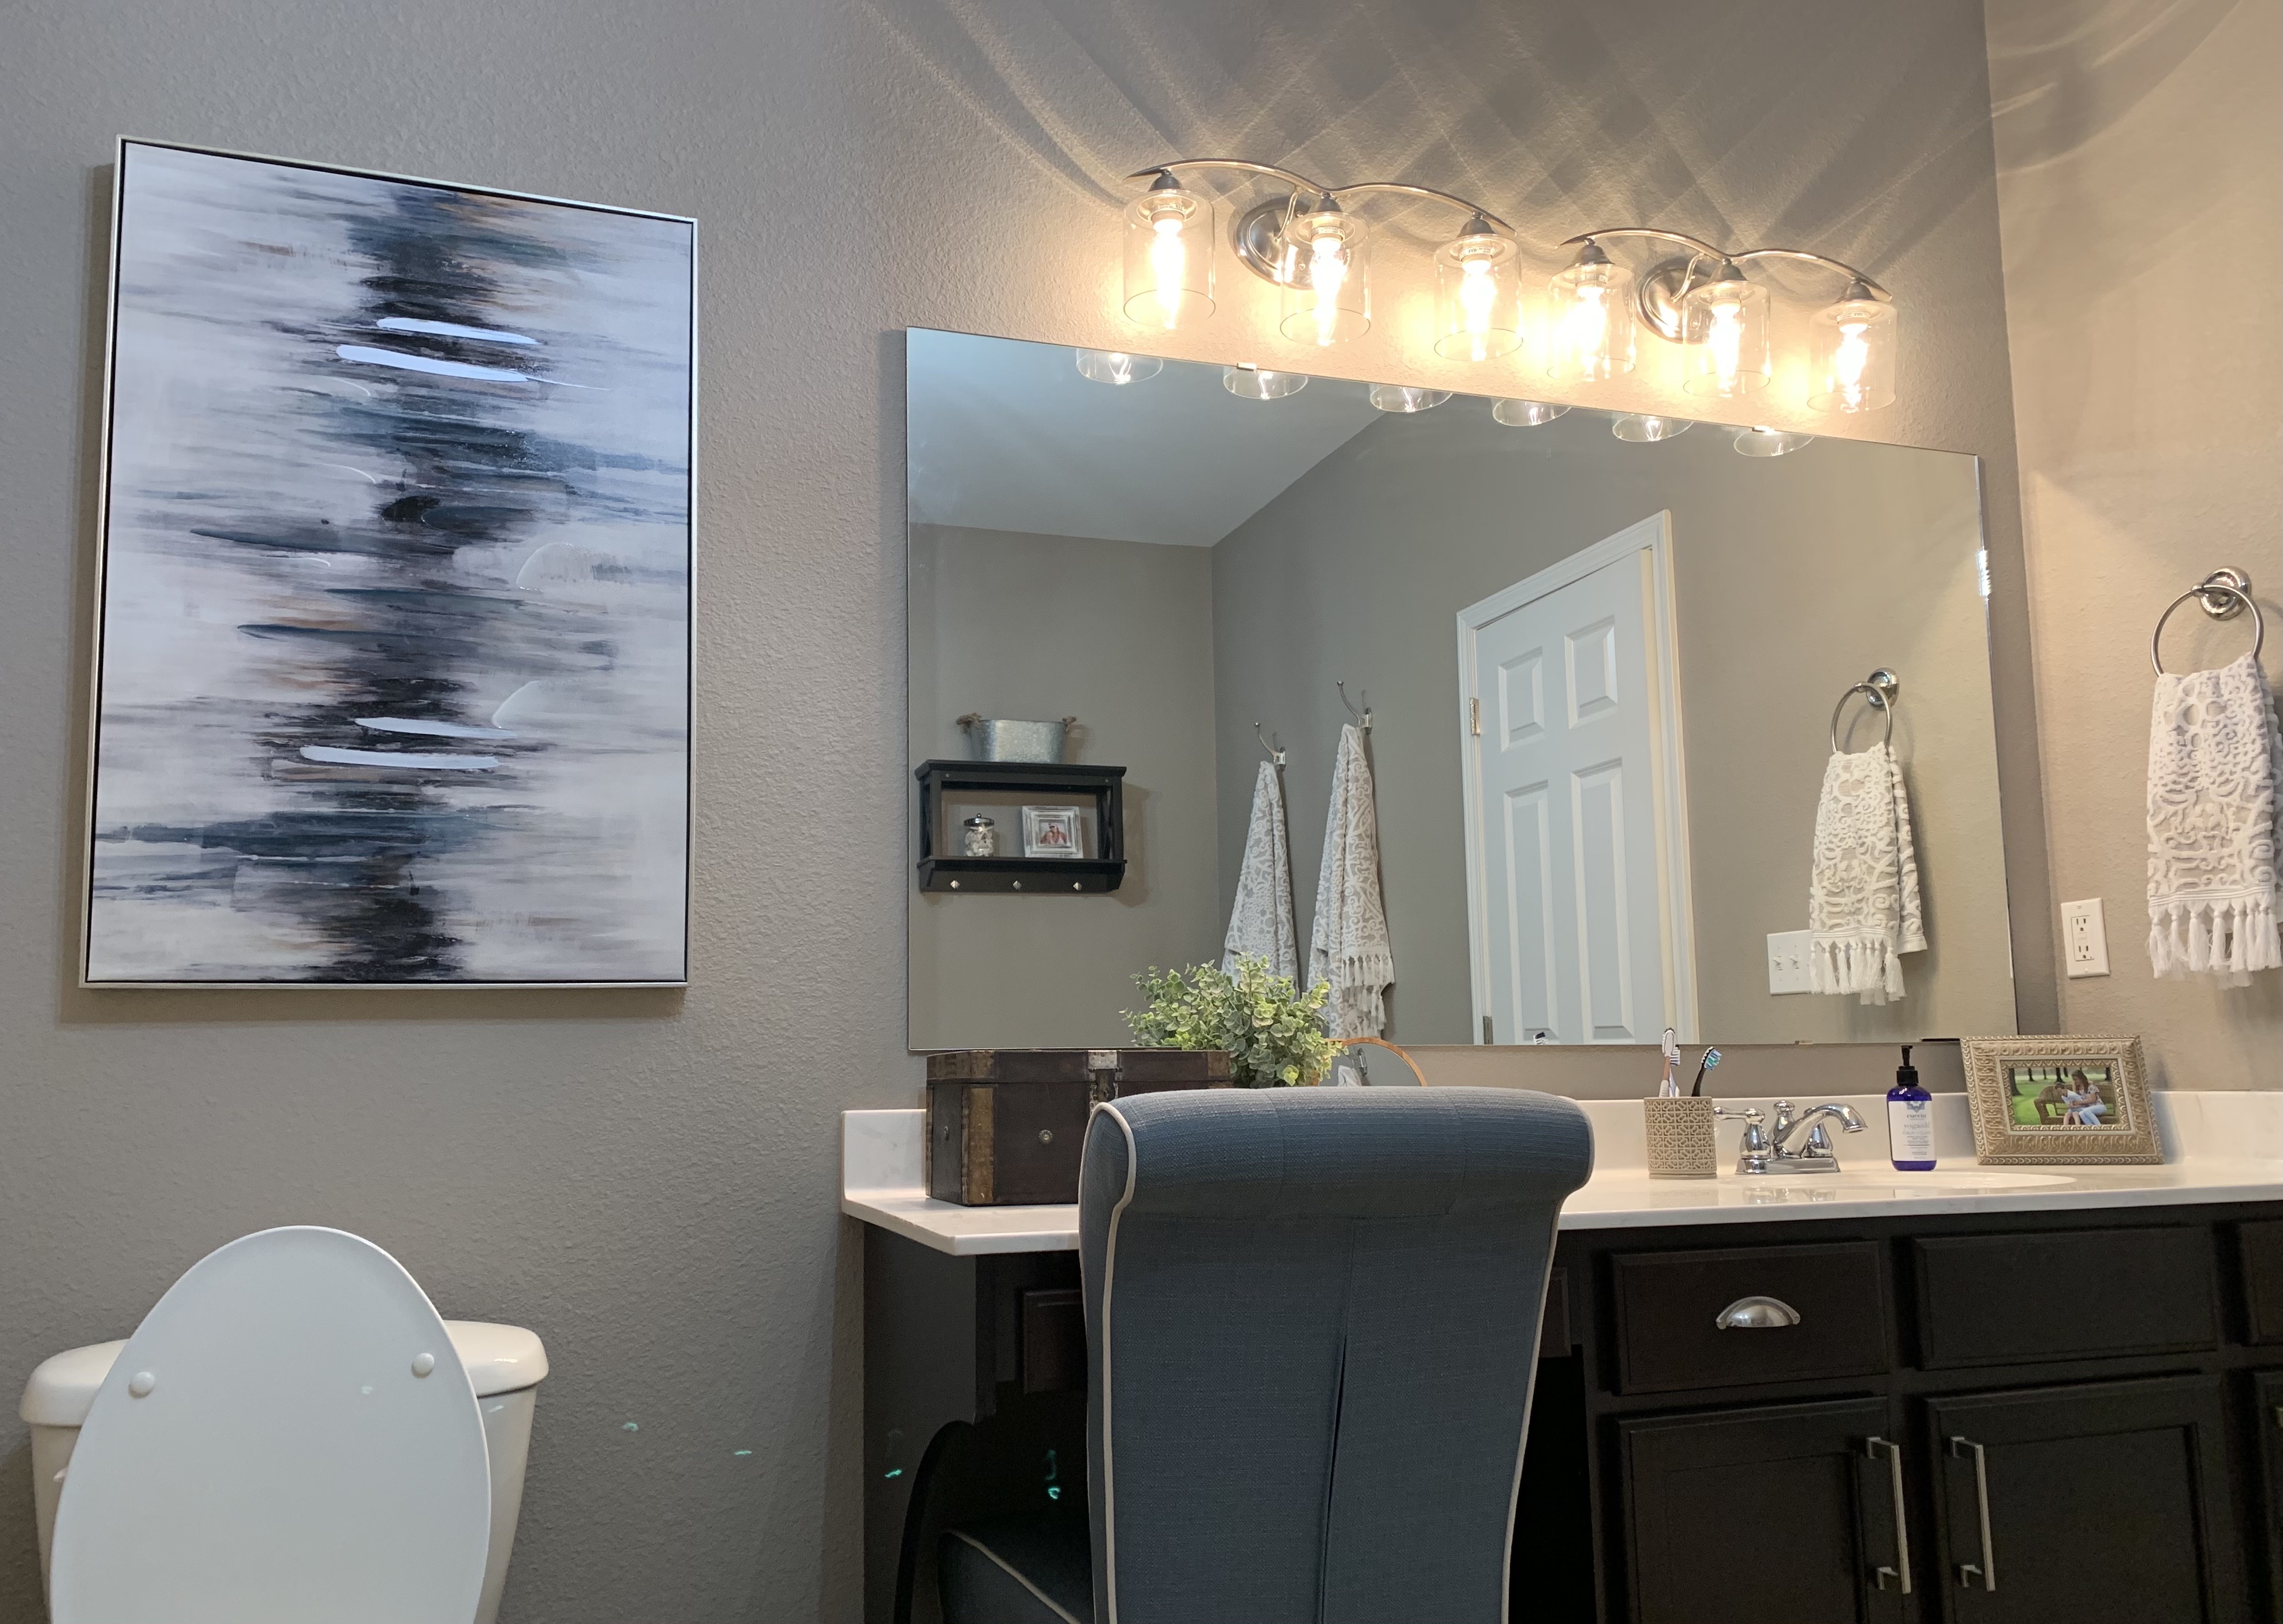
The first step was to completely get rid of the smaller set of drawers, since its only use was as a tv stand, and mount her tv on the wall instead. (Thanks to my hubby for helping me mount the tv!) And to completely transform the remaining furniture, I painted it white, got new brushed silver knobs, and replaced the attached mirror with a more modern, round mirror attached to the wall.

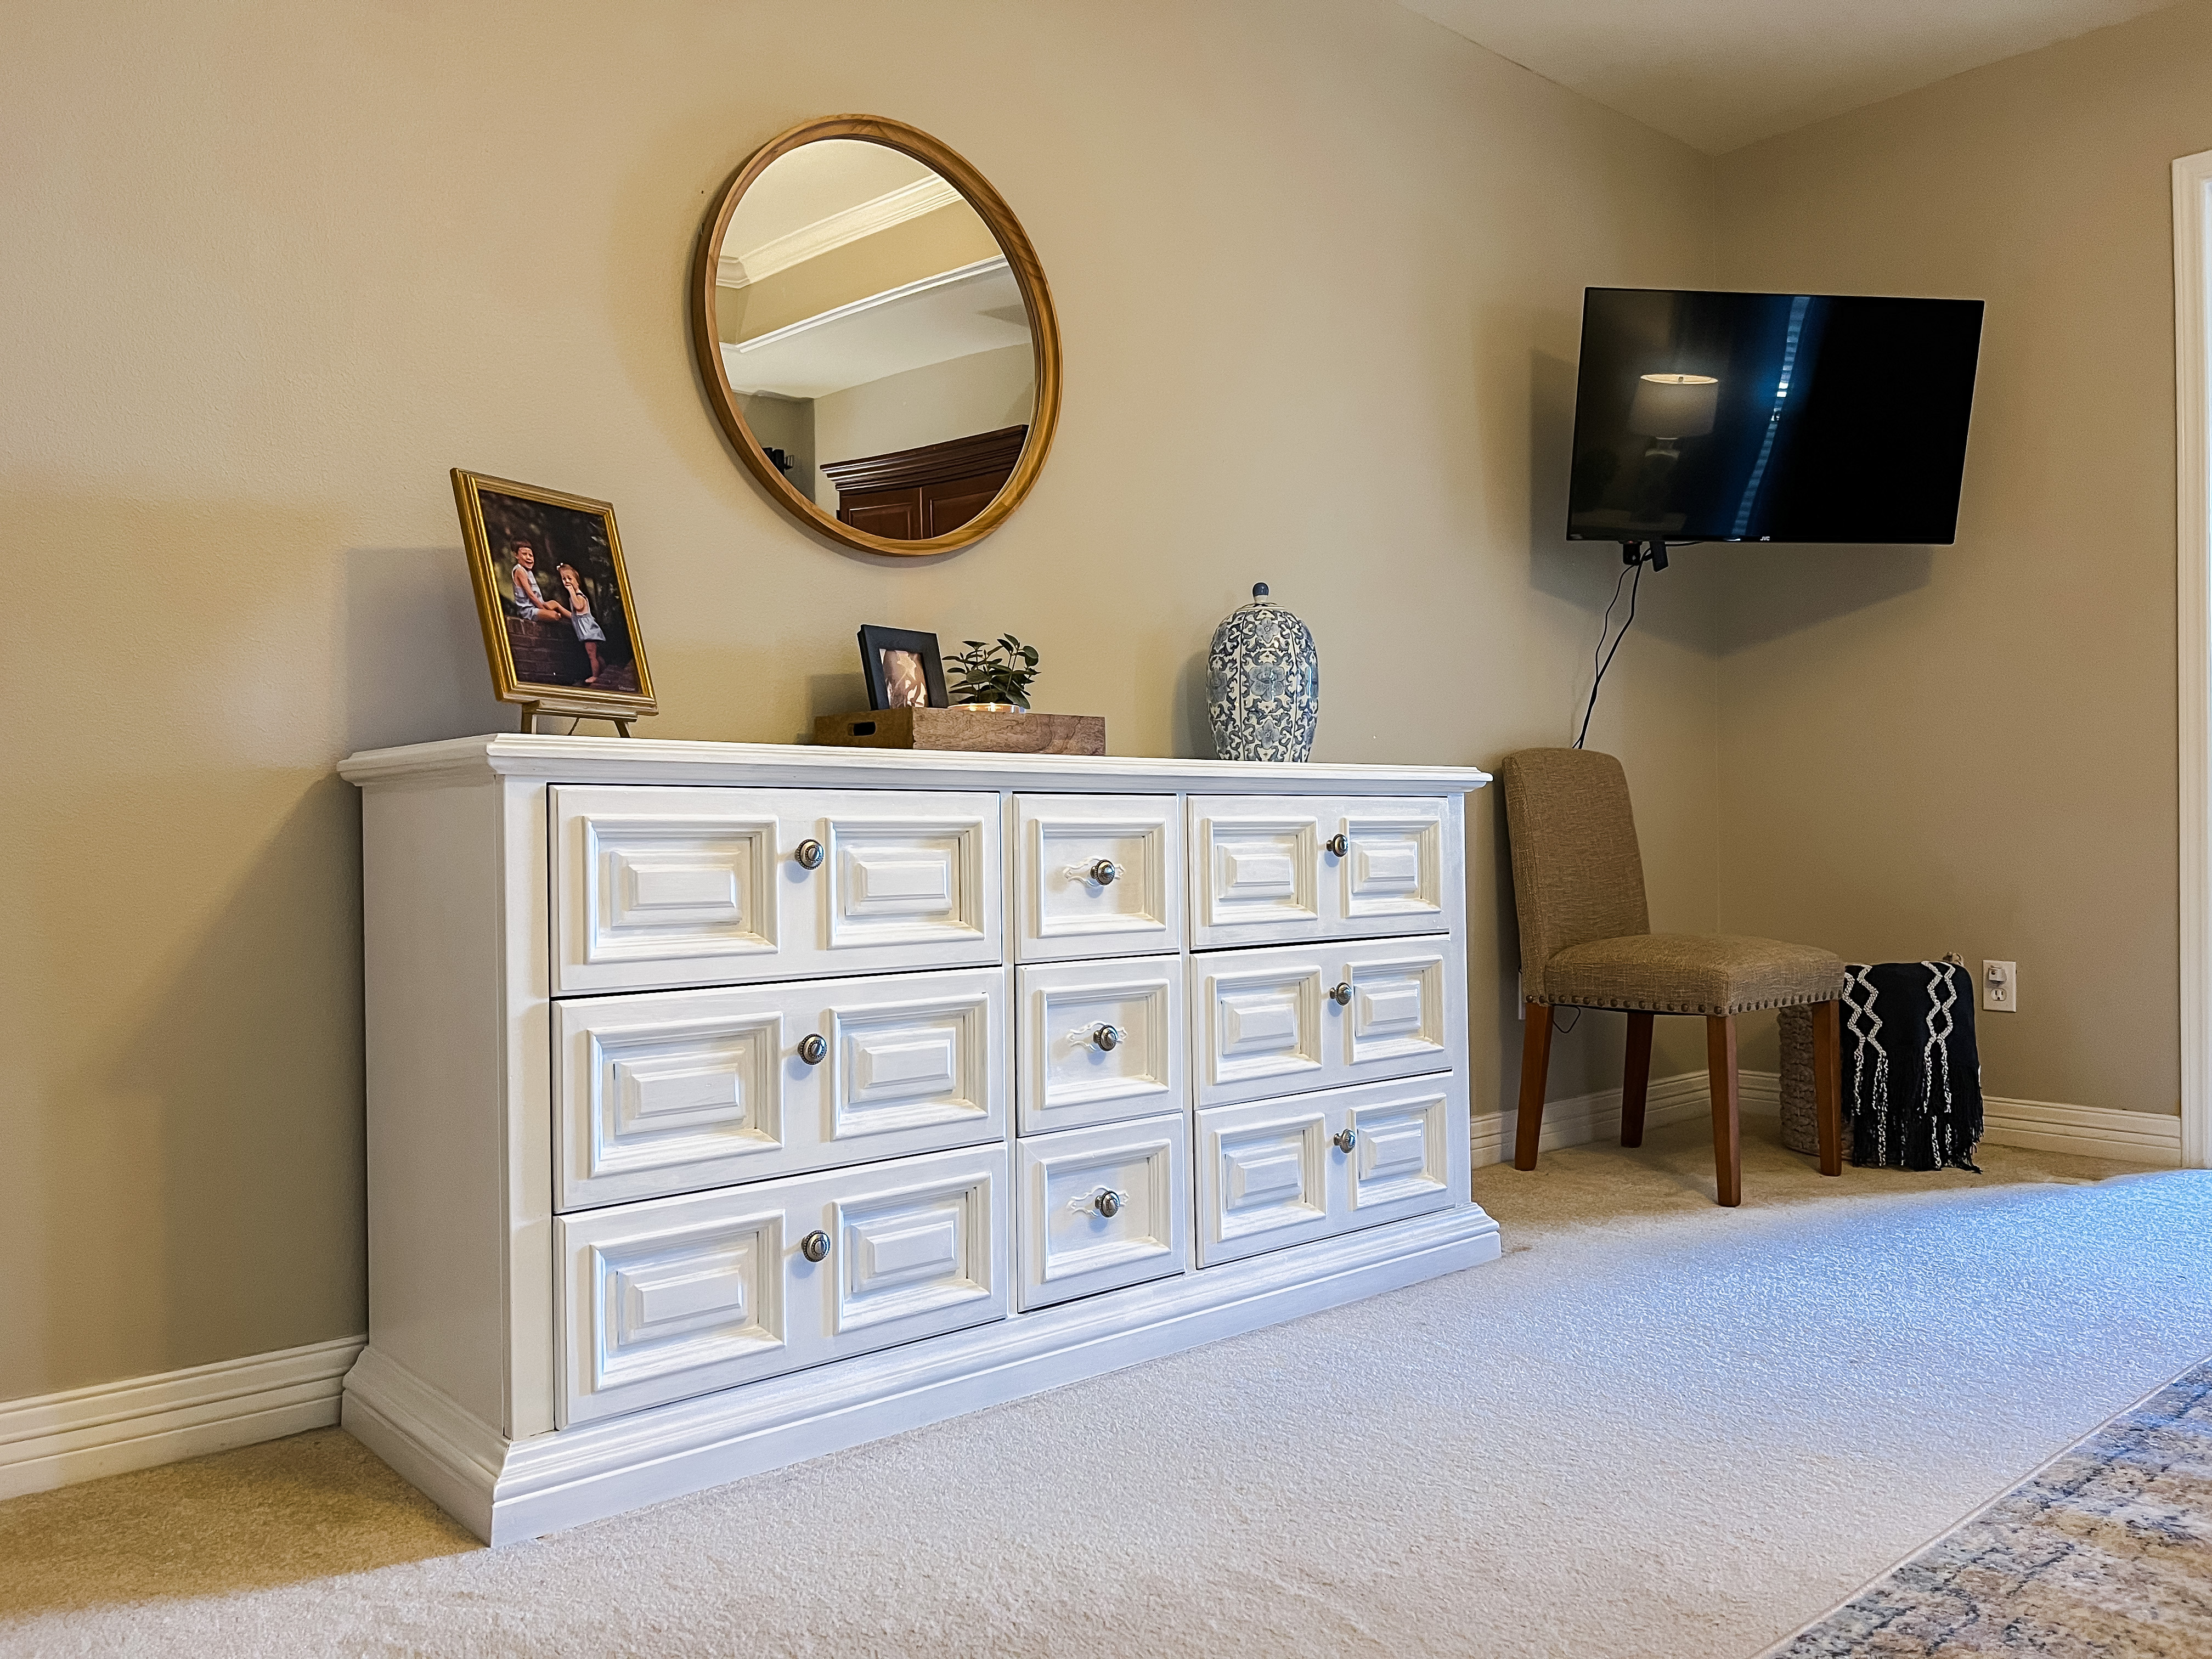
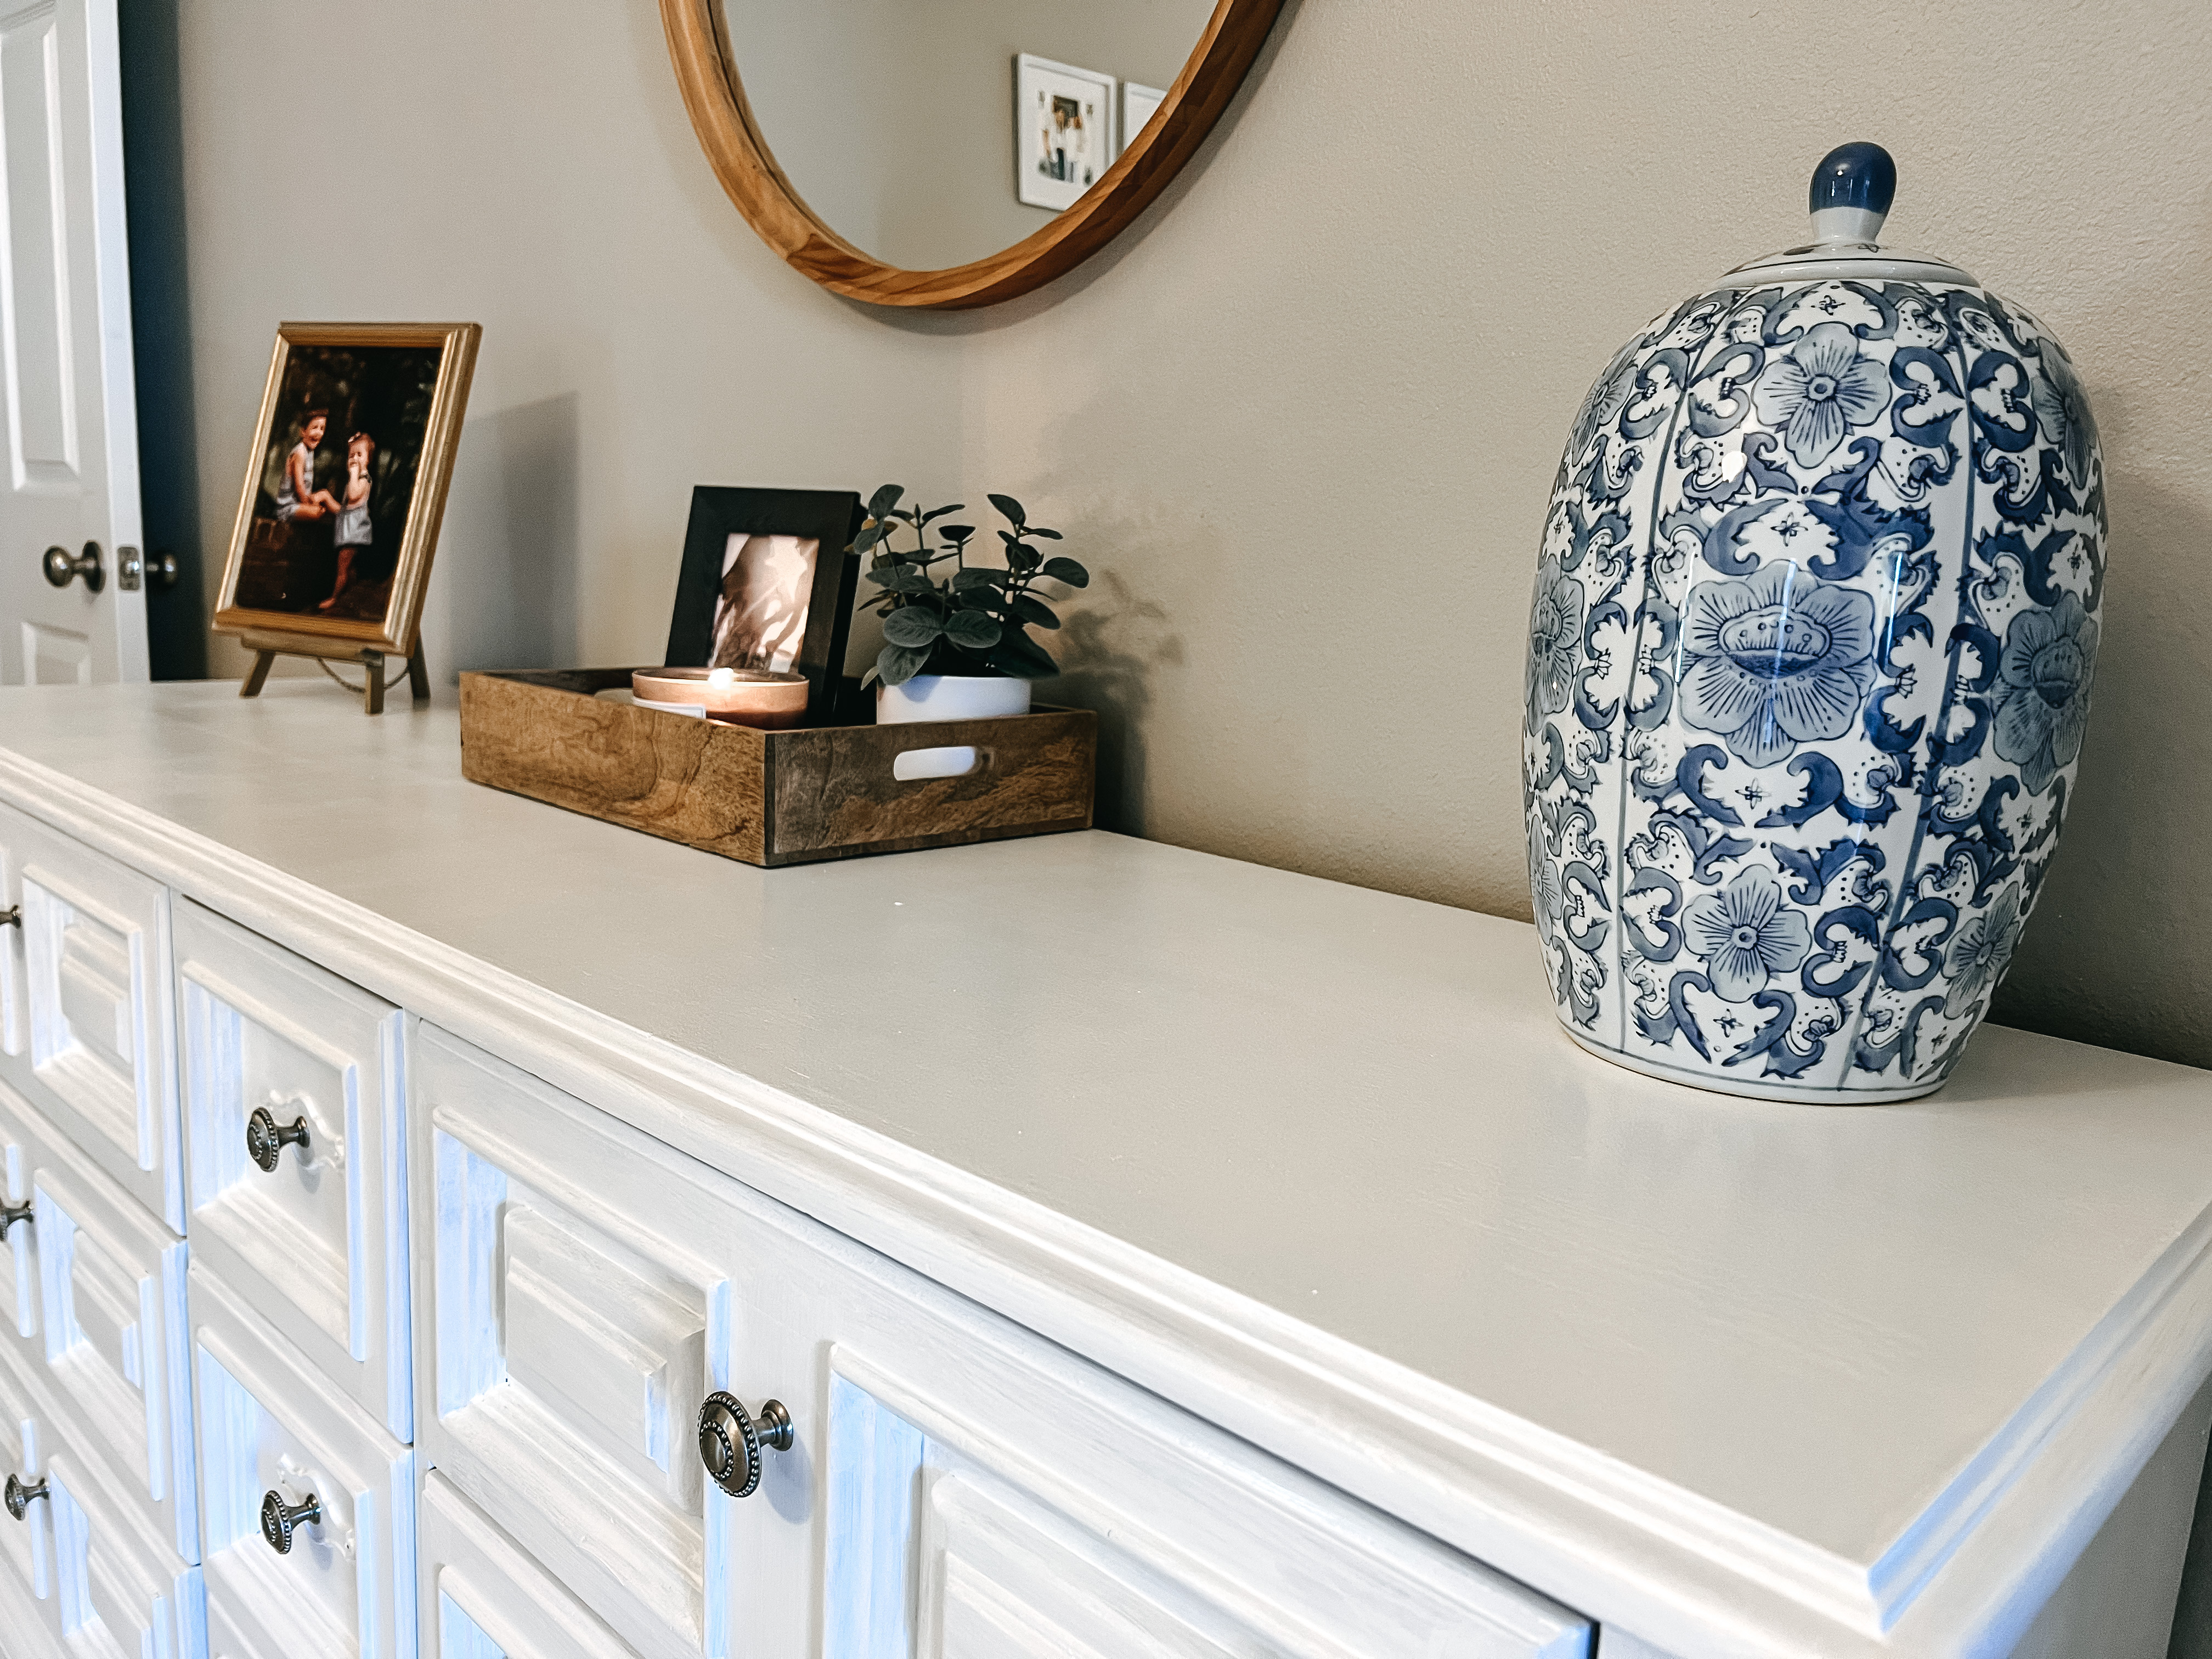
Although it is the same dresser, it looks completely different with new hardware and paint. (This involved a light sanding, two coats of primer and one coat of paint.) I went with a wood mirror instead of white to add some contrast.

After

The lighter color furniture also makes the room feel bigger and brighter.

After
After

My next challenge was a big, empty wall begging for some attention.

Before

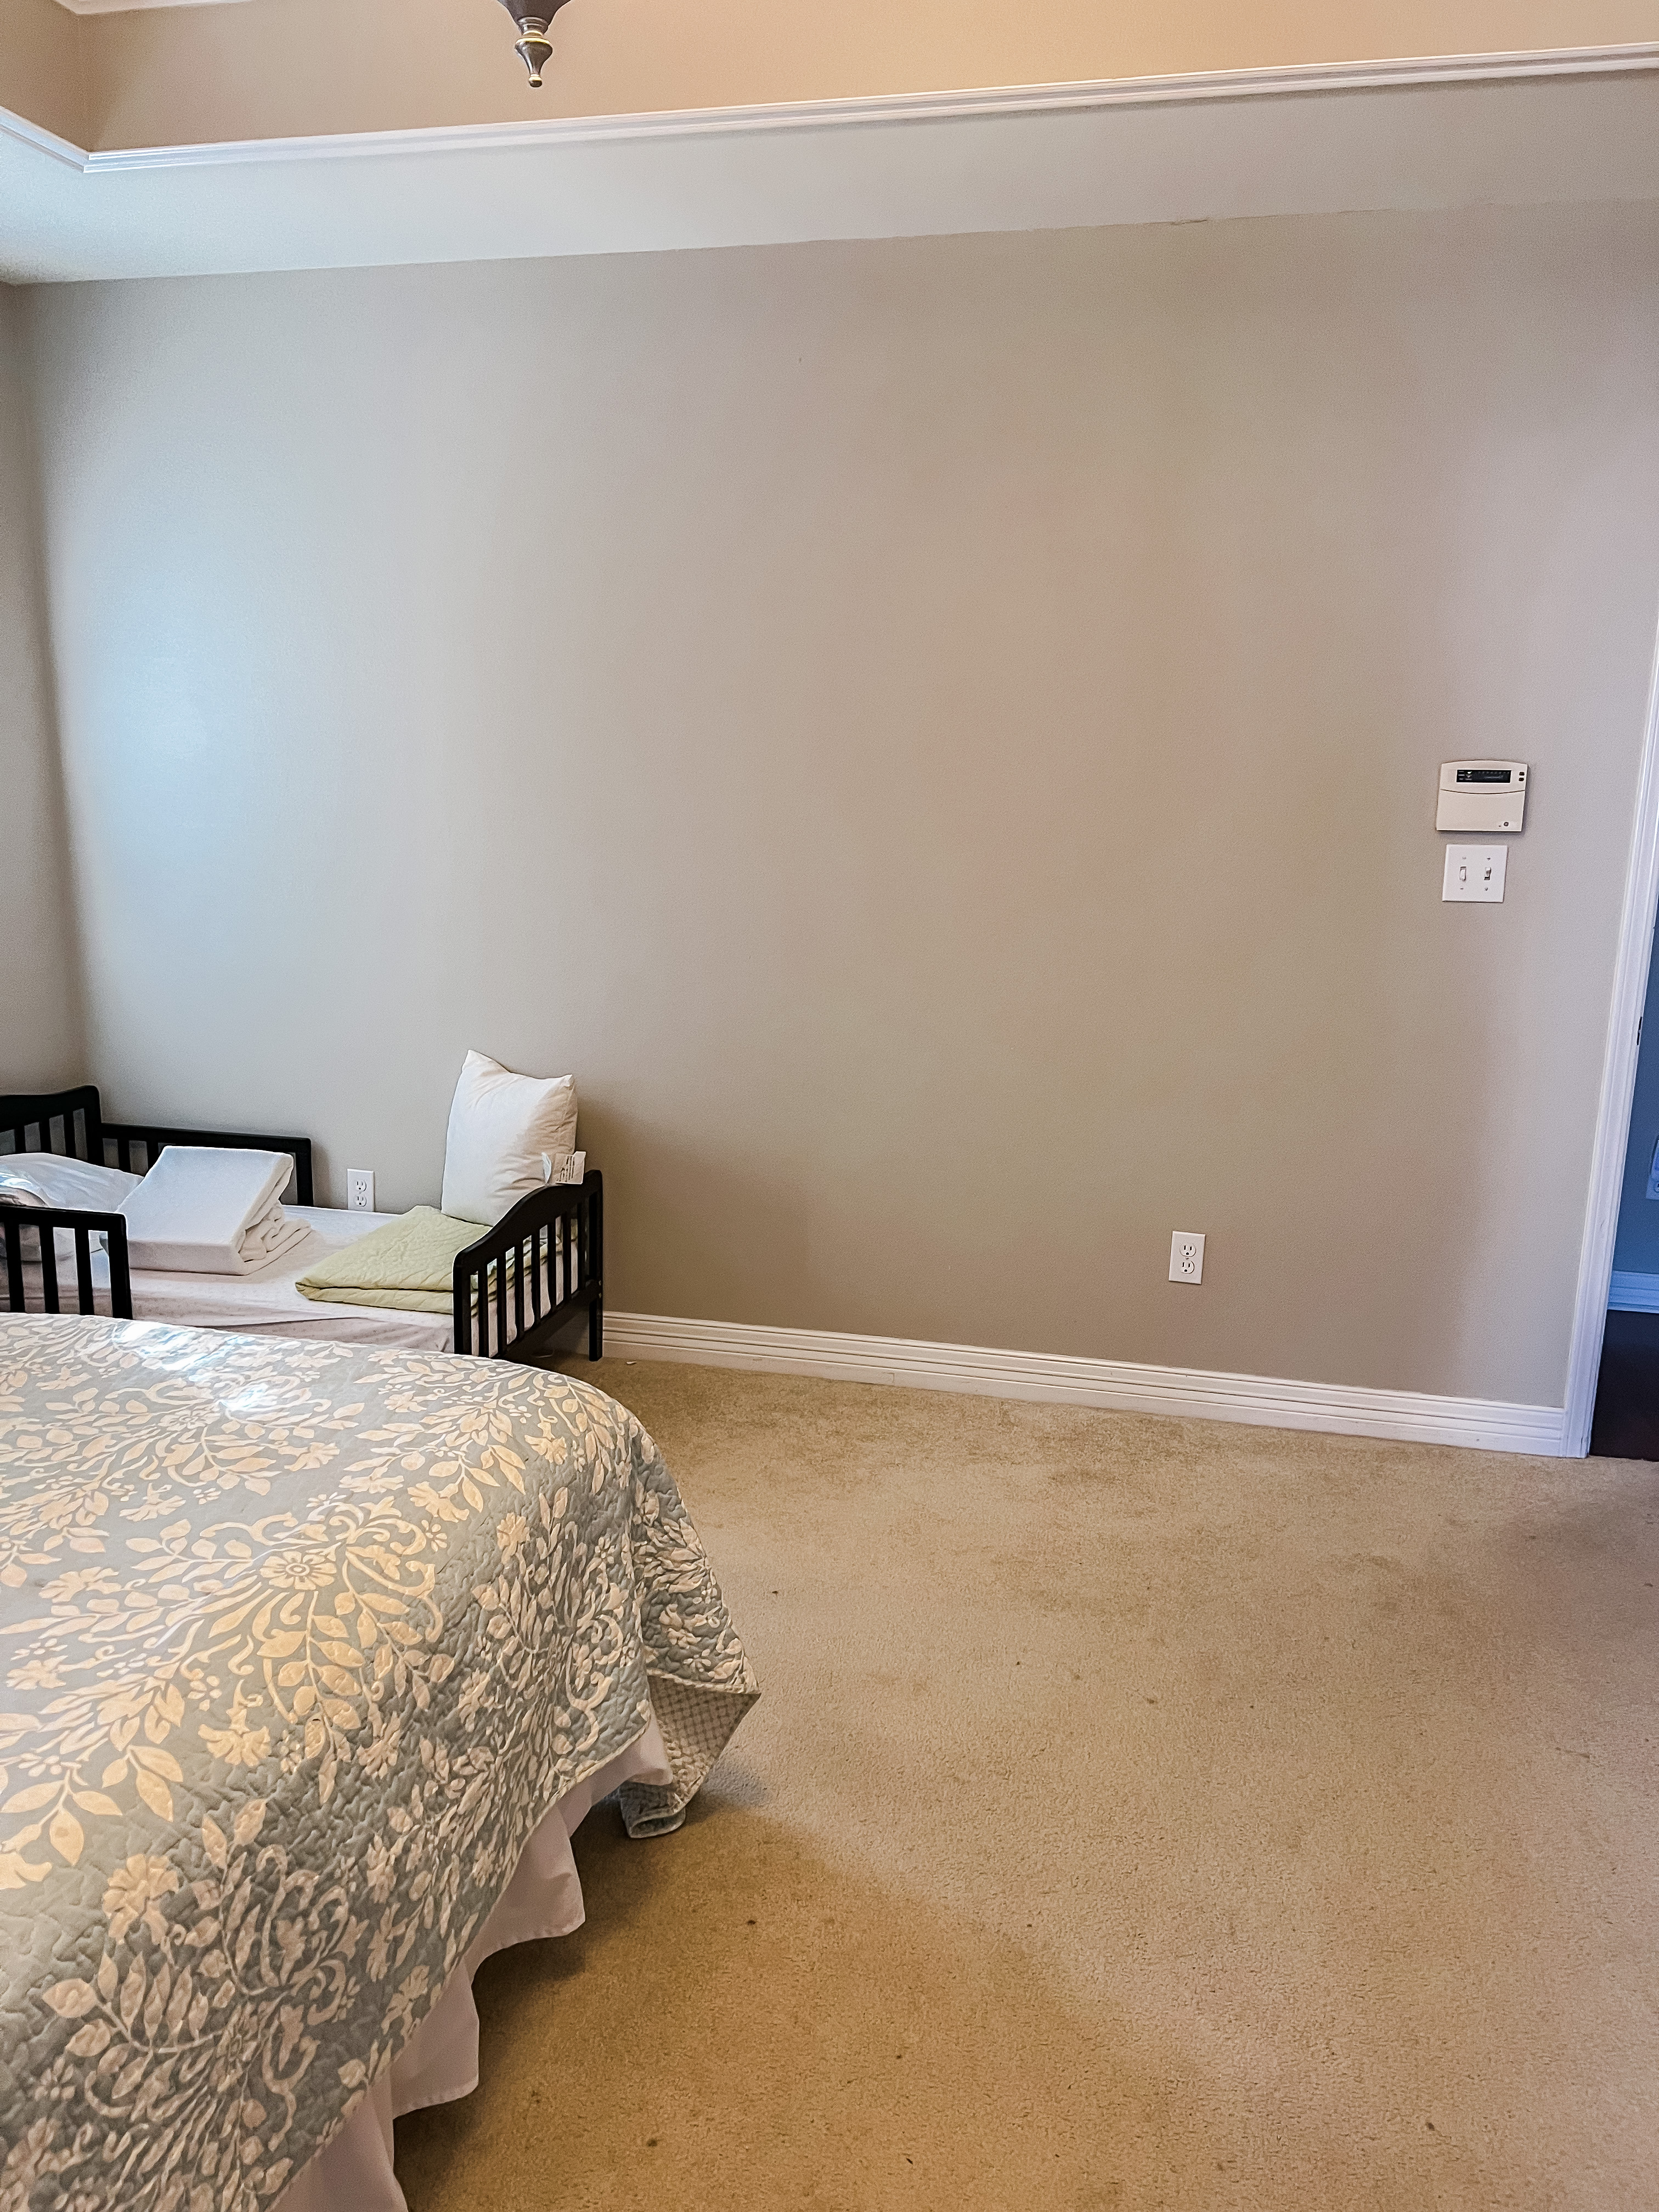
My original plan was to create a sitting area with a small chair and table, or a long bench with some pillows, but I couldn’t find anything I liked within my budget, so I went to plan B – I created a gallery wall with these white, matted 12×12 frames. I got these in a kit from Hobby Lobby for 50% off, and they came with a template for hanging so it took no time at all to get them even on the wall.

After

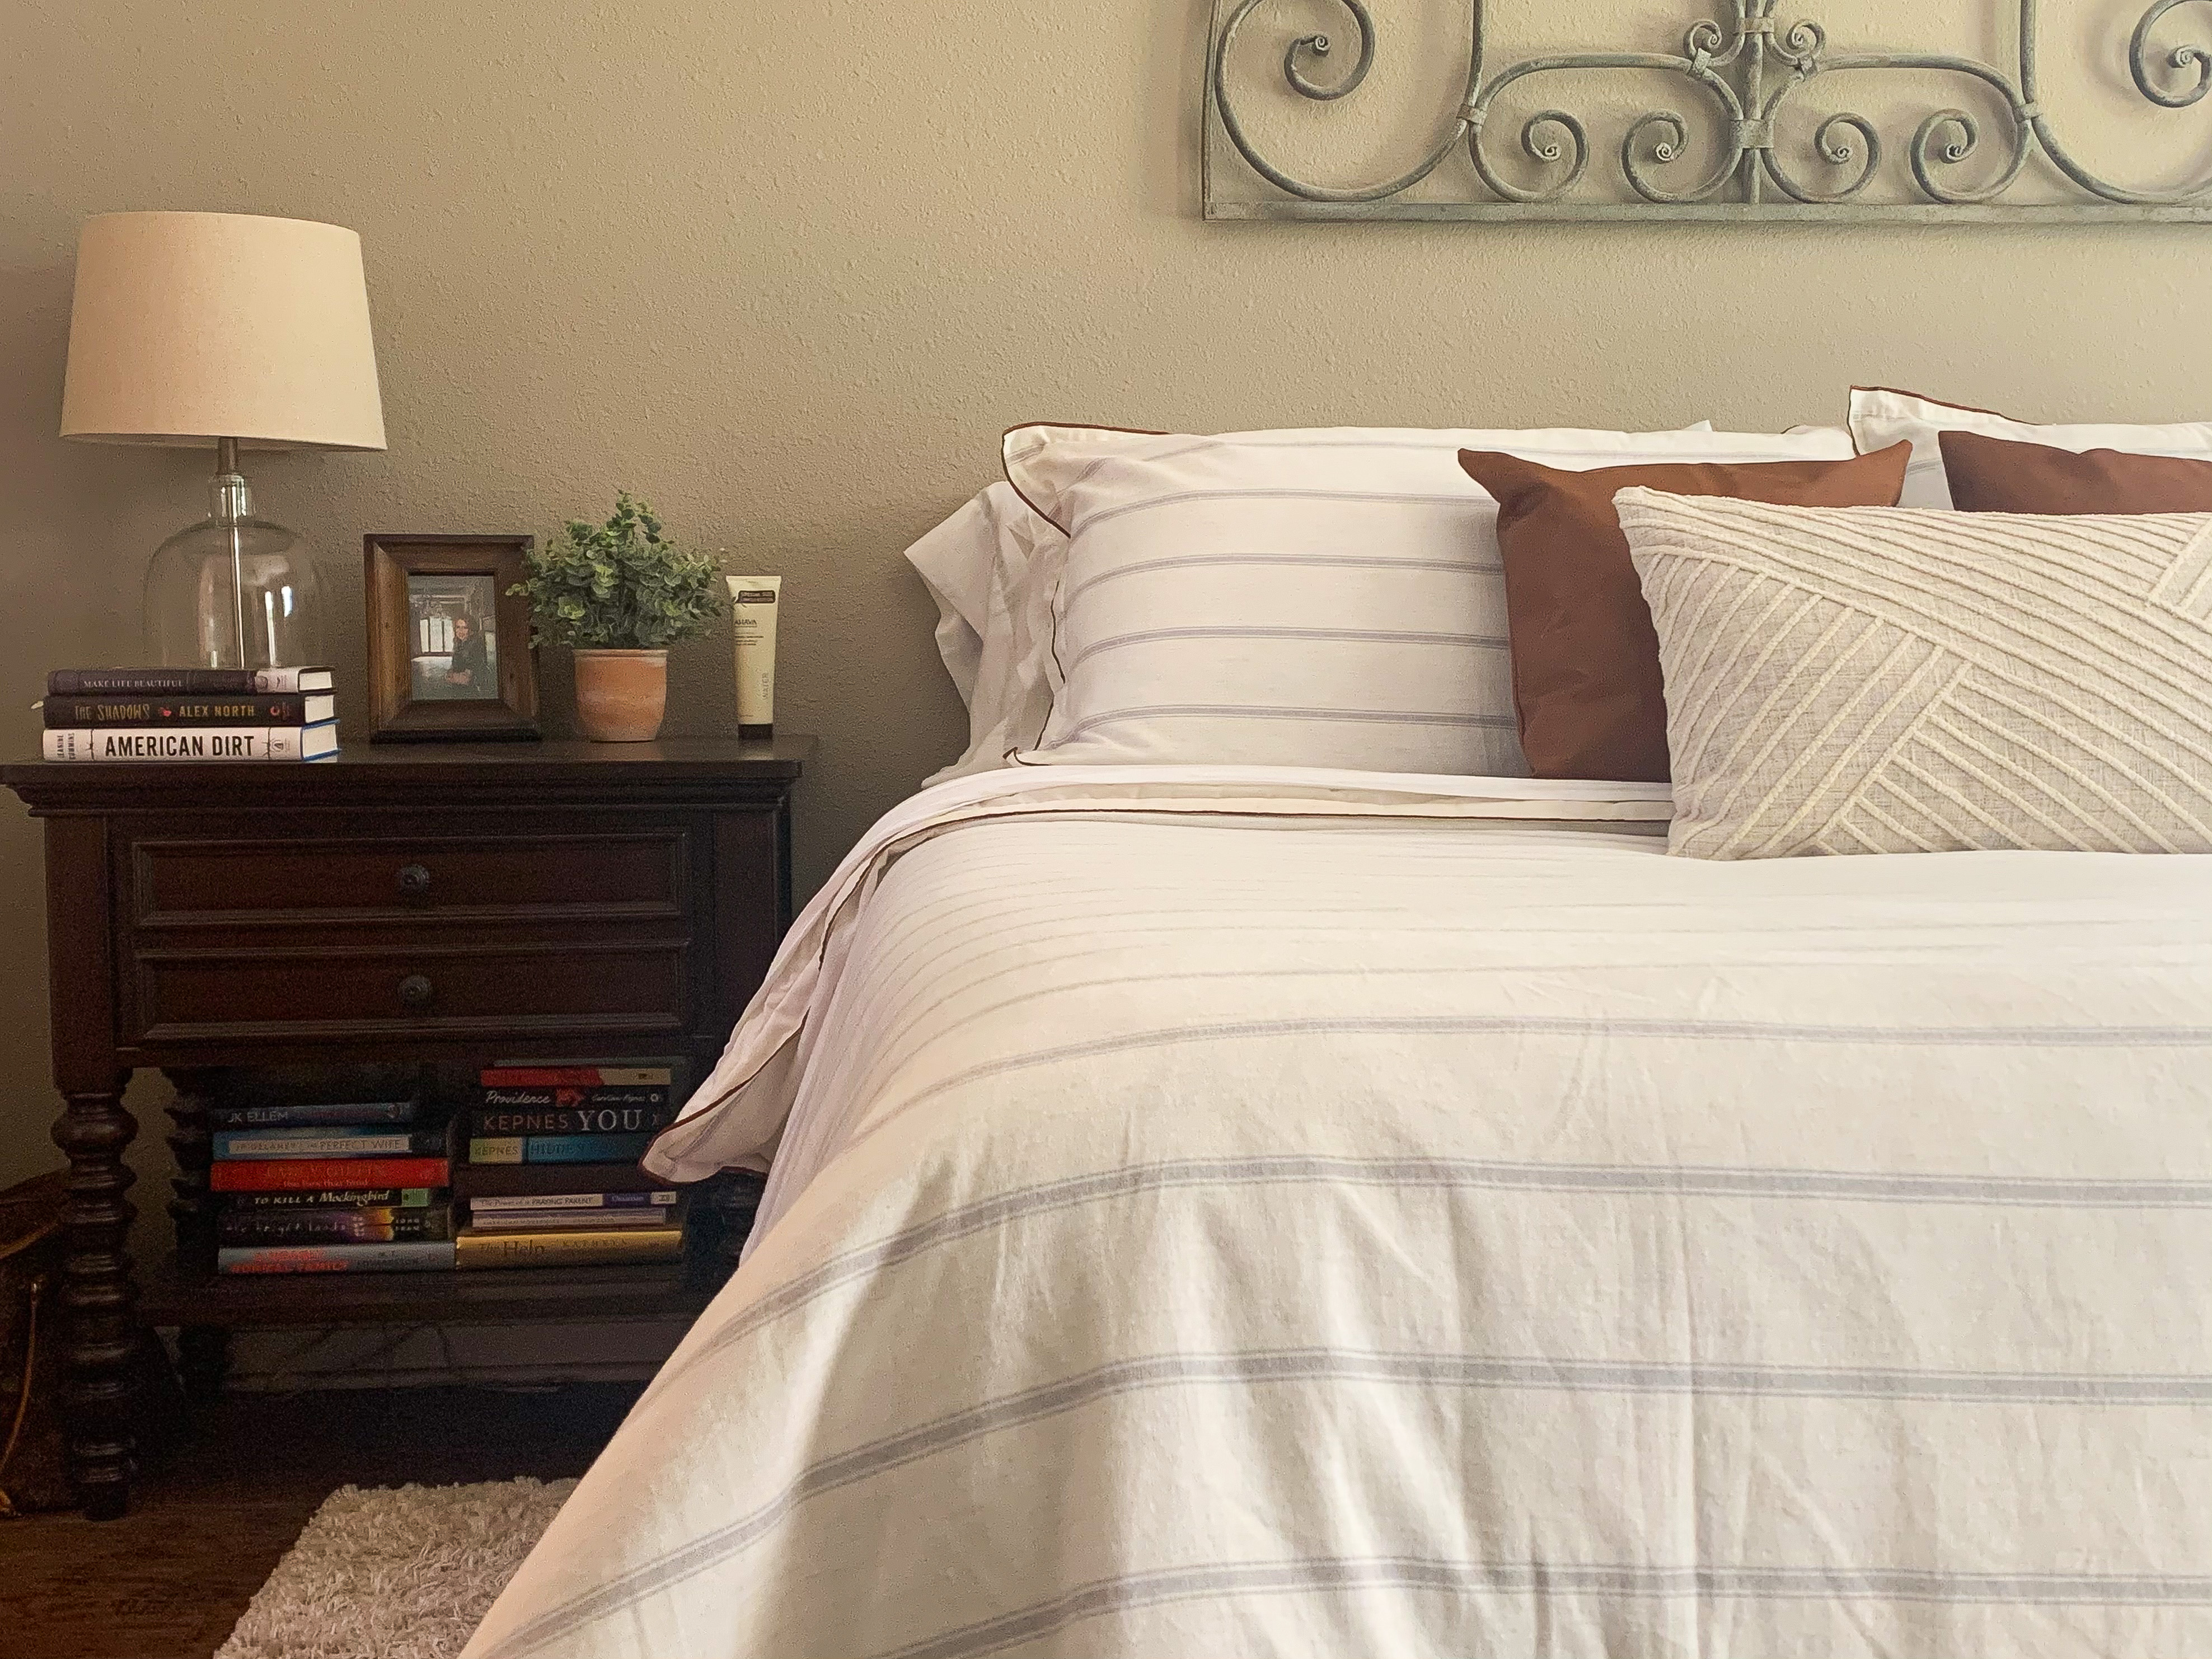
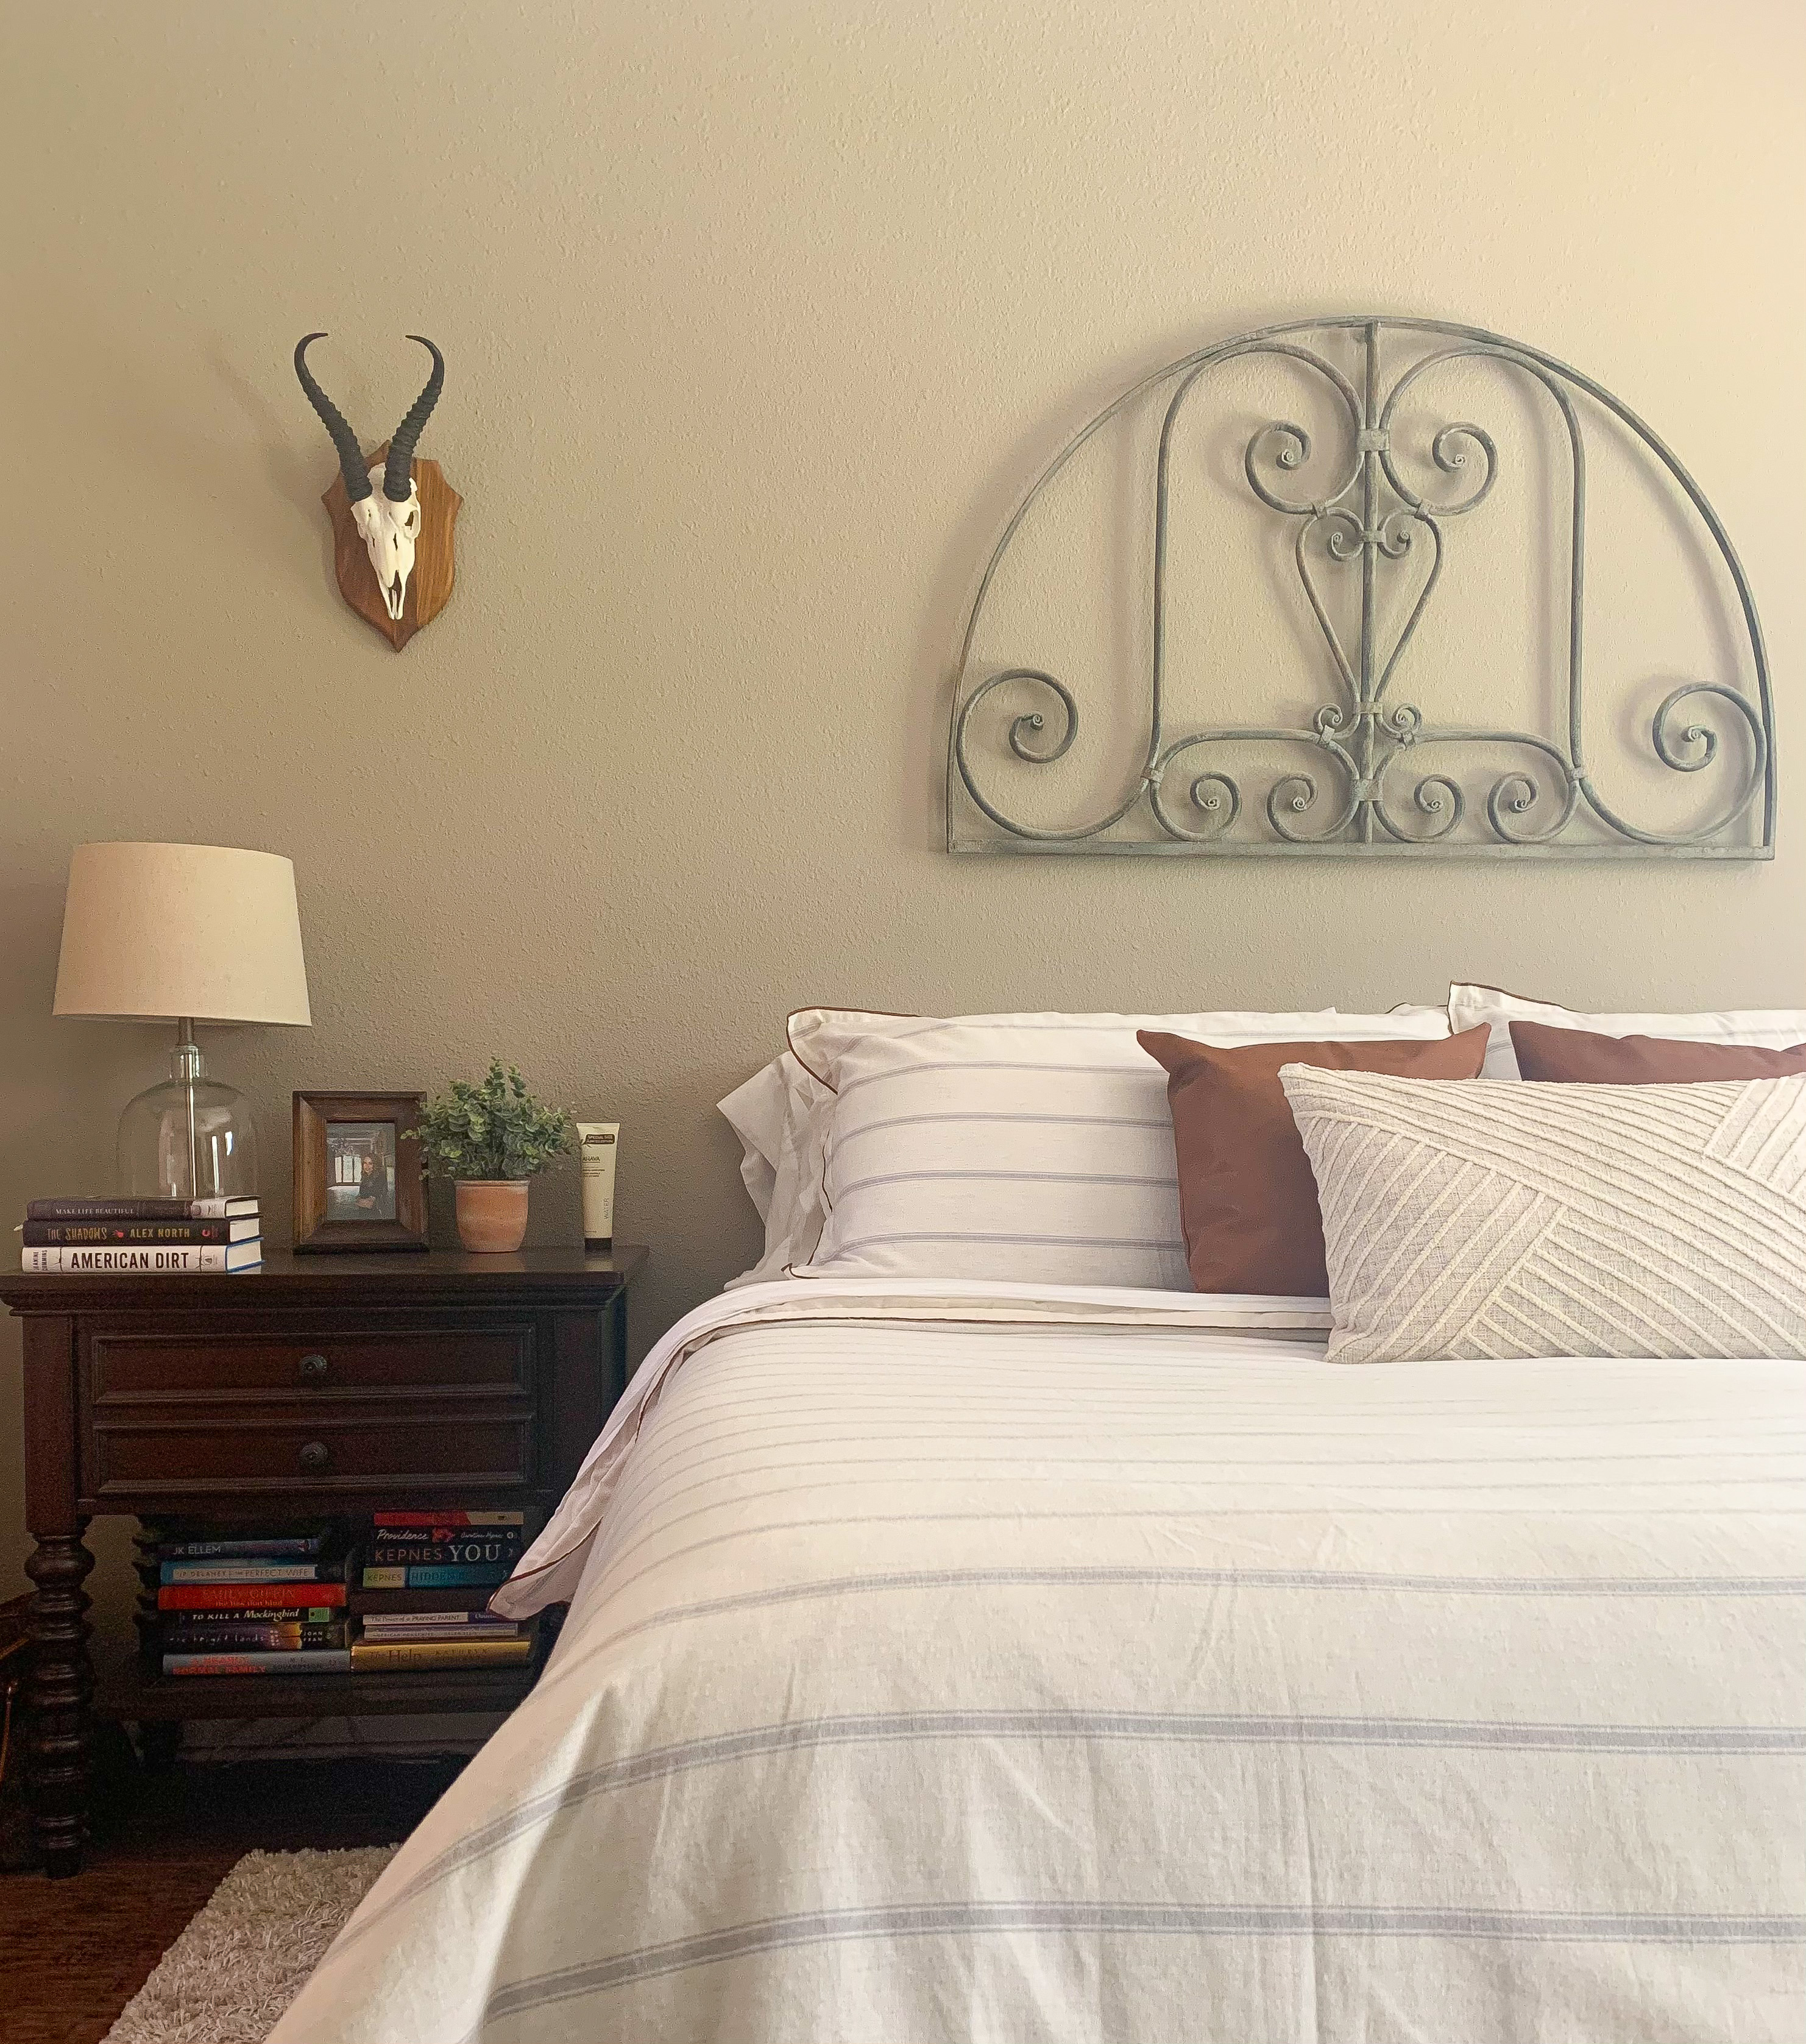
Next came the focal point of the room, the bed.

Before

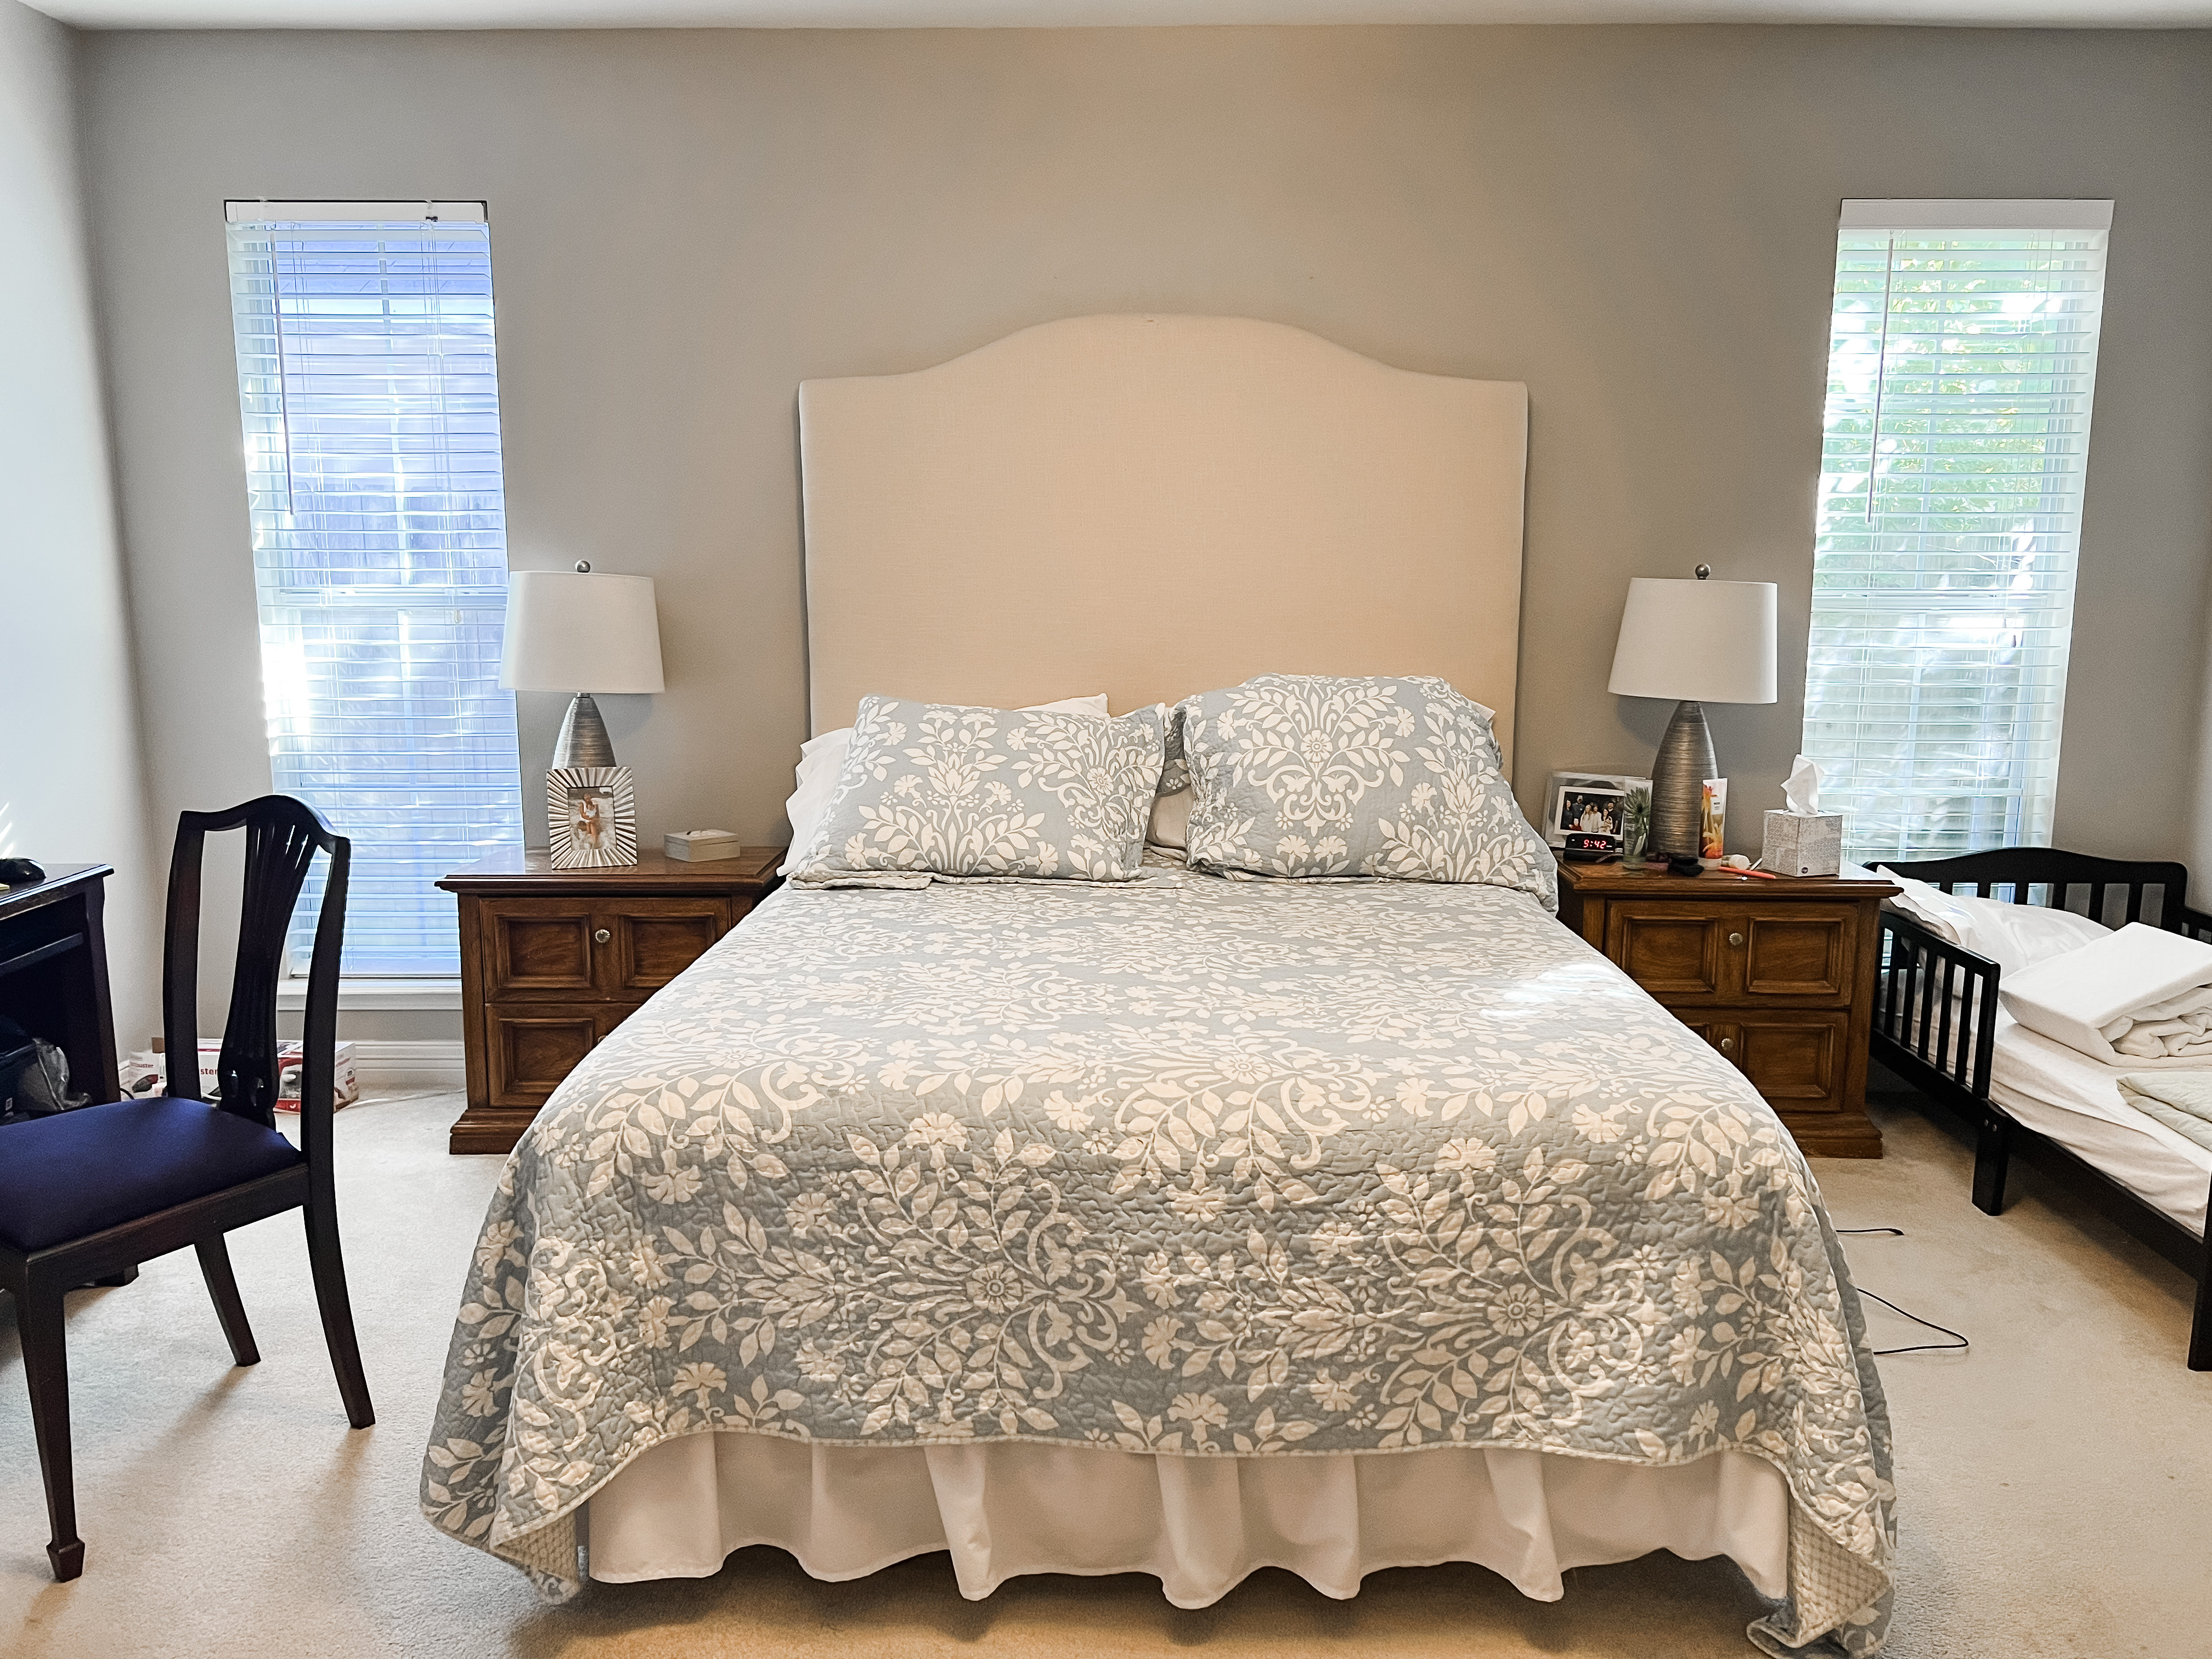
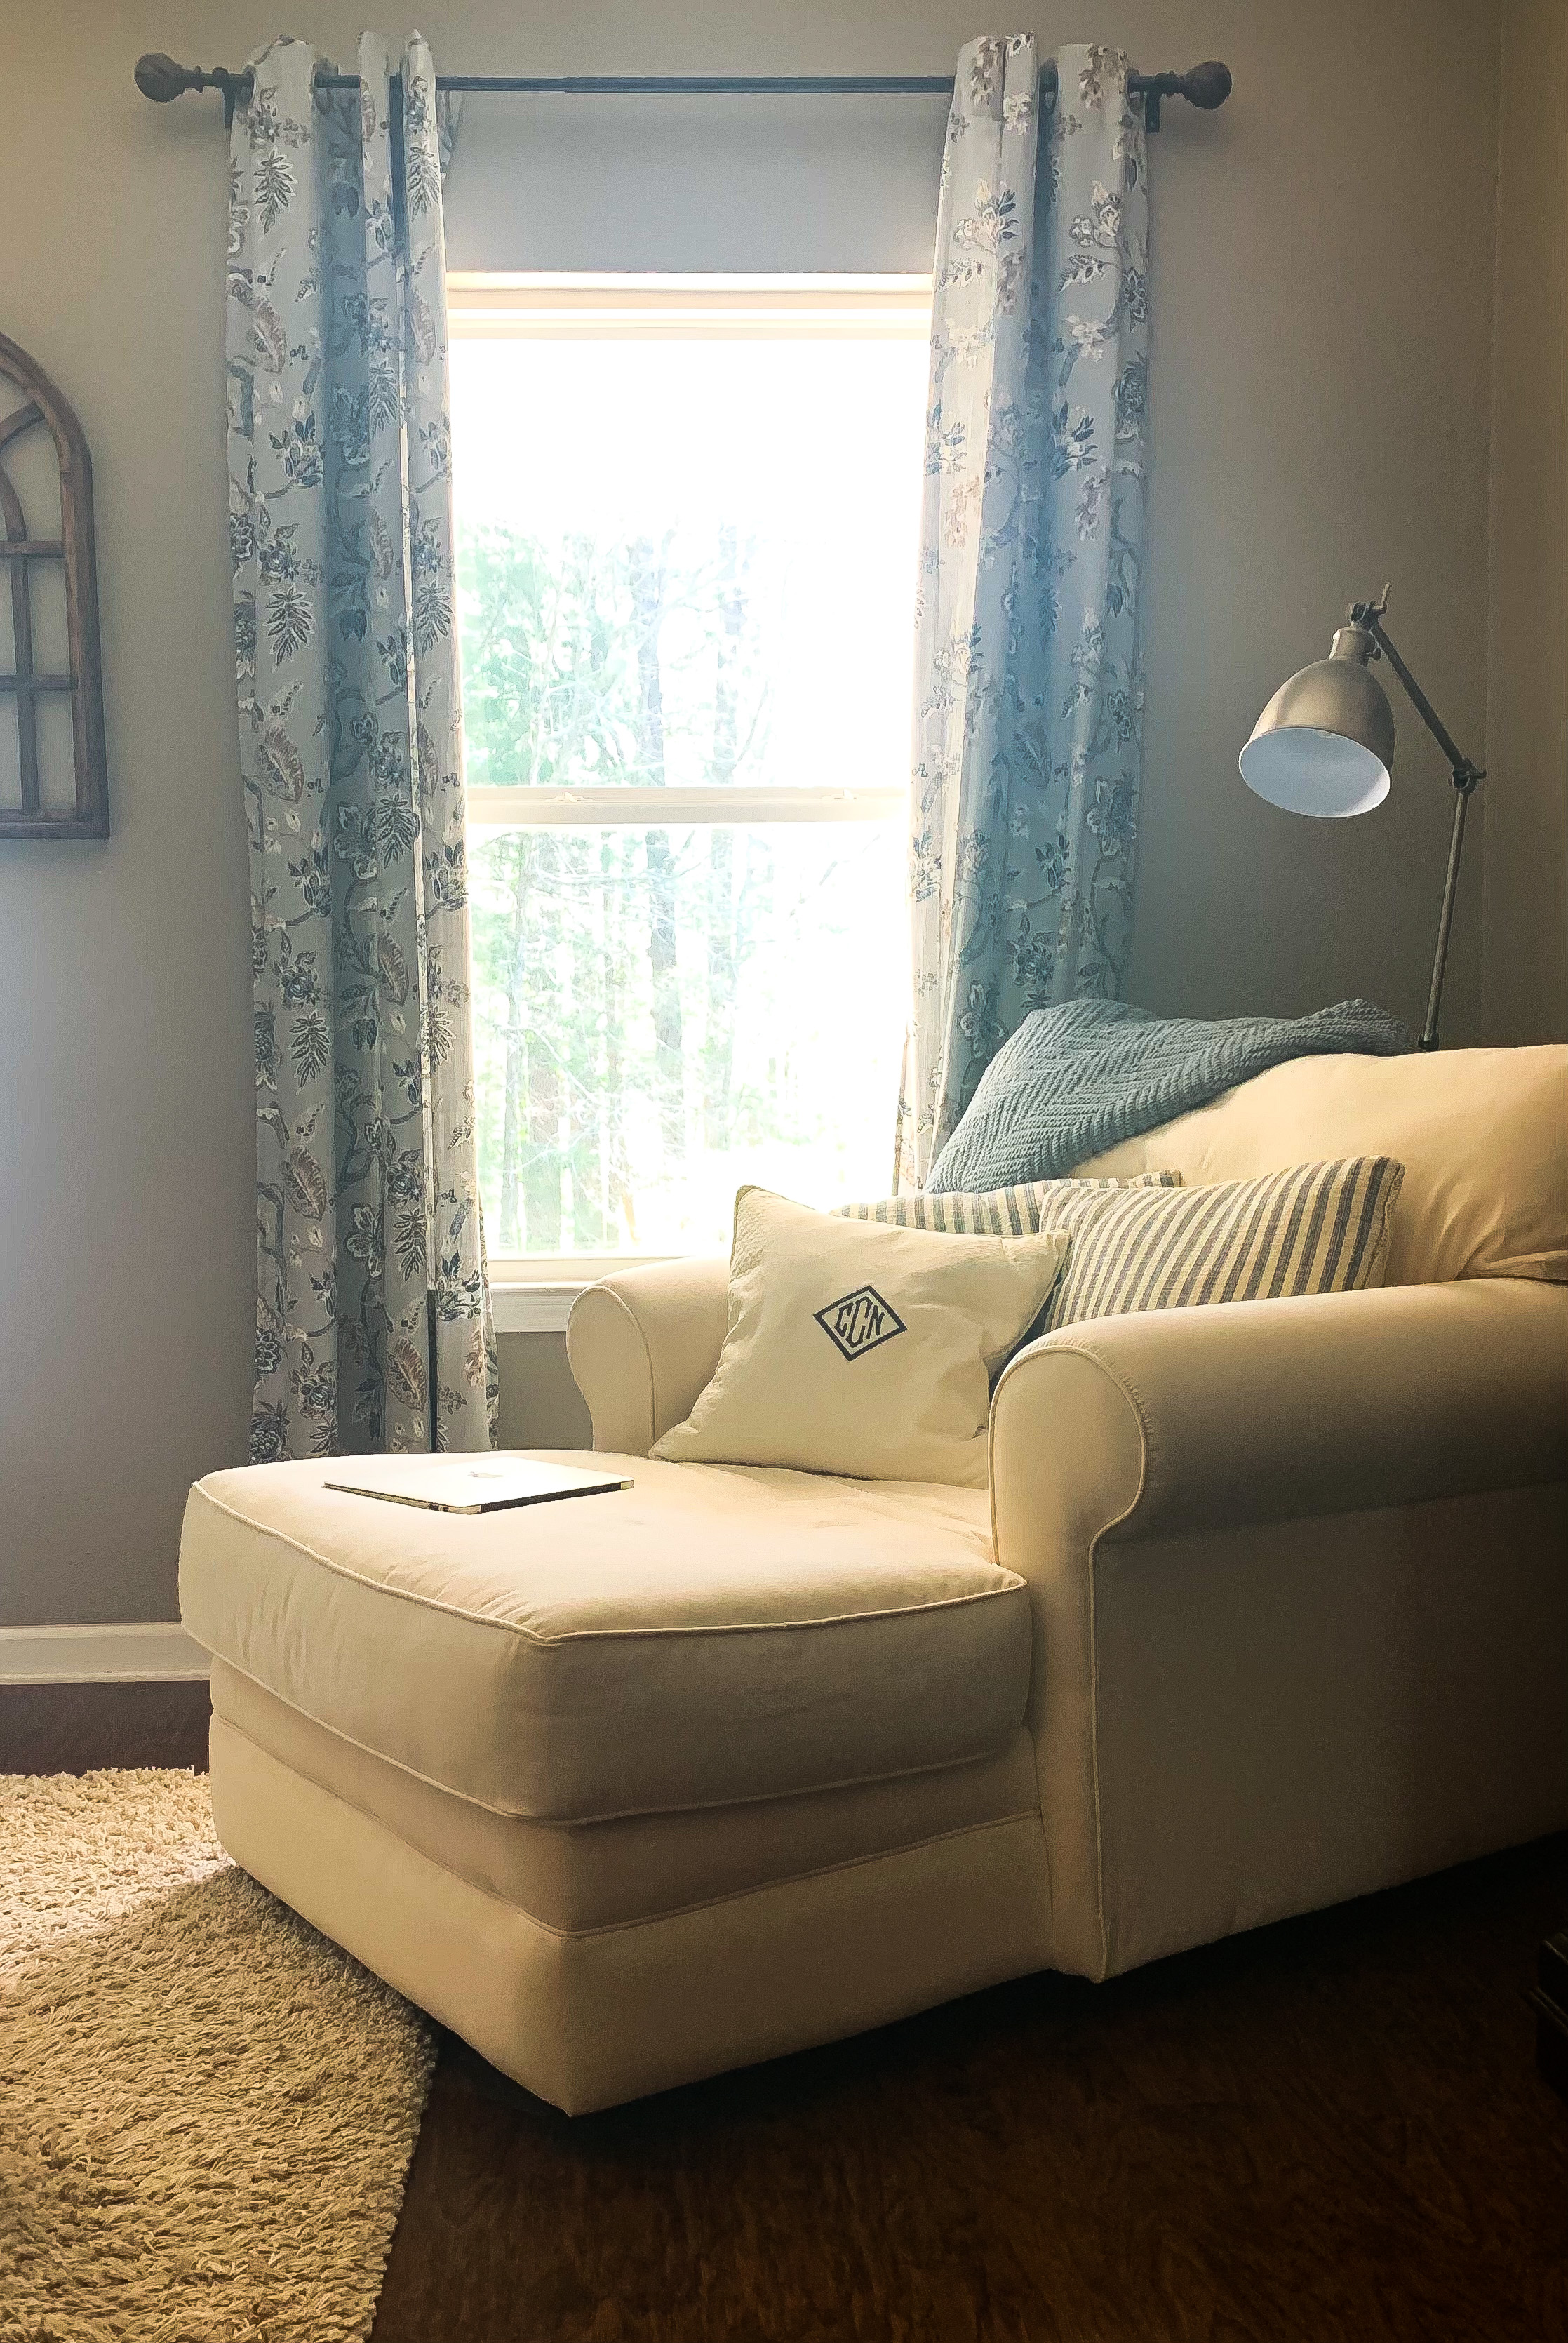
Notice the lack of curtains! Her color choices were navy blue and white, with a specific request for a white quilt. After shopping around, I found the perfect combination of bedding and curtains to create a cozy and beautiful space.

After

White quilt, khaki comforter, and navy blue Euro pillows – Target; navy blue curtains and curtain rods – Tuesday Morning; striped bolster pillow – Burke’s Outlet; navy blue and white floral shams and quilt – Kohl’s (on clearance!); wood and rattan bench – TJ Maxx

After

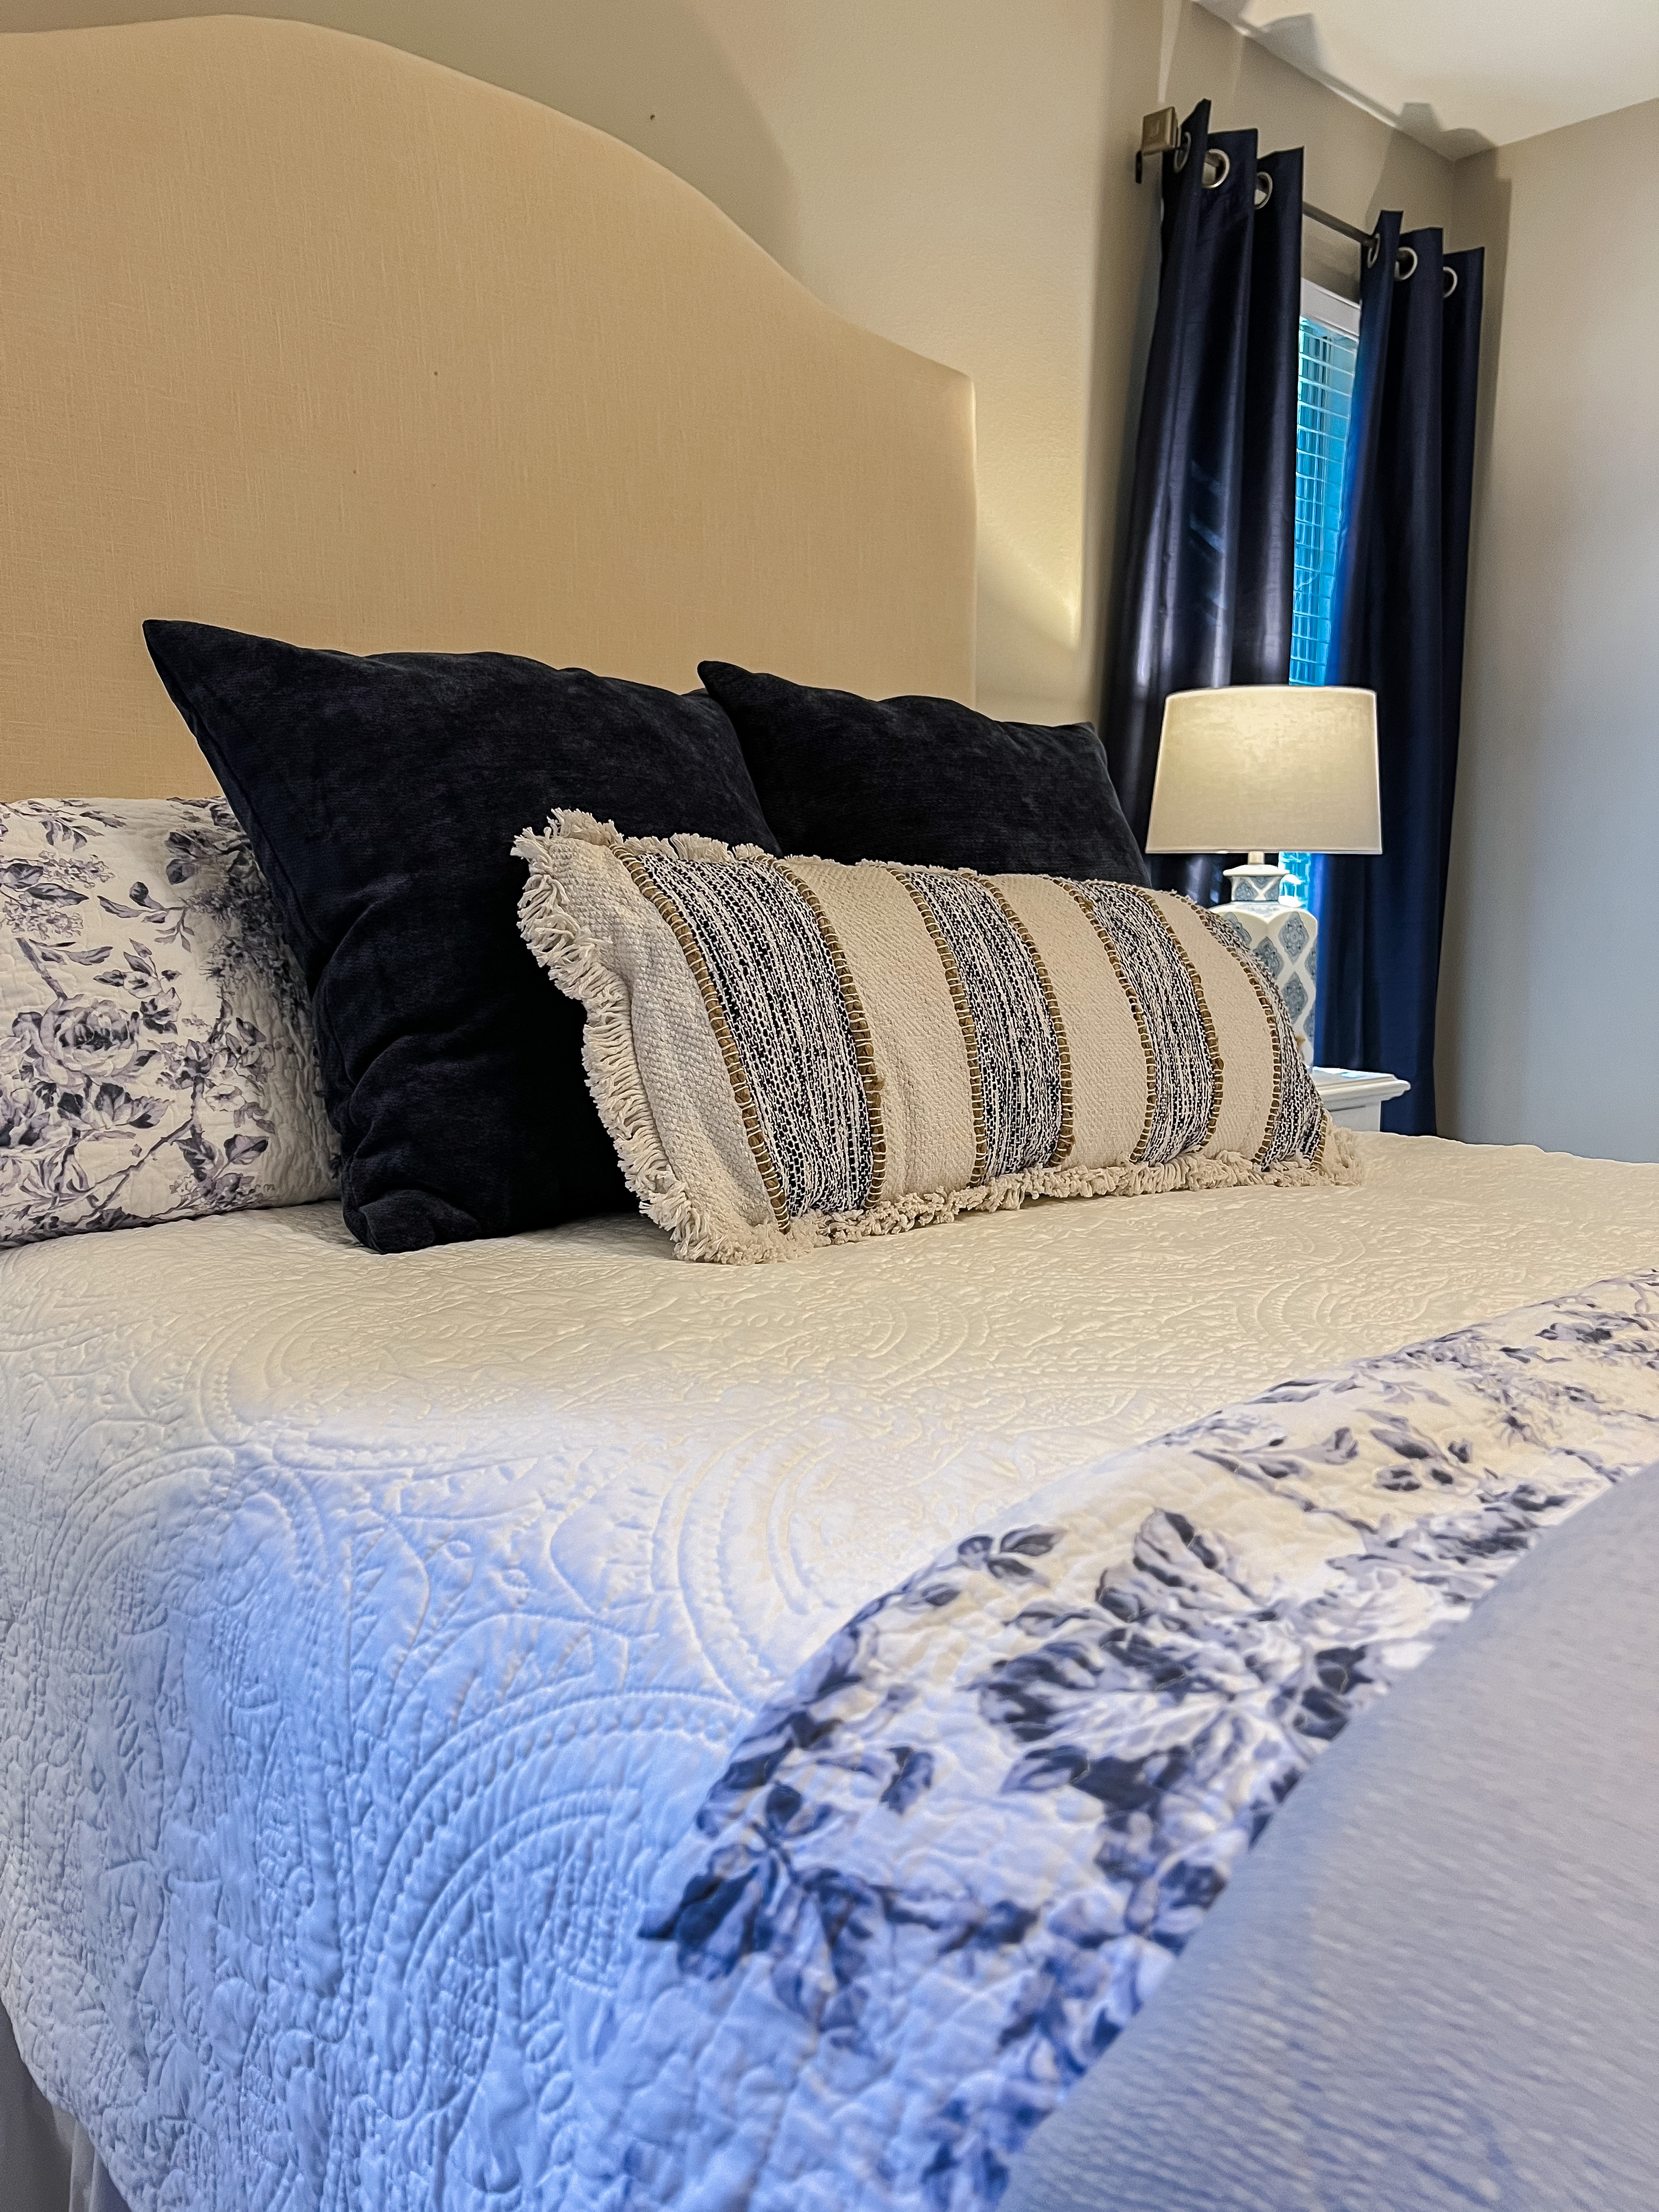
Layered bedding at the foot of the bed and layered pillows at the head of the bed make it seem more plush and inviting, and curtains make the room seem more cozy and put-together.

After

Last was the floor. The carpet was original to the house, and had several stains from over the years. I could not afford new flooring, but adding a rug with navy blue and cream in it not only covers the stains, but also anchors the room. (She is having the carpet replaced with wood flooring to match the rest of her house soon, and I can’t wait to see what everything looks like then!)

After

I painted the nightstands when I painted the dresser, and some matching navy blue accessories completed the space.

After

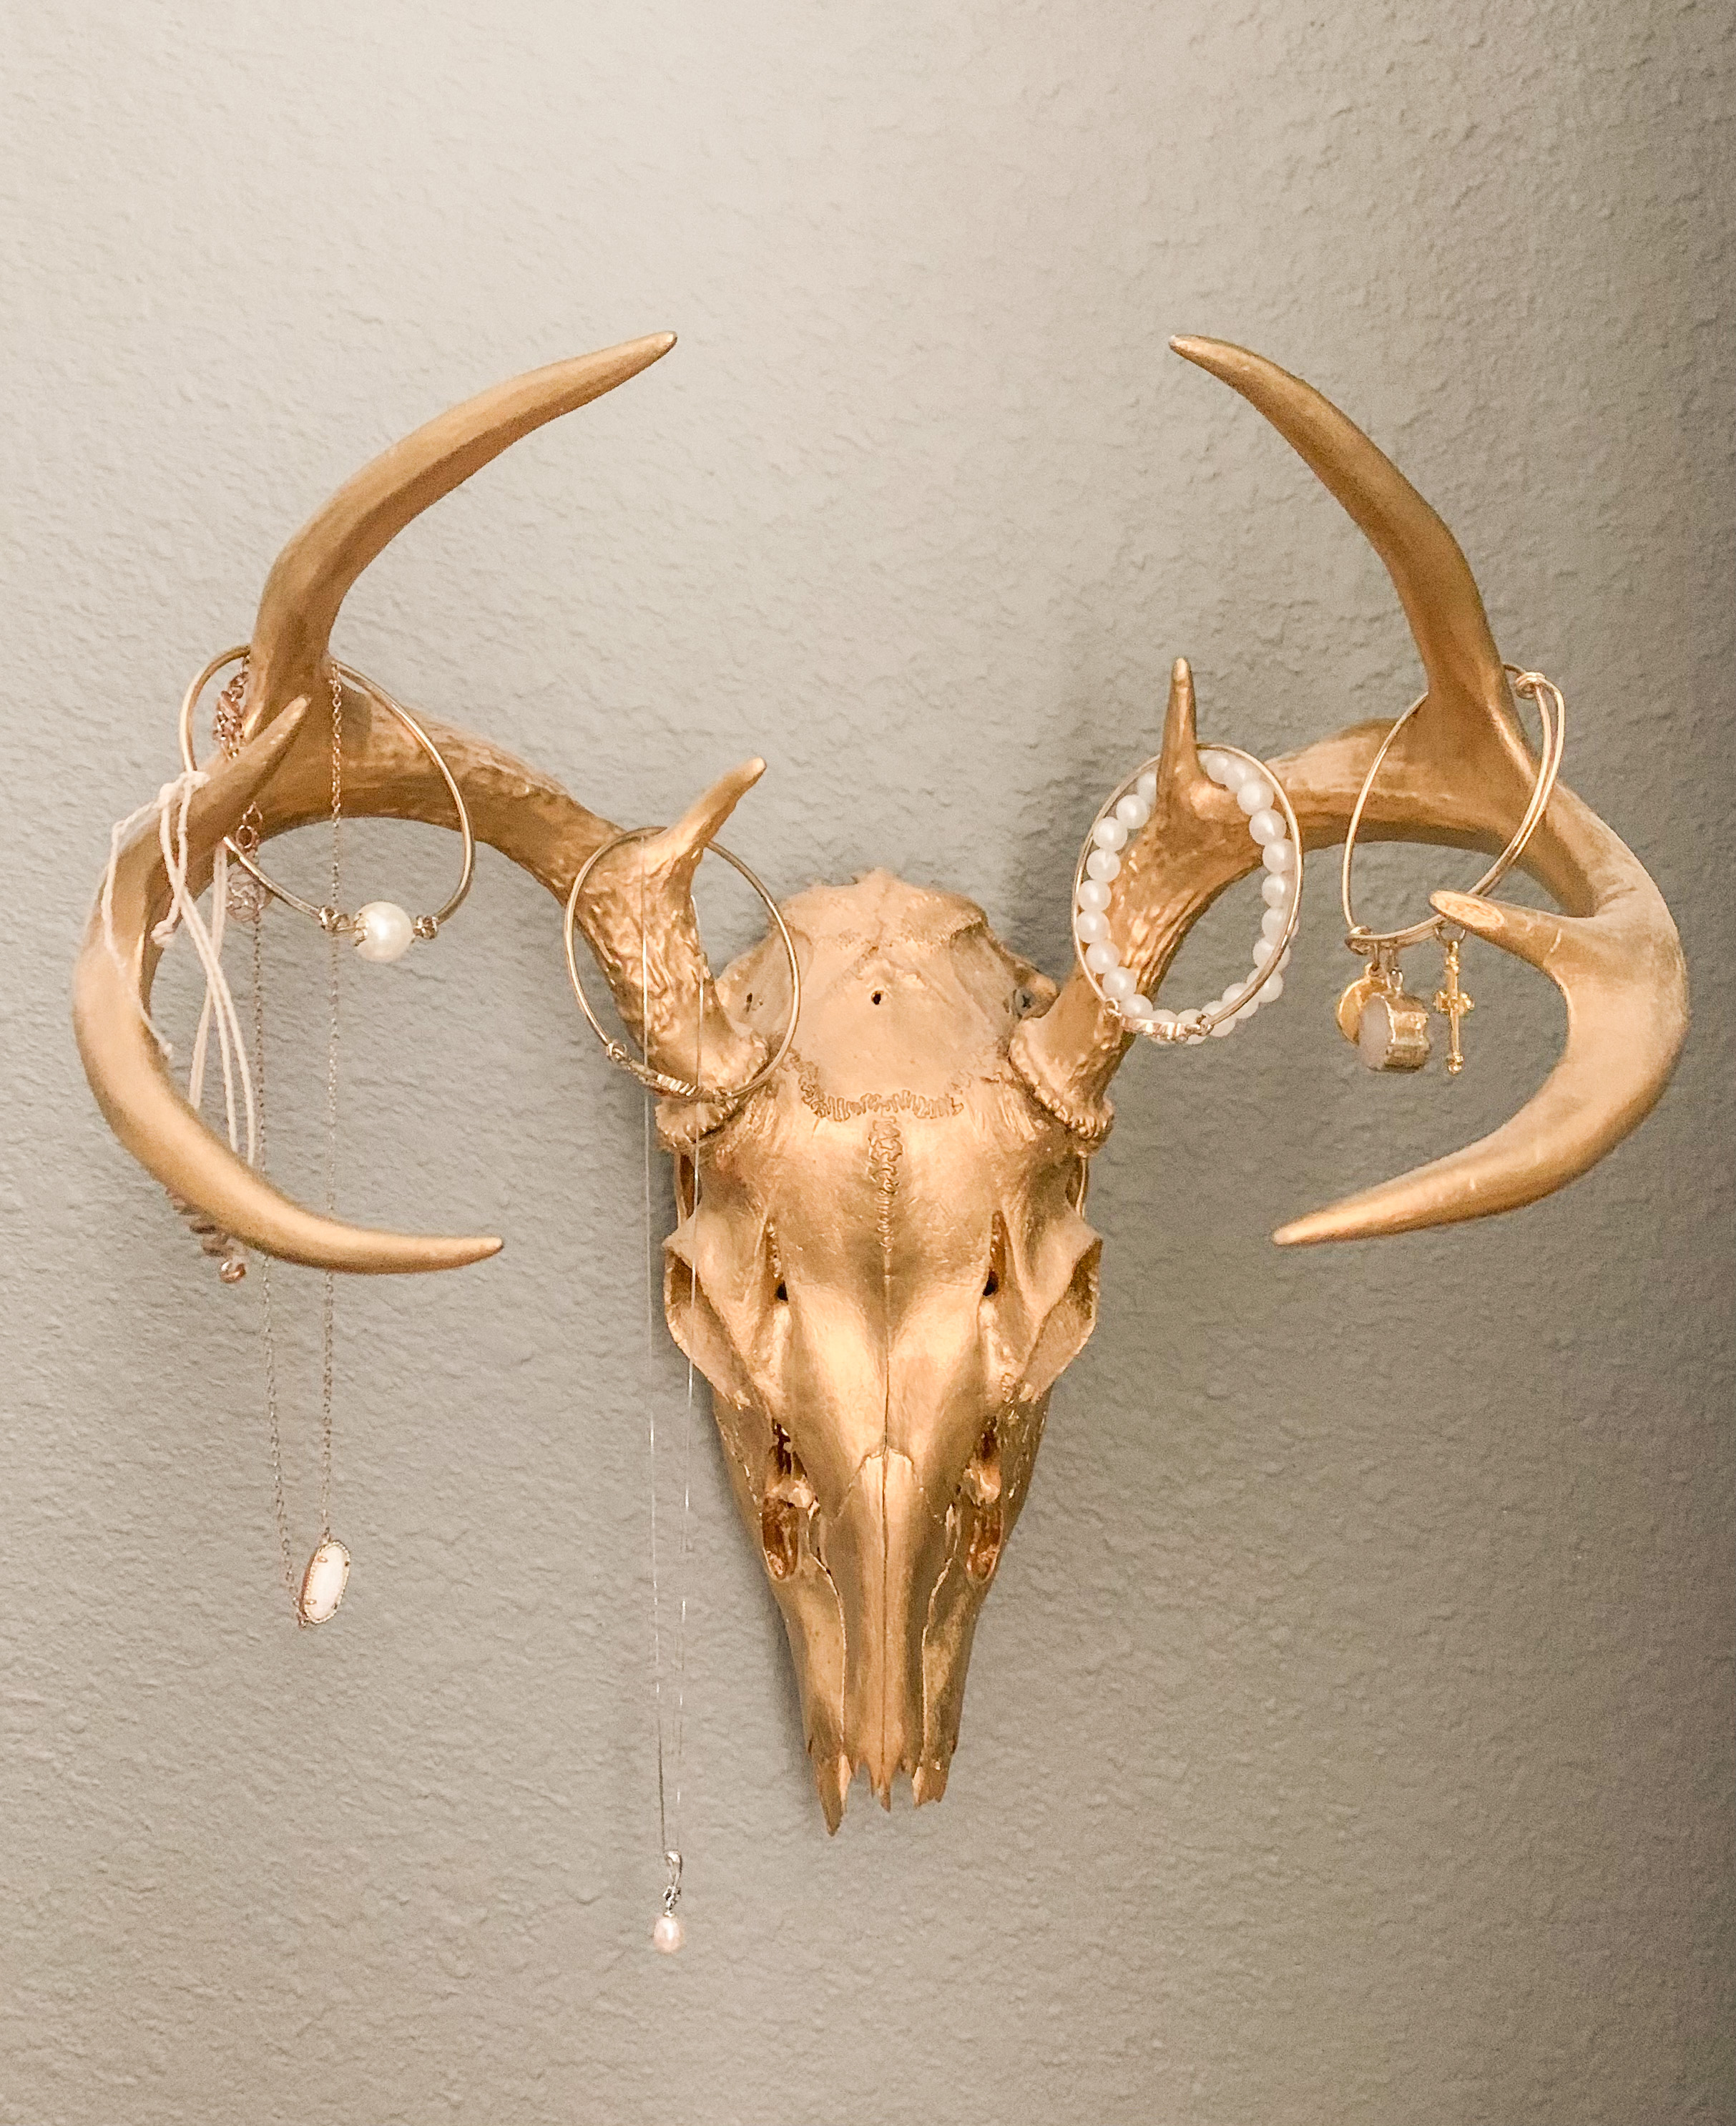
I was so excited to do this for our Mimi, and am so happy with how everything turned out! (Also, it was a nice change of pace not having to decorate around deer antlers!)

Thanks y’all!

-Nikki

Pork Chops with Caramelized Onions and Peppers

Looking for a quick and easy dinner that looks like you spent hours cooking? This is it! This cooks in one skillet in under 30 minutes, and it is so good! The onions and peppers have a sweet taste to them, and the pork chops are so juicy and flavorful.

Here’s what you’ll need:

  • 8 boneless pork chops
  • 1 onion
  • 1 bell pepper
  • 2 cloves garlic
  • 2 tbs olive oil
  • garlic salt and Tony’s
  • 1 tbs sugar
  • 1 tbs balsamic vinegar

Season pork chops with garlic salt and Tony’s (or whatever seasoning you’d like) and cook in large skillet coated in olive oil until they are done, about 5-6 minutes on each side.

Remove cooked pork chops to a serving plate and cover with foil to keep them warm. While meat is cooking, slice onion and bell pepper and mince garlic. Saute veggies in same skillet meat was in, stirring in the sugar, for a few minutes until onions start to turn brown.

Now stir in the balsamic vinegar and cook another minute or two, then pour caramelized veggies over pork chops. And that’s it!

It looks beautiful, it tastes amazing, and is perfect for a weeknight supper since it’s so quick and easy! If your kids are picky eaters and don’t like vegetables, just scrape the onions and peppers off theirs. My husband was really impressed with this dish, so I didn’t tell him how easy it was to make!

I hope your family enjoys this as much as mine did!

Thanks y’all!

-Nikki

Creamy Garlic Pesto Chicken

Do you ever get stuck in a cooking rut, feeling like you make the same thing for supper every week? I know I do, and this chicken recipe is a great way to change things up – it’s easy, it’s colorful, and most importantly, it’s delicious!

Baked chicken breasts covered in a creamy garlic pesto mixture and topped with cheese? Yes please!

Here’s what you’ll need:

  • 4 thin-sliced boneless/skinless chicken breasts (If you can’t find thin-sliced at your store, just cut them in half length-wise for a thinner piece of meat)
  • 8 oz cream cheese, softened (I used the 1/3-less-fat kind)
  • garlic basil pesto (If you have fresh basil then you can make your own, but since this Louisiana heat has fried my basil plants, I just bought a small jar from the store)
  • shredded parmesan cheese
  • shredded mozzarella cheese
  • garlic salt
  • black pepper

Start by preheating oven to 375 degrees. Then place chicken breasts in a single layer in a 13×9 greased baking dish, sprinkling them with garlic salt and black pepper.

Mix together about 1/3 cup of pesto with the softened cream cheese, then stir in a small handful of the parmesan cheese. Spread mixture over tops of chicken, then top with mozzarella cheese. (I used about 1/2 cup of mozzarella cheese because that’s all I had, but more cheese is absolutely fine!)

Bake at 375 for about 45 minutes, or until chicken is completely cooked through and cheese starts to brown. And that’s it! Super easy!

The cream cheese mixture will melt all around the chicken, so you can scoop up a little more to top chicken with when serving. You could also make some pasta as a side dish, and use the extra cream cheese sauce to toss with the pasta. (Garlic bread is also good dipped in the extra sauce!)

My family loved this dish, even the kids! I hope you and your family enjoy it as well!

Thanks y’all!

– Nikki

Decorating With Antler Sheds

Every year deer shed their antlers, and every year my husband shows up with more and more antler sheds he’s found in the woods while working.

Every now and then he even shows up with a whole deer skull. Yes, they are cool. Yes, it’s exciting to find them. But after so acquiring so many, I wonder what I’m supposed to do with them all?!?

So if you’re needing some tips on what to do with all of the antler sheds your husband brings home, here are a few things I’ve done with mine.

Of course the obvious thing is to just mix them in with your other decorations on bookshelves. We have them in our living room…

In our kitchen above the cabinets…

On top of our mantle…

We even have them in our bathroom…

You can also mix them in with other decorations, like I did on this wooden tray…

Another idea is to repurpose them so that they function as more than just “shelf filler.” Here is one attached to a drapery tie-back, creating a unique way to hold your curtains open.

If you are wanting to make them look more feminine, you can spray paint them…

I’ve even spray painted an entire deer skull gold to use in my daughter’s room as a unique way to display jewelry…

And when I STILL had too many antler sheds to know what to do with, I ended up just putting the extras in a wooden bowl as a centerpiece on my kitchen table!

While these antlers are out in my home year-round, you can also just save them for holiday decorating. They look good mixed in with pumpkins, pine cones, acorns, greenery, etc. during the holidays.

My sister and I even add them in with our regular ornaments on our Christmas trees.

I hope this has given you some ideas on what to do with your antler sheds, or even inspired you to take a walk through the woods and see if you can find some of your own! It really is like going on a treasure hunt!

Thanks y’all!

-Nikki

Ballpark Fajita Bowls

We were in Lafayette, Louisiana last weekend for my son’s baseball tournament, and the concession stand there was serving these chicken fajita bowls that were amazing! They were so good that I tried to recreate them at home. My version isn’t exactly the same, but it’s pretty close!

It’s basically just grilled fajita chicken with a few veggies mixed in over rice, then topped with cheese and creole sauce. The sauce they used had a sweet flavor, so I decided to use Yum-Yum Sauce on mine, like the sauce at a Japanese restaurant. I was even able to find a “light” version of the sauce at my grocery store! I served mine over cauliflower rice since I’m on a diet, and served the rest of my family’s over regular white rice. We all loved it!

I’m all about saving some time, so I bought pre-cooked grilled fajita chicken, a jar of fire-roasted red peppers, and a bag of frozen sweet corn.

Here’s what you’ll need:

  • 1 bag pre-cooked grilled fajita chicken, cut into bite-sized pieces
  • 1 can black beans, drained and rinsed
  • 1 jar fire-roasted red peppers
  • 1 bag frozen sweet corn (or fresh sweet corn cut off the cob)
  • olive oil
  • Yum-Yum sauce
  • shredded cheese
  • cooked rice (or cauliflower rice)

*You can use any vegetables you’d like (jalapeños, onions, green onions…) – These were just the ones the ballpark used.*

While the rice is cooking, heat 1-2 tbs olive oil in a large skillet. When the oil is hot, add in the chicken and vegetables, then toss around for a few minutes until everything is heated through.

Top cooked rice with the chicken and veggies, then top with shredded cheese immediately so it can melt. Once cheese melts, drizzle with the sauce. And that’s it!

So easy and so delicious! This literally took me less than 30 minutes to make. The longest step was just cooking the rice. And it’s also really pretty with all the different colors!

The coolness and sweetness of the sauce makes this a perfect summer meal, even though the rest of the dish is hot. I hope you and your family enjoy this as much as we did!

Thanks y’all!

-Nikki

Spring Home Refresh

Everyone knows about Spring cleaning, but what about Spring “refreshing?” To me, Spring is a season for new beginnings, and “refreshing” your home while Spring cleaning is a great way to boost your mood and get you excited about a new season. While you’re doing your Spring cleaning, get rid of clutter and anything on your shelves, walls, etc. that doesn’t excite you anymore. You can spend just a little bit of money on small stuff to “refresh” your home, and make you feel like you have a whole new place to come home to at the end of the day. And if money is tight, try just rearranging some furniture or things on shelves and walls for a new feel. Walking into a clean, “refreshed” home after a long day at work can inspire you and make you truly appreciate what you have.

One of my pet peeves is clutter on kitchen counters. I have a small kitchen, so if I have a ton of stuff on my counters, then I don’t have much of a work space when I’m cooking. One way to decrease clutter is to group things onto a tray or riser. This also makes cleaning your counters much easier, because you don’t have a bunch of little things to clean around and under.

** Wooden riser – T.J. Maxx, $12.99

This picture of my kids makes me smile while I’m cooking or cleaning up, and this little bird has special meaning as well. Trying to clean around little things like these is much easier when they are together on this riser, and it also looks less cluttered.

Another place in my home that was very cluttered and not very pretty was the entry table at our back door. We don’t have a true foyer or entry area, so this console table at the back door was a catch-all for mail, keys, and lots of other junk. I also had a huge clock hanging above it, which made the console table look small and even more cluttered. This is the first area we see when coming home through the back door, so walking into a cluttered area after a long day at work wasn’t very relaxing or inviting.

To “refresh” this entry space, I swapped out the big clock for a mirror, making the space appear a little larger, and utilized the drawers in the console table for all of our junk.

**Round wooden mirror – Target, $59.99

Now we walk into a clean, simple area when arriving home, which makes us even happier to be home at the end of the day. And the mirror reflects light from outside, making it brighter and more cheerful inside. This entry space is also right off our kitchen, so the shelf is a perfect spot to store cookbooks for easy access.

Besides kitchen counters, bathroom counters are notorious for being cluttered and unorganized. Some bathrooms have a ton of drawer and cabinet space to hide everything, but not ours. To help with storage in our bathroom, I found a small wooden box at a local antique store to keep my lotions, perfumes, etc. inside. They are still on my counter for easy access, but tucked away in a cute little box. Having all those bottles inside the box makes cleaning the counter much easier as well.

**Abstract painting – Hobby Lobby, $29.99; Hanging towels – World Market, $6.99-$12.99; Light fixture globes – Lowe’s, $6.99 each

Our light fixtures above the mirror were also outdated, and rather than spend a fortune on new light fixtures, I just bought new glass domes for the existing fixtures. The previous domes were frosted glass with a fluted shape, and these clear, plain ones have a cleaner, more modern look. They also put out more light than the frosted ones did.

Another spot in my bathroom that was cluttered and hard to clean was the linen cabinet/shelves. For some reason, I guess I thought I had to have every inch of every shelf filled with something. Getting rid of some things on the shelves helped not only with cleaning, but also with making the room feel a little bigger.

**Bracelet holder – Target, $12.99; Wooden tray – Amazon, $4.99

The last room I’ve “refreshed” so far is our master bedroom. It was already pretty clutter-free, but the bedding we had was a darker color, making the room feel smaller and not very “Spring-like.” We had a paisley print Pottery Barn bedding set since we got married almost 15 years ago, and while it was still in very good shape, it was time for a “refresh!”

If I was going to get a new bedding set, I was NOT going to get another duvet cover! They are beautiful and more expensive and all, but they sure are hard work when making the bed! I even had the clips in ours that are supposed to hold the duvet cover in place over the down comforter, but it would still slip down and get out of whack.

I looked online and in stores for WEEKS, and every comforter set I found in my price range was super busy-looking, with a ton of pattern and color. I was looking for something simple, lighter-colored, and super comfortable. Just when I had given up hope I found this one at Target! This is the softest comforter I’ve ever felt, with the material feeling like an old t-shirt. It’s also thick enough to give it some “pouf,” but not heavy so it doesn’t suffocate you on warm nights.

It’s an off-white color with light blue stripes, and a cognac-brown color trim. The lighter color makes the room feel larger, and the simplicity of the pattern makes it feel calm and relaxing when you walk into the room. And did I mention how soft it is?!?

**King comforter set with pillow shams – Target, $89.99; Faux leather pillow covers – Amazon, $9.99 each; Lumbar pillow – World Market, $14.99

Another reason I chose this bedding (besides how soft it is!) is because of the blue stripes. I already had the blue color in our bedroom with curtains and throw pillows/blanket on my reading chair, so it tied in perfectly without having to change out other colors.

**Curtains – Bed Bath & Beyond; Reading lamp -Target; Monogrammed throw pillow – Ballard Designs (I’ve had all of this so long that I don’t remember prices, sorry!)

So for around $200-$300, I was able to “refresh” my house and make it feel like a whole new space. Some people think you have to paint walls, buy new furniture, or replace countertops to make a space feel new and different, but just a little decluttering can accomplish the same feeling.

So when you’re doing your Spring cleaning this year, try rearranging some things. Try donating or selling some things that don’t inspire you anymore to make room for something new that does. Try decluttering countertops to make cleaning easier and give you a calmer feeling when you walk into the room. Your home should be a relaxing place that you love coming home to at the end of the day!

Thanks y’all!

-Nikki

Cub Potatoes

My husband and kids would eat potatoes with every meal if they had a choice, so I try to change things up every once in a while in how I cook them. Of course there’s the usual mashed potatoes and baked potatoes, and if I’m feeling extra fancy I’ll make scalloped potatoes, but these “Cub” potatoes are my favorite.

There’s a hole-in-the-wall restaurant and bar in Shreveport, Louisiana called The Cub, and this recipe is my take on potatoes they serve there. Of course mine aren’t quite as good as theirs, but they are close enough!

Covered in butter and pepper jack cheese, these potatoes have just the right amount of kick, and melt in your mouth!

Here’s what you’ll need:

  • 4 baking potatoes
  • 4 oz pepper jack cheese
  • 1/2 stick butter
  • salt and pepper to taste

Start by peeling the potatoes, then cut them into bite-size pieces and boil until tender. While the potatoes are boiling, grate the cheese. (You can buy the pre-shredded pepper jack, but the block that you grate yourself seems to melt easier and taste better to me!) Next cut the butter into small pieces, or if you have time, you can put it in the freezer until it hardens enough to grate it into small pieces. Combine the butter pieces and the grated cheese in a bowl and set aside.

When the potatoes are finished cooking, drain them and transfer to a greased baking dish. Sprinkle with salt and pepper, then top with the butter and cheese mixture. Bake at 350 degrees for about 15 to 20 minutes, or until cheese is melted and bubbly.

You could also put these in individual gratin dishes and broil for more color on top, and you can also add more cheese if you’d like.

So if your family is like mine and wants potatoes with everything, then here is a different way to try them! I hope your family loves them as much as mine does!

Thanks y’all!

-Nikki

The Forgotten

Imagine you are an 81 year old woman, widowed, living alone, diagnosed with COVID-19. Your children and grandchildren either live out of state, or are too afraid to come visit you because they don’t want to get sick too. You are weak from coughing, running fever, and not being able to eat very much. You can barely walk from your bed to the bathroom or kitchen because you are so weak, and you are terrified you are going to fall and not be able to call for help. You’ve been to the emergency room twice, hoping to be admitted to the hospital just so you know you are safe and not alone, but you “just aren’t quite sick enough.” Not only are you physically ill, but you are depressed now too because of your fear and isolation.

These are the patients we take care of as home health nurses. For many of these patients, we are the only physical contact they have with the outside world. When it’s time for us to leave so we can get to our next patient, we see the loneliness in their faces and feel guilty about having to leave them. We see their faces when we go to bed at night, we pray for them, and we look forward to our next visit just as much as they do.

I am in no way trying to take away from the COVID patients in hospitals fighting for their lives, with no family allowed in their hospital rooms, or from the nurses, doctors, respiratory therapists, aides and others working in a hospital or nursing home setting. I have worked in hospitals as well and have great appreciation for all hospital staff, especially the housekeepers who make sure everything is sanitized and safe. But these “forgotten” COVID patients, and the home health and hospice staff that take care of them, have really been weighing on my heart lately.

I don’t see home health and hospice in the news. We had issues getting enough PPE in the beginning as well. We are risking our health and the health of our families as well. We are stressed, we are tired, we are worried, we occasionally cry on the drive home. We did not get offered the vaccine when the hospitals and nursing homes did, and many of us still haven’t been able to get vaccinated. Yet we continue to expose ourselves, because this is what our calling is, and we can’t imagine having a career in anything else.

So tonight when you say your prayers, please say a prayer for the 81 year old woman living alone, sick with COVID, and scared of what is going to happen to her. Please say a prayer for the home health and hospice nurses, therapists and aides taking care of these “forgotten” patients, the ones you don’t see on the news or on your Facebook feed. And please say a prayer that we can return to some kind of normalcy soon, with families being able to visit each other, and medical personnel being able to hold a sick patient’s hand without gloves on.

Black & White Torte

Want to “wow” everyone this holiday season with your kitchen skills? Then volunteer to bring dessert and and make this elegant marbled torte! Swirls of white chocolate and milk chocolate in an Oreo crust taste amazing, and the marbled dessert top looks like a piece of art!

What is a torte? It’s just a fancy European word for thin cake. Tortes are usually much heavier in both texture and taste than a regular cake. Tortes are baked in a springform pan (or a special torte pan) so they can be removed easily for display on a cake stand or tray.

Here’s what you’ll need:

  • 1 package Oreo cookies
  • 1 stick butter
  • 2 sticks unsalted butter
  • 1 bar white chocolate (I think they are 4 oz each)
  • 1 bar semisweet regular milk chocolate (or you could use semisweet dark chocolate for an even richer look and taste)
  • 1 pint heavy whipping cream
  • 6 eggs
  • 3/4 cup flour
  • 1-3/4 cup packed brown sugar

Start by melting the stick of regular butter in a small pot on stove, and crushing Oreos in food processor until they are finely ground.

Mix the melted butter with the crushed Oreos and pat into the pan to form the crust.

Put crust in refrigerator to chill while you are making the filling.

In two separate pots, make the white and regular chocolate fillings by melting each bar on low heat with 6 tbs unsalted butter and 1/4 heavy cream. While the chocolate is melting, beat the eggs, flour and brown sugar until smooth.

Once chocolates are melted, add in half of the brown sugar mixture to each pot and stir until smooth. Pour both chocolate mixtures into chilled Oreo crust and swirl with a knife to create the marbled look.

Bake at 375 for 30-45 minutes, depending on what size pan you are using, until center is set. (Longer cooking time for smaller, deeper pan and shorter cooking time for larger, more shallow pan.)

Allow to cool before removing sides of springform or torte pan, or it will fall apart.

The top of the torte will have a slight crunch to it, and under that will be slightly gooey, like a freshly-baked cookie.

Not only does this torte look elegant, but it tastes amazing – the perfect holiday dessert! And even though it does dirty up several dishes to prepare, it really isn’t complicated at all.

Thanks y’all!

– Nikki

Smothered Skillet Pork Chops

Looking for something fancy to cook for supper tonight? These smothered pork chops are not only delicious, but your family will think you were in the kitchen for hours cooking them! They actually only take about 30 minutes, and with all the colors in the sauce from the vegetables, they look as good as they taste!

Here’s what you’ll need:

  • 4 bone-in pork chops, 1-inch thick
  • 1 yellow onion, chopped
  • 1 red bell pepper, chopped
  • 3 stalks celery, chopped
  • 3 garlic cloves, minced
  • 4 green onions, chopped
  • fresh thyme (I used about 5 sprigs)
  • 3 tbs flour
  • 2 tbs butter
  • 2 tbs olive oil
  • 2 cups chicken stock
  • 1/4 cup heavy cream
  • 1 tsp hot sauce
  • salt and pepper
  • large skillet with a lid

Season the pork chops with salt and pepper, then brown in olive oil in large skillet about 3 minutes per side, then remove them to a plate. They will finish cooking later in the sauce.

While the pork chops are browning, you can chop up the vegetables.

In the same skillet the meat was in, melt the butter, then add in the onion, bell pepper, celery and garlic. Add a little more salt and pepper and cook vegetables a few minutes until they are tender.

Now stir in the flour and let it cook about a minute, then stir in the chicken stock. While that is coming to a simmer, add in the fresh thyme.

You can either put the whole sprigs of thyme in, and let the leafy parts cook off and remove the actual stem later, or you can just run your fingers down the stem and the little leaves will come right off – there’s no need to chop it. It will have a lemon-like smell to it.

It’s already colorful and smelling yummy! Once the sauce is simmering and starting to thicken up, add the pork chops back in, reduce heat to low, and put the lid on. Cook meat about 10 minutes in sauce, then flip them over and cook another 10 minutes.

Now take the pork chops out one more time, and stir in the hot sauce, heavy cream and chopped green onions to finish the sauce. Add meat back to skillet and you’re done!

You can serve them over rice, mashed potatoes, grits… the sauce would be so good over pretty much anything. I served mine over angel hair pasta.

So pretty, so delicious, and so easy! (Even though your family will think it took you hours!) And only one skillet to clean up! I hope y’all enjoy these pork chops as much as we did!

Thanks y’all!

– Nikki