Crescent Sausage Casserole

My husband came home from the deer camp last week bragging about this casserole that another hunter’s wife had sent, insisting that I try it. So he got the recipe for me, and he was right – it is amazing!

crescentsausagecasseroleblog 006

With only four ingredients, it is super easy to make. The kids loved it, and it even made enough to have two nights in a row.

Here’s what you’ll need:

  • 2 lbs ground sausage (1 lb spicy plus 1 lb regular)
  • 12 oz cream cheese (1 1/2 blocks)
  • green onions, chopped (I used about 3 bunches)
  • 2 pkgs crescent dough sheets (If you can’t find the sheets, just use crescent rolls and pinch the seams together)

Start by browning your sausage in a large skillet until it is fully cooked. Combining the spicy and regular sausage gives this meal the perfect flavor for both kids and adults. While the sausage is cooking, preheat your oven to 365 degrees and spray a 13×9 casserole dish with cooking spray.

After the sausage is completely cooked, stir in the cream cheese until it melts (I used the 1/3-less-fat kind and it still tasted great), then stir in the green onions. Spread out the first package of crescent dough in the bottom of your greased casserole dish. Spread the sausage mixture on top of the dough, then place the second sheet of dough on top to cover completely. Bake at 365 for 20-30 minutes, until the crescent dough begins to brown.

crescentsausagecasseroleblog 003

(I actually baked the bottom crescent layer by itself for about 8 minutes before adding the sausage mixture and it came out perfect. I was worried the bottom layer would come out soggy if I didn’t.)

I suggested to my husband adding shredded cheddar or pepper-jack cheese to the sausage mixture, or even some other vegetables, because it just sounded so plain. He told me to trust him about how good it was with just these few ingredients, and I’m glad I did – it was amazing!

crescentsausagecasseroleblog 005

We had this for supper, but it would also be perfect for breakfast or brunch. I hope y’all enjoy this as much as we did! And thank you to whoever gave my husband this recipe!

Thanks y’all!

– Nikki


Easy Crock Pot Deer Steaks

crockpotdeersteak 009

This time of year we have a freezer full of deer meat, so deer steaks are on the menu almost weekly. Fried deer steaks are wonderful, but messy to cook and not very healthy. Grilled deer steaks are amazing, but not when you have to grill them in below-freezing weather outside. In comes the good old crock pot to save the day…

crockpotdeersteak 007

I’ve had this same crock pot for almost twenty years! It’s got some scratches and burnt-on food on the outside, and it’s not very fancy, but it has never let me down. My family has enjoyed countless meals from this miracle of a machine, including this deer steak recipe.

The deer steaks cook all day in the crock pot, but there’s a small amount of preparation first – if you were to just throw the meat in there with some water and seasonings, you would basically just be boiling the meat, and that doesn’t sound very appetizing. I like to brown my steaks a little bit in a skillet first, giving them some color and locking in their flavor.

Start by tossing your steaks around in a bowl with whatever seasoning you want – I used Tony’s seasoning, garlic salt, and Worcestershire sauce – along with a couple spoonfuls of flour.

crockpotdeersteak 001

The little bit of flour will give the meat some texture when browning it, but not a thick breading like when frying it.

crockpotdeersteak 003

In a skillet barely coated with oil, brown the seasoned steaks in batches just enough to give them some color, about a minute on each side. You don’t want to cook them all the way, just sear the outsides. They will finish cooking in the crock pot.

crockpotdeersteak 004

Add each batch to your crock pot until you’ve browned them all, saving the leftover pan drippings to make your gravy.

In the same skillet, add a spoonful of flour and whisk into the leftover oil. Once the flour is completely combined, slowly whisk in hot water (I used about 3 cups) to start the gravy. Be sure the water is hot – cold water will not whisk in as easily and your gravy will be lumpy. (You can also use chicken or beef stock to give it more flavor, but I didn’t have any on hand.)

Now for the secret ingredient – onion soup mix!

crockpotdeersteak 002

Whisk in a packet of this and your plain old gravy will instantly turn a beautiful brown color and make your kitchen smell amazing! Now pour your gravy over the deer steaks and let the crock pot work its magic!

crockpotdeersteak 008

I cooked mine on low for about 8 hours, and the house smelled amazing all day.

crockpotdeersteak 012

I served mine over rice this time, but you can also serve them over mashed potatoes, cheese grits, white beans, or anything else you can think of.

crockpotdeersteak 011

They are so tender from cooking all day, so flavorful from the onion soup mix, and have a beautiful color from browning them first.

Thanks y’all!

– Nikki


Sausage Pasta with Cheese

sausagecheesepastablog 012

This pasta uses ground sausage and LOTS of cheese, perfect for cold winter nights! (Or if you live in Louisiana, warm and muggy winter nights!) The kids loved it as well, and didn’t even notice that it had vegetables in it because of all the cheese! There is no baking involved – everything goes in one big skillet – so it is super easy to make.

Here’s what you’ll need…

  • 1 lb ground sausage (I used deer sausage)
  • 1 box pasta (I used penne, but any kind will work)
  • 1/2 onion, chopped
  • 1 bell pepper, chopped
  • 3 cloves garlic, minced
  • 1 jar marinara sauce
  • salt and pepper
  • crushed red pepper flakes
  • parsley
  • cream cheese (1/2 block, or 4 oz)
  • shredded mozzarella cheese
  • shredded parmesan cheese

Start by boiling your pasta, then drain it and set aside. While the pasta is boiling, start browning the ground sausage in a large skillet. (You want to use the biggest skillet you have, because everything will end up in there, including the cooked pasta.)

Once the sausage is cooked through, move it to one side of the pan and add the onion, bell pepper and garlic to the other side. If your sausage did not make enough grease to cook vegetables in, you may have to add a little butter or oil for them. (I used deer sausage, which is very lean, so I had very little grease from it. I used about 1 tbs olive oil for my vegetables.) Season vegetables with salt and pepper while they cook.

Once the vegetables are tender, add the jar of marinara sauce and a pinch of crushed red pepper flakes, and stir everything together until it is well combined. Next melt in the cream cheese – this will turn the sauce from a red color to a dark pink color, and will make it thick and creamy. Once the cream cheese is completely blended in, add in the cooked pasta and toss it all together so that all pasta is completely coated with sauce.

Cover entire top of pasta with mozzarella cheese (I used a small bag of pre-shredded) and a handful of parmesan cheese, then turn heat off. Put a lid on the skillet for about 5-10 minutes, and the heat will melt the cheese on top.

sausagecheesepastablog 010

Once the cheese is melted, sprinkle a little parsley on top to make it pretty, and that’s it! The sauce is thick, so between that and the melted cheese, it tastes like something that has been baking for a while. No one has to know you only used one pan!

sausagecheesepastablog 011

The vegetables disappear under all the cheese, so the kids aren’t questioning what all is in there before they take a bite. And since everything goes in one big skillet, there are less dishes to wash. I hope your family enjoys this as much as mine did!

sausagecheesepastablog 012

Thanks y’all!

– Nikki


Easy Crock Pot Chicken Thighs

If you’re looking for a new chicken recipe that is easy, cheap, and full of flavor, then here it is! Using only a handful of ingredients, this chicken is SO flavorful and could not be easier to make. You literally just dump everything in the crock pot and walk away, and it turns out gorgeous and delicious.

pesto chicken blog 063

Here’s what you’ll need:

  • 8 boneless/skinless chicken thighs
  • 1 small jar pesto (I used basil pesto, 8 oz)
  • 1 packet Hidden Valley ranch dressing mix
  • 1 cup chicken stock
  • salt and pepper to taste

You can use boneless/skinless chicken breasts instead, but the thighs have a richer flavor with the darker meat, and I feel like they pair better with the pesto flavor. (Plus they are cheaper!)

If you’re unfamiliar with pesto, it’s basically a mixture of herbs (I used the basil flavor), garlic and olive oil. It can be found in your grocery store by the jarred pasta sauces.

All you do is place the chicken in a single layer on the bottom of the crock pot, then mix the remaining ingredients together and pour on top. That’s it!

pesto chicken blog 062

Cook on low 6-8 hours, and the chicken comes out with beautiful coloring and lots of flavor. (If you are a fan of the show “This Is Us,” then you know I checked my crock pot throughout the day! But there is no need to stir it or check on it while it cooks.)

pesto chicken blog 064

When it’s done cooking, the chicken will be tender enough to cut with a fork, and really impressive looking even though it was so easy to make. I hope your family enjoys this dish as much as mine did!

Thanks y’all!

  – Nikki

Ashley’s Baby Shower

showerblog-mrpstees-bathroomblog 038

As an almost-40-year-old woman living in the South, I’m a little embarrassed to admit I’ve never hosted a baby shower. So when I decided to give my sweet niece Ashley a baby shower, I had no idea where to start!

I looked around on Pinterest for some ideas, and also thought back on all the baby showers I had been to in my life, and came up with “4 F’s” that I wanted this shower to have – Food, Frill, Family and friends, and Fun!

I’ll start with the most important “F” –

1 – Food – Anyone that’s ever been to a shower knows that “shower food” is the best! Diets don’t count at showers, you can eat with your fingers, the plates are small so you have to go back for seconds… the food is the main reason people show up at a shower!

showerblog-mrpstees-bathroomblog 032

You’ll want to have a variety of “finger food,” like these mini chicken salad sandwiches and turkey pinwheels, and at least two dips, like this hot pepperoni dip and 7-layer Mexican dip. Party food is a good excuse to get all the pretty serving trays you never use out of the back of your cabinets! I forgot I even had some of these!

showerblog-mrpstees-bathroomblog 028

Since this was a baby shower AND being held at a church, the drinks were of course non-alcoholic. Lemon slices and mint leaves gave the water and punch a more formal and festive look.

showerblog-mrpstees-bathroomblog 031

And of course there was a cake!

showerblog-mrpstees-bathroomblog 030

Sometimes the more simple something is, the more elegant it looks. We kept the cake very simple with just solid baby pink flowers, and I think its simplicity made it stand out even more.

2 – Frill – After planning my menu for the shower, it was time to plan the decorations! I didn’t have a huge budget for decorations, so I used a few things I already had.

showerblog-mrpstees-bathroomblog 034

This onesie with the new baby’s name on it fit with my “rustic floral” theme, so I hung it up as a decoration instead of wrapping it. I printed this quote from Pinterest and framed it, and it can go in the nursery after the shower.

showerblog-mrpstees-bathroomblog 037

These white lanterns were leftover from a wedding, so I filled them with pink flowers and reused them as table centerpieces.

showerblog-mrpstees-bathroomblog 046

The rest of the decorations came from Hobby Lobby and were not expensive at all. I am a huge believer in “less is more,” so I kept it simple with white tablecloths, and pink, white and gold accent decorations.

3 – Family and Friends – Of course there can’t be a shower without guests!

We invited all of Ashley’s friends and family, and she got a ton of wonderful presents for baby Stella. It was so good to catch up with everyone, especially the ones I hadn’t seen in a while.

There were “advice” cards for everyone to fill out for the new mom, and that got everyone telling stories about their experiences and memories.

showerblog-mrpstees-bathroomblog 040

4 – Fun – I  haven’t been to very many showers that had games, but I knew I wanted something fun at this one. Too many times everyone is sitting around at showers waiting for it to be over so they can leave, and I wanted this one to actually be enjoyable.

Pinterest is full of ideas for baby shower games, but many were very time-consuming or not appropriate for a shower being held at a church. I finally decided on a couple that I thought would be fun…

showerblog-mrpstees-bathroomblog 042

We played the “Don’t say baby!” game, but looking back we should have changed it to “Don’t say cute!” – because everyone kept describing all the presents she opened as “so cute!” And don’t let those sweet Baptist women fool you – they can be very competitive! It was very entertaining to watch everyone stealing clothespins!

showerblog-mrpstees-bathroomblog 041

We also had a photo board where the guests got to guess which baby pictures belonged to the mom and dad of baby Stella, and it was fun hearing everyone thinking out loud about their guesses.

The winners of the games got prizes, and it was so nice to have all the laughter and fellowship instead of just sitting around watching presents get opened.

At the end of the shower, everyone was full and smiling, so I guess my first baby shower was a success!


 showerblog-mrpstees-bathroomblog 049

Congratulations Ashley! I can’t wait to meet baby Stella!


1960’s Bathroom Remodel on a Budget

I’ve been wanting to update my mom’s bathroom for YEARS, so I was super excited when she FINALLY gave me the go-ahead! My dream in life is to be Joanna Gaines, you know – have good hair everyday and walk around with my coffee picking out paint colors and area rugs, so you can imagine my excitement to have an opportunity to “flip” a bathroom!

Here are the “before” pictures –

Yes, that is wallpaper border, and yes, the sink and bathtub are blue, and yes, that’s a toilet seat cover on her vanity stool. And don’t get me started about the pink stuff everywhere and the single ceramic butterfly on the wall above the toilet. I definitely had my work cut out for me!

There wasn’t enough in the budget for a new bathtub and sink, and I was scared to try and resurface them to white, so I had to work around the blue. The first thing I had to do was decide on a new accent color that would go along with this light blue, because the pink obviously wasn’t working. My mom really likes navy blue, so I decided to go with that and a neutral light gray.  Since there is so much white in the bathroom with the tiles and vanity, I knew a darker color would really stand out.

She also wanted a new shower curtain rod and new window curtain rod, since the ones she had were as old as the house, which was built in the 1960’s.

I started looking around my favorite low-budget stores for inspiration, and found this beautiful shower curtain at target –

showerblog-mrpstees-bathroomblog 081

It is white with the same color light blue as the bathtub, and has navy blue in it as well. It was the perfect starting place!

Next I found some simple, cute things at TJ Maxx for the sink and vanity area –

showerblog-mrpstees-bathroomblog 074

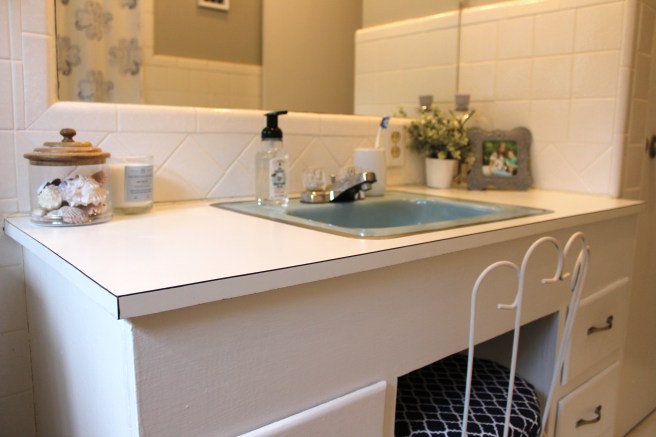
The blues and grays go with the color scheme, and it is so much more clean and simple. The wooden lid on the glass jar gives a little warmth, and the plant gives some texture. I wasn’t able to find a new vanity stool that would fit under the counter, so I gave her old one a fresh coat of white spraypaint and made a new seat cushion with some navy and white material from Hobby Lobby.

showerblog-mrpstees-bathroomblog 084

Not only does the stool look better, but the foam I used is much thicker than her old seat cushion, so it’s more comfortable for her to sit on. I also gave the vanity and drawers a fresh coat of white paint and found these drawer pulls at Lowe’s for only $2 each!

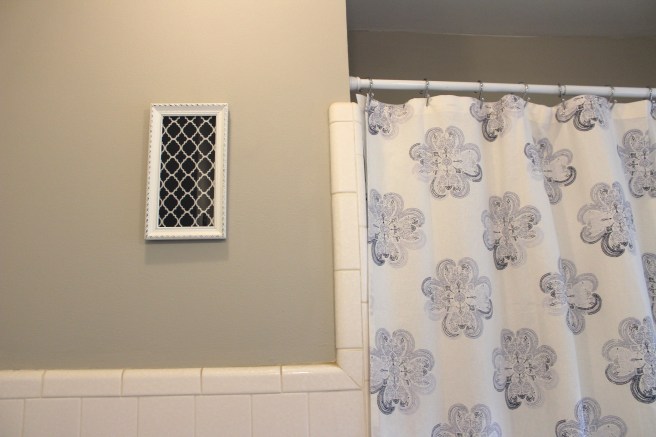
I needed something else navy for the walls to tie in the accent color, so I took a scrap of the leftover seat cushion material and put it in a pretty white frame for the wall –

showerblog-mrpstees-bathroomblog 077

And speaking of the walls, there was entirely too much white in this bathroom, so I wanted to do something to the top part of the bathroom where the tile stopped. We got some samples of the removable peel-and-stick wallpaper to look at, but they were either the wrong color or too busy of a pattern, not to mention it would cost over $150 to get enough rolls of it for the whole room. I decided to paint the top part of the walls instead, and chose this warm light gray color (“soulful gray” Valspar paint at Lowe’s). The color on the walls not only warmed the room up, but gave it some definition it lacked when it was white floor-to-ceiling. I was afraid it may make the already-small bathroom look even smaller, but it actually made it seem bigger instead!

I got a solid white curtain for the window from Amazon for only $15  –

showerblog-mrpstees-bathroomblog 072

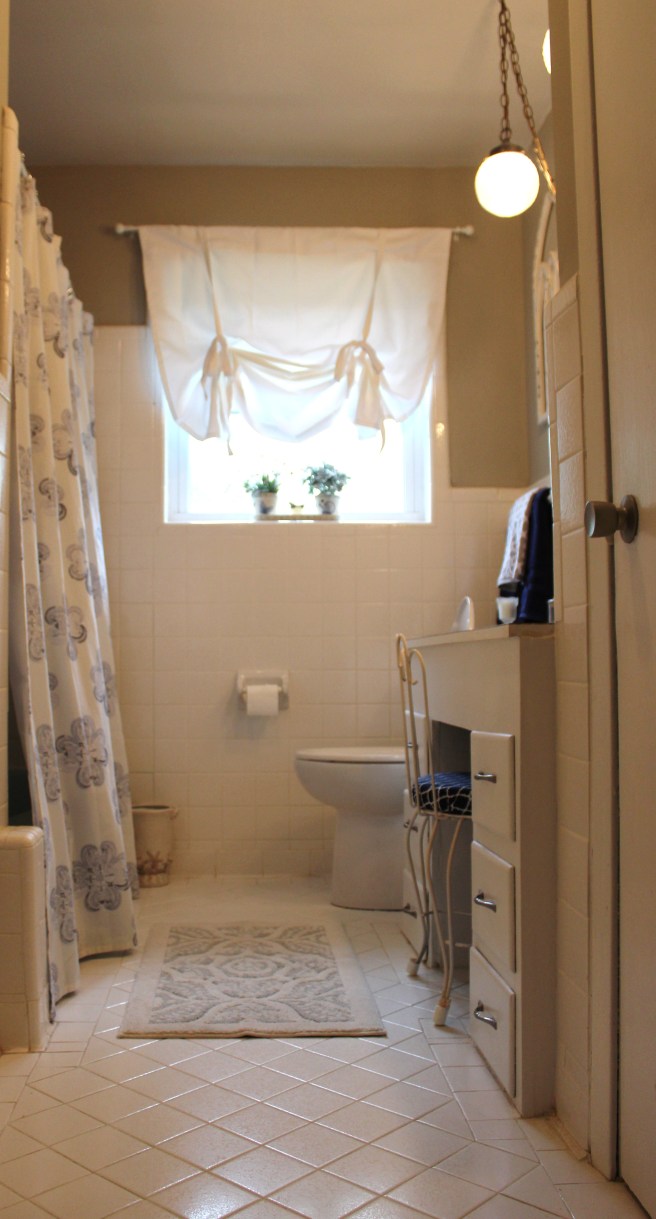
I went with one that had some character to it with the tie-up feature since it was plain white. I also found a solid white curtain rod, as well as a white shower curtain rod. This gray and cream rug matched the wall color perfectly, gave the room more warmth and texture, and best of all was only $12 at Target!

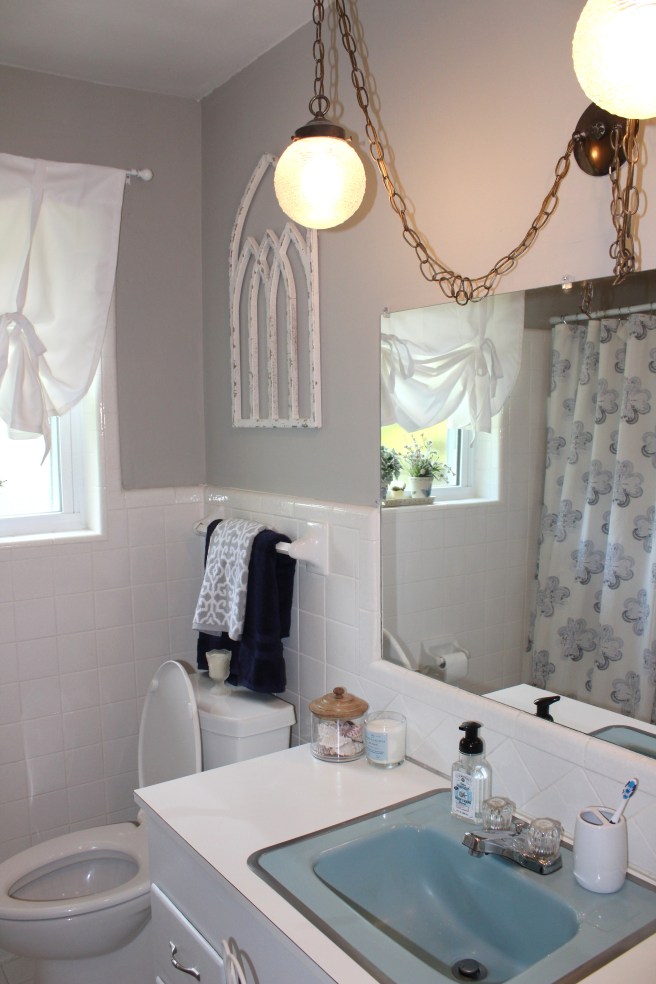
My favorite thing I found for this bathroom though is this beautiful wooden cathedral window frame from Hobby Lobby ($25) –

showerblog-mrpstees-bathroomblog 078

The white contrasts beautifully with the gray walls, and the distressed parts are gray to tie in with the accent colors. These navy blue and gray hand towels brought a little more color to this part of the bathroom. Much better than the lone butterfly and the dust-collecting greenery that was hanging here before!

My mom hated the hanging light fixture that was above her vanity, but I told her to give it a chance until after I was finished. Now that it is against a different backdrop, she loves it!

showerblog-mrpstees-bathroomblog 086

This is a very small bathroom compared to master bathrooms in newer homes, but changing the colors and getting rid of all the clutter has made it feel a little bigger.

showerblog-mrpstees-bathroomblog 072

And now when you walk in, your eyes are no longer drawn to the ugly blue sink and bathtub, because they actually look like they belong there.

showerblog-mrpstees-bathroomblog 080

This bathroom project took only a day to complete, and the total cost for everything, including 2 gallons of paint (gray for walls and white for linen closet door and vanity), was only around $200! The transformation is even more unbelievable in person – it feels so warm and clean now when you walk in. I enjoyed doing this so much for my mom, and she is so happy with it that she plans to let me “update” her entire house now one room at a time! I’m so excited to start on the next room!

Here are a few before and after pictures next to each other so you can really see the difference –

I hope this has given you some inspiration for your own home, and showed you that it doesn’t take a lot of money to make a huge impact on a room. My mom is so thankful to me for her new bathroom, but I am just as thankful to her for allowing to “be” Joanna Gaines for a day!

Thanks ya’ll!

– Nikki


Baked Balsamic Pork Chops

coconutshrimpblog 008

If you’re looking for a healthy meal with a ton of flavor, you’ve found it. These pork chops are baked, but the coating makes them juicy, flavorful and beautiful.

And besides being healthy, they are also easy to make – here’s what you’ll need:

coconutshrimpblog 001

  • 4-6 boneless pork chops
  • 1/4 cup olive oil
  • 2 tbs grainy mustard
  • 1/4 cup balsamic vinegar
  • chopped fresh rosemary (2-3 sprigs)
  • salt and pepper to taste

Grease a casserole dish and preheat oven to 425 degrees. Place the pork chops in a single layer in the dish, then mix together all other ingredients and pour over the meat.

coconutshrimpblog 002

The balsamic vinegar will have a strong smell, but as it bakes the vinegar smell will go away and it will turn into more of a glaze. If you don’t have any fresh rosemary, you can use dried, just don’t use as much since dried herbs have a stronger flavor than fresh.

Now just bake at 425 degrees for about an hour, or until meat is cooked through. (If you are using thick-cut pork chops it may take about 15 minutes longer, and if you are using thin-cut it may take about 15 minutes less. I just used regular size center-cut chops.)

coconutshrimpblog 003

The top of the pork chops will have this beautiful glazed coating, and they will be juicy from baking in the drippings from the meat.

If you aren’t a fan of mustard, or of balsamic vinegar or rosemary, I encourage you to at least give these a try anyway – none of these flavors are overwhelming once cooked, but instead combine to create their own unique flavor. These ingredients are also fat-free, making these pork chops a healthy option. And the color on them is beautiful!

These chops go well served over rice, or just by themselves. I hope you enjoy them!

Thanks y’all!

– Nikki


Coconut Shrimp

coconutshrimpblog 016

If you live in Louisiana, you have to love shrimp. And if you’ve watched Forrest Gump, you know from Bubba that there are a million ways to cook it, but fried in a sweet coconut batter is one of my favorite ways.

Here’s what you’ll need:

  • flour
  • salt and pepper
  • 2 eggs, beaten
  • 1 cup Panko breadcrumbs
  • 1 cup sweetened shredded coconut
  • 1 lb raw shrimp, peeled and deveined with the tail on
  • oil for frying

First set up a breading station for the shrimp using 3 bowls…

coconutshrimpblog 011

In the first bowl, mix the flour (I used about a cup) with salt and pepper to taste. The beaten eggs go in the second bowl, and mix the coconut and Panko in the third bowl.

coconutshrimpblog 010

You can use regular breadcrumbs if you’d like, but the Panko breadcrumbs are larger and give the shrimp more texture and crispiness. You can also add a couple dashes of hot sauce to the eggs to give your shrimp a little more kick.

Roll the shrimp around in the seasoned flour, then dip in the eggs, then the coconut mixture. Really press the shrimp into the coconut mixture – you want as much as you can to stick to the shrimp so they can have the most flavor possible.

coconutshrimpblog 012

Once your oil reaches 350 degrees, drop the shrimp in and fry until they are a beautiful golden brown. I used peanut oil, but if you want some added flavor you can use coconut oil for frying.

coconutshrimpblog 013

It doesn’t take long at all to fry these little babies. If you are deep frying them, it only takes about 4-5 minutes, and if you are using a skillet it takes about 2 minutes per side.

coconutshrimpblog 015

Aren’t they beautiful?!? You can dip them in cocktail sauce or sweet & sour sauce, but they have so much flavor I usually just eat them plain. The mix of savory and sweet flavors make these shrimp taste amazing!

coconutshrimpblog 018

Thanks y’all!

– Nikki


Bacon Ranch Chicken Bake

chickenblog 037

Is your mouth watering yet? This dish has chicken, bacon, ranch and cheese, AND is super easy to make! My 9-year-old son calls it “Baconator chicken” because it reminds him of Wendy’s Baconator fries!

The chicken bakes in the drippings from the bacon on top, making it juicy and flavorful. And what wouldn’t be delicious covered in cheese?!?

Here’s what you’ll need:

  • boneless/skinless chicken breasts
  • bacon – 1 slice per chicken breast
  • ranch dressing – 2 tbs per chicken breast
  • shredded cheese
  • salt & pepper

Start by placing chicken breasts in a greased baking dish in a single layer, then sprinkle with salt and pepper. Next spread a little ranch dressing on top of each piece of chicken, about 2 tbs per piece. Cut the bacon into thirds and arrange on top of each piece of chicken in a single layer, being sure the chicken is mostly covered.

chickenblog 034

Now bake at 400 degrees until chicken and bacon are cooked, about 45 minutes. The juices from the chicken and bacon will accumulate in the bottom of dish while cooking, keeping the chicken juicy.

Now top with shredded cheese (I used cheddar-jack) and pop back in the oven just until it melts, about 5 minutes.

chickenblog 035

Doesn’t that look amazing?!? It tastes as good as it looks, and kids love it because it’s covered in cheese! You can also dip this in some of the leftover ranch dressing to make it even better.

chickenblog 036

So if you’re needing a new chicken recipe, or an easy weeknight supper idea, here you go! I hope your family enjoys it as much as mine does!

Thanks y’all!

– Nikki

Homemade Dill Pickles

pickleblog-d5-mrpstees 017

Whenever I see fresh cucumbers in the summer, all I can think about are fresh homemade pickles! They taste so much better than store-bought pickles, and are not hard at all to make.

pickleblog-d5-mrpstees 047

As a child, one of my favorite places to be was my neighbor Ann’s house. Ann was like another mother to me. She taught me how to cook, how to fish, how to cross stitch, how to drive, and how to make the best dill pickles in the world. Some of my best memories of growing up involve her, and this is her recipe.

All you need is vinegar, water, salt, garlic, dill seed, and of course cucumbers.

pickleblog-d5-mrpstees 018

Dill seed comes in a tiny plastic container and can be found in the spice section of your grocery store. It’s different than dill weed, an herb that comes in a larger jar. The seeds are more potent and give the pickles their sour dill flavor. (Apparently everyone is making pickles this weekend because I had to go to three different grocery stores before finding some!)

Start by peeling your garlic cloves  – you will need about 3-4 per jar. Next slice your cucumbers however thick you want your pickles to be.

pickleblog-d5-mrpstees 041

Place 2 garlic cloves in the bottom of each jar, then fill with sliced cucumbers the rest of the way. Top off with 1-2 more garlic cloves.

pickleblog-d5-mrpstees 042

Next is the pickling liquid – pour 2 parts water to 1 part vinegar in a pot. (I used 2 quarts water and 1 quart vinegar for 5 jars.) Add in 3/4 cup salt and half of the container of dill seed, then bring to a rolling boil, stirring occasionally to dissolve the salt.

pickleblog-d5-mrpstees 044

Once the liquid is boiling, pour into jars over cucumbers. (You can use a funnel if your aim is not so great!) Pour a little more dill seed in the top of each jar, about 1/2 teaspoon, then screw lids on tight.

pickleblog-d5-mrpstees 046

Store in a cabinet until the cucumbers turn a darker green, usually about a week, then they are ready to enjoy!

pickleblog-d5-mrpstees 045

Every summer when I eat these homemade pickles, I think of my sweet neighbor Ann and how much fun we had when I was a little girl.

pickleblog-d5-mrpstees 049

I hope you enjoy them as much as I do!

Thanks y’all!

– Nikki